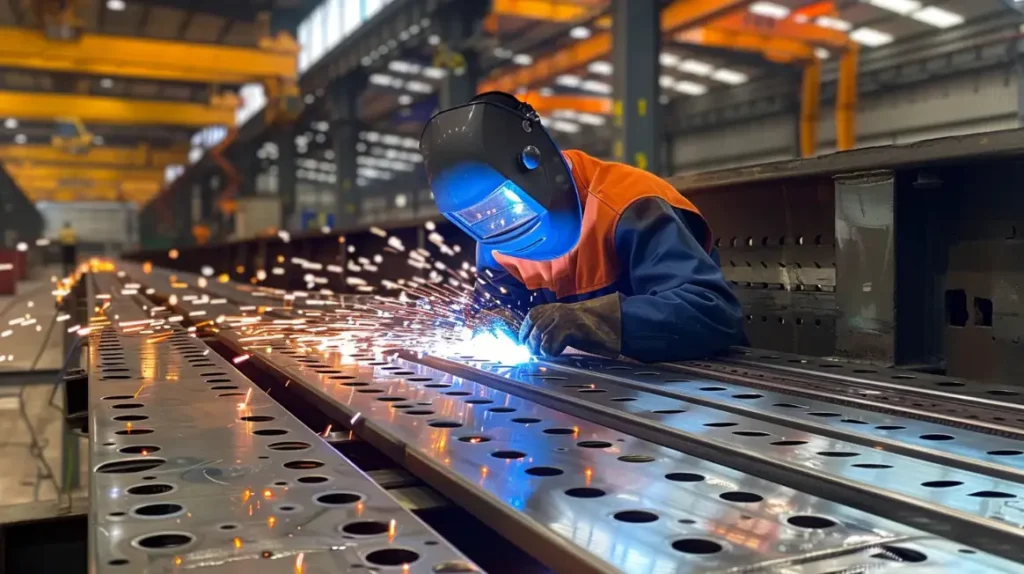
Have you ever wondered why your welding isn’t up to par? Understanding welding defects will improve your work. Learn to avoid common welding mistakes to produce more robust and reliable welds. This is a must-have for every welder!
Welding defects can affect a weld’s strength, durability, and appearance. Cracks, porosity, and inclusions are some of the most common types. Other types include lack of fusion or penetration, undercuts, overlaps, weld mismatches, excessive penetration, and distortion. By identifying and preventing them, you can improve the appearance and strength of your welds.
Are you ready to dive deeper into the world of welding? Continue reading to learn how to avoid these defects and ensure your welds look great.
What is a welding defects?
Overview and Definition
Welding imperfections are irregularities that appear in the weld material during the welding process. These defects in welds can affect the weld’s appearance, performance, and integrity. Various factors, including incorrect welding parameters or techniques, inappropriate materials, or environmental conditions, can cause defects.
Impact of defects on weld integrity and performance
Welding imperfections can significantly impact the integrity and performance of a weld. This could lead to failures in applications that require reliability. Here’s how:
- Strength reduction: Defects like porosity and cracks reduce the overall strength, making the weld more susceptible to failure when loaded.
- Susceptibility to Corrosion: Some defects, such as notches or inclusions, may create corrosion sites, particularly in environments where corrosive materials are present.
- Fatigue life reduction: Cracks or other discontinuities act as stress concentrators, reducing the fatigue lifetime of a component. It will fail faster under cyclic load than a weld without defects.
- Compromise Aesthetics: In addition to structural implications, defects may also affect the aesthetics of a weld. This is especially important for consumer products, where visual appeal is significant in selling.
- Increased Repair Costs: Additional labor and material costs often result from repairing or reworking defects. In extreme cases, components may have to be scrapped or remade. This can increase project costs.
Welding defects types
The location of welding defects is classified based on whether they are within the weld or on its surface. We can categorize welding defects into two broad groups: external and internal.
External Welding Defects
They are usually visible on the surface and are easier to detect, even without sophisticated equipment. They can have a significant impact on both the mechanical and aesthetic properties of the weld.
Internal Welding Defects
You can find these defects in the base metal, the weld metal, or even between them. These defects can be detected using non-destructive methods like X-rays or ultrasonic tests.
#1 Cracks
Cracks can be a severe defect that compromises the strength and integrity of the weld. Hot cracks and Cold cracks are the two main types.
Understanding the difference between Hot Cracks and cold Cracks
Hot Cracks: These cracks are also known as solidification cracks and occur at high temperatures when the pool is solidifying. The weld pool’s inability to contract during cooling causes the cracks. This causes tensile stress that pulls the solidifying metal apart. Hot cracks are usually found in the weld material or along the grain boundaries of the heat-affected zones (HAZ ).).
Cold Cracks: These cracks are caused by hydrogen after the weld metal has cooled. They can occur several hours or even days later. Diffusible hydrogen, high tensile stresses, and a susceptible microstructure (like that of hardened stainless steel), combined with the presence of weld metal, contribute to these cracks. Cold cracks can be more dangerous than hot ones because they are difficult to detect after welding.
Causes and Prevention Strategy
Hot Cracks:
Causes: high sulfur and phosphorus in the base material; improper selection of filler materials; high thermal gradients and rapid cooling rates.
Prevention Strategies:
- Use materials with low sulfur and phosphorus.
- Choose the filler material that has a solidification range suitable for your application.
- Optimize the welding parameters to reduce thermal gradients and control cooling rates.
- Preheating is an excellent way to reduce cooling rates, thermal gradients, and temperatures.
Cold Cracks:
Causes: Presence of diffusible hydrogen in the weld and a complex, brittle microstructure within the HAZ.
Prevention Strategies:
- Remove any contaminants (such as moisture, oil, or rust) that could introduce hydrogen.
- Store electrodes in dry conditions and use low-hydrogen electrodes.
- Preheating the material will slow cooling rates, reducing hydrogen concentrations in the weld areas.
- Apply a post-weld heat treatment (PWHT) to reduce hydrogen cracking and residual stresses.
- Reduce stress concentrations by designing the weld joints.
#2 Porosity
A typical welding defect is porosity, defined as pores or cavities within the weld metal. Pores vary from microscopic holes to larger ones visible to the naked eye, resulting from gases trapped in the welding pool as it solidifies.
The nature of porosity in Welds
Gases like hydrogen, oxygen, and nitrogen can cause porosity. Moisture, oil, corrosion on electrodes or workpieces, or shielding gas can cause these gases. These gases can be trapped as the weld pool hardens, creating bubbles and porosity.
How To Minimize Porosity
- Clean Workpiece: Ensure the welding surfaces are clean and free from contaminants like grease, oil, and moisture.
- Use Low-Hydrogen, Dry Electrodes: Store electrodes dry and use them whenever possible.
- Correct Shielding Gas: Use the correct type of gas and mixture.
- Optimize Welding parameters: Adjust welding voltage, current, and travel speed to achieve a stable arc.
- Avoid excessive moisture: Take extra precautions in environments with high humidity to keep your work area and materials as dry as possible.
- Correct Welding Method: Dragging the electrode around the weld pool can ensure that the gas shield is more stable, thus reducing the risk of porosity.
- Ventilation: Ventilating the area around the weld pool is crucial. This will prevent the gas from entering the molten pool.
#3 Inclusions
Welding includes foreign materials trapped between the base metal and weld metal. They can cause the weld to be significantly weakened and even fail under stress.
Slag inclusions: Causes and Solutions
Flux in welding processes like SMAW (Shielded Metal Arc Welding) or FCAW (Flux-Cored Arc Welding) causes them. The flux is a significant cause of slag inclusions in welding processes such as SMAW or FCAW.
Causes:
- Insufficient removal between passes of slag in multi-pass welding.
- A high welding speed prevents the slag from rising to the surface.
- Poor slag control due to incorrect welding technique or angle.
Solutions:
- You must clean the slag thoroughly between welding passes. Remove all visible slag with a chipping hammer or wire brush before placing the next bead.
- Increase the welding speed to achieve a sufficient heat output and allow slag to float to the surface.
- To promote slag separation, use proper welding techniques, such as the correct angle of the electrode and the manipulation of it.
- If necessary, preheat the workpiece to slow down the cooling process. This will give slag more time to rise above the surface of the weld pool.
Preventing metallic Inclusions
When electrode or base metal particles get trapped in the weld, they are known as metallic inclusions. Improper welding techniques or contamination usually cause them.
Causes:
- Use of electrodes or base materials that are dirty or rusted.
- If the electrode melts improperly, metal droplets can become trapped in the weld, preventing proper fusion.
Solutions:
- Before welding, clean the electrode and base material thoroughly to remove any contaminants such as rust or oil.
- Use the correct welding parameters to ensure a stable arc and the proper fusion of base metals.
- Maintain a consistent arc size and practice proper electrode manipulation to prevent erratic metal droplet transfer.
#4 Lack of Fusion
A serious welding defect, or lack of fusion, occurs when the weld metal fails to fuse properly with the base metal or the previous weld bead during multi-pass applications. The result is a weak weld that compromises the structural integrity.
Identifying the Lack of Fusion
It can be challenging to detect a lack of fusion, mainly when it occurs in the interior layers of multiple-pass welds or between the weld beads and the base metal beneath. There are some signs of this defect.
- Visual Inspection: Sometimes, you can observe a lack of fusion at the toe or interface of weld passes. Check for gaps or irregularities where the weld doesn’t blend seamlessly with the base metal.
- Non-Destructive Test (NDT): Techniques like ultrasonic, radiographic, and magnetic particle tests can help identify areas where fusion is not occurring.
- Weld Appearance: While not always indicative that fusion is lacking, an irregular or inconsistent appearance to the weld beads can be a hint.
Best practices to ensure proper Fusion
You must consider the welding technique, equipment settings, and preparation to achieve proper fusion. Here are some tips to reduce the risk of failure of fusion.
- Joint Preparation: Ensure that the surfaces to be welded are clean and devoid of contaminants. They should also be appropriately beveled if necessary to ensure good penetration.
- Adequate heat input: Use the correct welding parameters to apply enough heat to melt base metals and allow the weld pool to mix appropriately with base materials.
- Correct Technique: Use the correct welding technique for your job. This includes the angle of the electrode and the direction of travel.
- Preheating: In some cases, the preheating of the base metal improves weldability. This is because it slows the cooling rate and allows the weld metal more time to fuse with the base.
- Cleaning between passes: Remove any slags, oxides, or contaminants that could interfere with fusion.
- Control the Interpass Temperature: By controlling the temperature between passes, you can maintain the proper heat input while reducing the risk of defects such as lack of fusion.
- Proper Use of Equipment and Consumables: Set up your welding equipment and consumables.
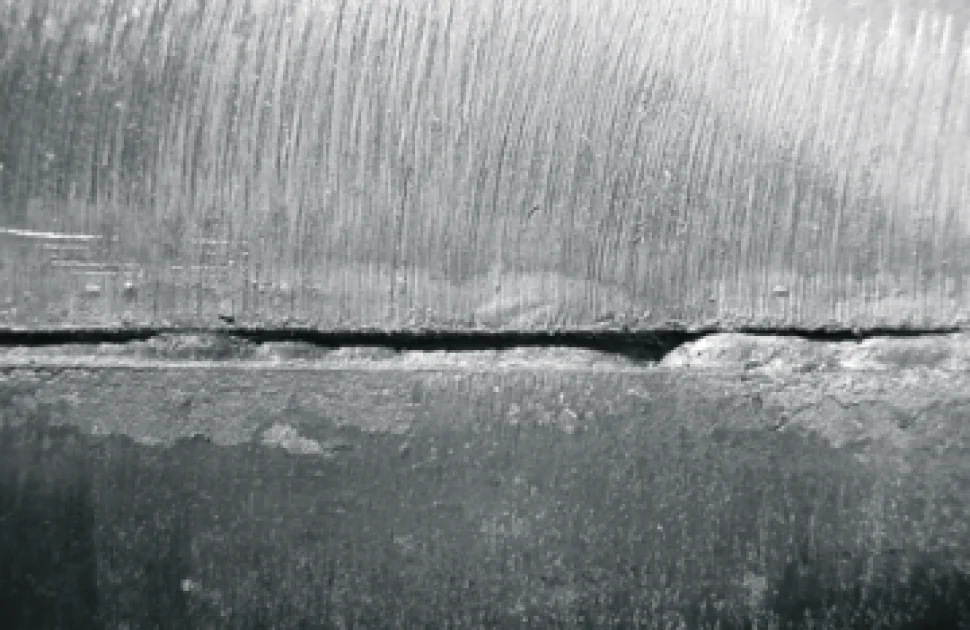
#5 Incomplete Penetration
An incomplete penetration occurs in welding when the weld metal fails to penetrate the entire joint thickness, leaving part of the root unfused.
The Dangers Of Incomplete Penetration
A joint with incomplete penetration will have a weak spot, reducing the load-bearing capacity. This defect can be dangerous, as it is not always visible on visual inspection. Primary risks include:
- Reduced strength: The joint might not be able to withstand the design loads and fail prematurely.
- Concentration of Stress: The unfused region can act as a notch, which concentrates stress and facilitates crack initiation.
- Pathways of Corrosion: Gaps between the welds can allow corrosive materials to enter the structure and accelerate degradation.
Techniques for Full Penetration
You must combine the proper joint design with the correct welding technique and equipment settings to achieve full penetration. Here are some fundamental techniques for ensuring complete penetration.
- Joint Design: Use joint designs that allow access to the joint’s root, such as angles or V-grooves, allowing the welding arc to reach the base.
- Joint Preparation: Cleanse the joint thoroughly, removing contaminants or oxides that could prevent the weld from fully penetrating the base material.
- To ensure that the joint receives enough heat, adjust the welding parameters. This allows for deeper penetration of weld metal in the base material.
- Correct welding technique: Weaving or manipulating arcs can help distribute heat evenly and increase penetration. The angle of the welding torch and the direction of welding are also critical.
- Backing Strips: In some instances, backing strips placed on the other side of the weld may help achieve full penetration. They do this by supporting the molten weld pool and preventing the weld from falling through.
- Peening: This technique can change the weld profile and encourage deeper penetration in subsequent passes. However, use it cautiously to prevent other defects.
- Preheating: Preheating can slow the cooling process, giving the weld metal more time to penetrate the joint.
- Temperature control between passes: Maintaining optimal conditions to achieve full penetration is possible by managing the temperature between passes.
- Welding Sequential: Using a sequence to distribute heat evenly in thicker materials helps achieve consistent penetration throughout the joint.
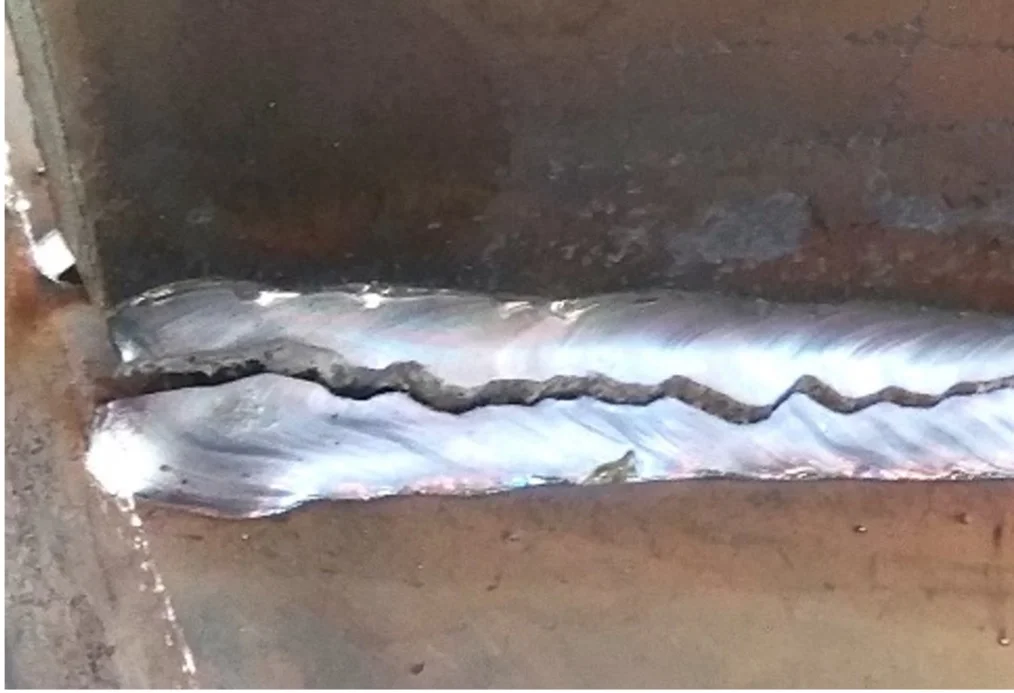
#6 Undercut
An undercut welding defect occurs when the weld metal does not adequately fill the base metal at the weld’s toe. This defect may compromise structural integrity by creating stress concentrations, which can lead to a premature failure of the weld.
Recognizing Undercut Defects
Inspect the weld to look for irregularities at the edge where the weld metal meets the base metal. Undercut can appear as a continuous groove or an intermittent groove. It is more common in fillet-and-butt welds. There are several methods for repairing an undercut.
- Rewelding: The most common repair method involves grinding the area to remove the defect and then rewelding the area using the proper parameters and technique to ensure the fill is defect-free.
- Weld build-up: In some instances, you can apply additional weld passes on top of the undercut to fill in the groove without removing the existing weld material. This method is delicate and requires careful monitoring to prevent overheating or further defects.
Preventive Measures
Attention to the welding technique, equipment settings, and material preparation is essential to prevent undercutting. The following are essential preventive measures:
- Correct Welding Method: Keep a steady grip and control the welding speed to maximize heat distribution. This will also allow for adequate deposition of filler metal. Adjust the torch angle to maximize coverage of the area.
- Set the correct welding parameters: Choose the appropriate current, voltage, and travel speed based on the thickness and material you’re welding. A welding speed that is too high or a current that is too low can cause an undercut to form.
- Use Suitable Filler Materials: Choose a filler compatible with the base material that melts and flows appropriately to fill the joint.
- Joint preparation before welding: Cleanse the area to be welded thoroughly, removing any contaminants or coatings that could interfere with the process of welding and cause defects.
- Avoid excessive welding heat: A high heat level can cause base metals to melt without adequate filler metal deposition, resulting in undercutting. You can adjust the heat output by changing the welding parameters or using pulsed techniques.
#7 Overlap
In welding, the term overlap refers to the situation in which the weld metal spills onto the surface without properly fusing with it. This defect can lead to weak bonding between the weld metal and the base material, resulting in areas with reduced strength or an increased failure risk under stress.
Overlap Phenomenon – Identification and Remediation
To identify overlap, inspect the weld and look for areas where metal has flown onto the surface of the base metal without melting into it. This situation often leads to the formation of a lip or edge that requires proper welding. Overlap can be remedied by:
- Grinding & Rewelding: The best way to fix an overlap is to grind the area to remove any unfused metal and reweld the area. Be sure to check for proper fusion and penetration.
- Controlled Heat: In some instances, applying heat to an area with a hammer and lightly tapping the overlap may encourage better fusion.
Avoiding Overlap in Welding Processes
Understanding the causes of overlap and using best practices to prevent these conditions is critical. The key strategies include:
- Correct Welding Method: Maintaining an even angle and distance when using the welding torch will help ensure proper metal deposition and heat distribution.
- Welding parameters: Adapting welding current, voltage, and travel speed according to the thickness and type of material can help control weld pool behavior and prevent excessive spillover.
- Selecting the Correct Filler Material: You can reduce the chances of overlap by selecting the correct filler material.
- Joint preparation: Cleaning and preparing joint surfaces before welding can improve the weld quality by ensuring the weld metal adheres correctly to the base metal.
- Avoiding excessive welding speed: Welding at too high a speed can result in inadequate heat input. This causes the weld to solidify and fuse before the base material.
#8 Weld Mismatch
The weld mismatch is also called height mismatch. This issue arises when the parts being welded are at different levels. This can compromise structural integrity and the aesthetic appeal of the weld joint.
How to deal with height mismatches in welds
Improper alignment, uneven preparation, or variations in welding technique can cause height mismatches in welds. Here are some ways to fix these problems:
- Measurement and Assessment: Use precision measuring instruments to determine the height difference between the two sections.
- Grinding and filling: If the mismatch is minor, grinding the upper side to match the lower can correct it. Filling the gap or undercut resulting from this will be required if it results from the grinding.
- Heat application: The controlled heat on the higher side allows for mechanical manipulation.
- Use of Filler Plates: If there is a significant mismatch in the surface, a filler strip or plate can be welded to the lower side of the joint before the final welding. This will level out the surfaces. Workers must apply this technique with precise fitting and welding to prevent new defects.
How to ensure consistent weld profiles
The entire welding process demands close attention to detail. This includes the preparation and the final pass. Use these strategies to ensure consistent weld profiles.
- Thorough preparation: Ensure that the edges of the materials to be welded are uniformly prepared.
- Accurate alignment: Use clamps or other fixtures to align the workpieces precisely during welding.
- Consistent welding techniques: Maintain consistent techniques, including torch angle and welding speed.
- Sequential Welding: In large or complex weldments, use a sequence of welding that minimizes residual stresses and distortion.
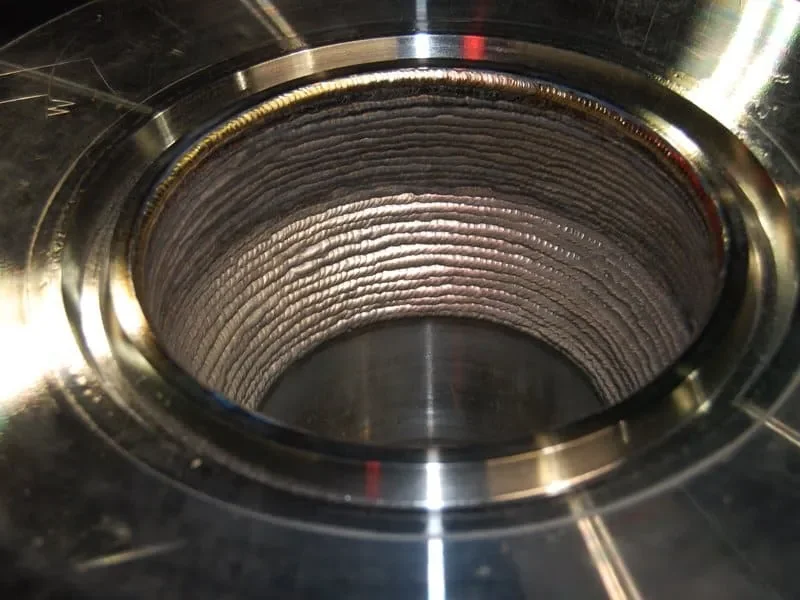
#9 Excessive Penetration
When welding, excessive penetration can occur when the weld metal is inserted too deeply into the base materials. This could lead to the protrusion of weld beads on the other side of the joint. While deep penetration is often sought for solid welds, it can sometimes harm appearance and integrity.
Risks of excessive penetration
An excessive penetration of the weld structure can cause several problems, including:
- Base Material Weakening: Over-penetration may thin the base material surrounding the weld. This can weaken its overall strength, making it more prone to cracking when stressed.
- Increased stress Concentration: Uneven distribution of weld metal can lead to increased stress concentrations in certain areas, especially where excessive penetration has occurred. This could cause failure points.
- Lack of Aesthetic Value: Excessive penetration can be unsightly for projects in which appearance is essential and may require extra work to correct.
- Reduced fatigue resistance: The irregularities caused by excessive penetration may act as stress raisers and reduce the fatigue resistance of a welded joint.
Controlling Penetration Depth
Welders have several options to limit penetration depth to avoid excessive penetration.
- Adjusting Welding parameters: Reduce welding current and voltage as they directly affect penetration depth.
- Modify the Welding speed: Increasing the welding speed can reduce penetration as the heat input to the material decreases over time.
- Select the Right Electrode Type and Size: Use smaller electrodes or those designed for shallow penetration to control the depth.
- Change the Angle of Welding: Altering the welding angle can reduce the penetration depth at any point.
- Use pulse welding techniques: For TIG and MIG welding, using an alternating current can help control heat input and, therefore, penetration depth.
- Implement Pre-weld Joint Design Considerations: You can prevent excessive penetration by designing the joint to accommodate the suitable filler.
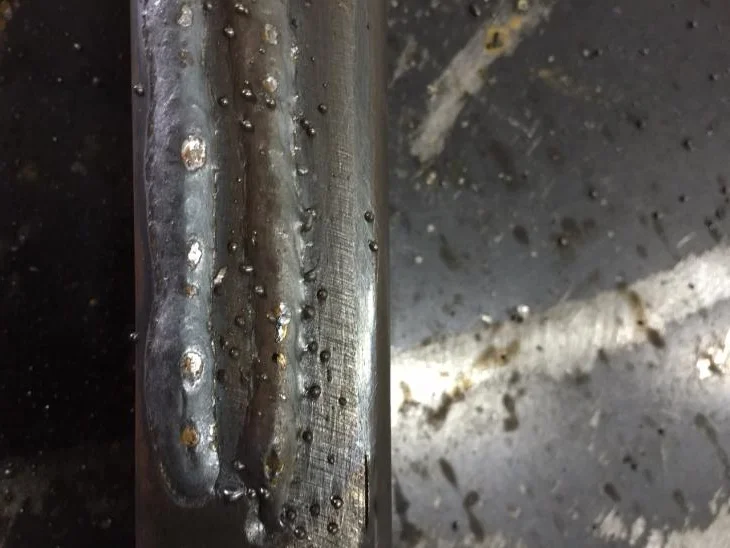
#10 Spatter
Spatter refers to the droplets of molten metal expelled during welding, solidifying on the workpieces or nearby surfaces.
Understanding Spatter
Several factors can cause spattering when welding. These include:
- Wrong Welding Parameters: High voltage or amperage settings can produce excessive heat, causing more molten metal to be expelled.
- Incorrect Shielding Gas Blend: The type of shielding gases and their mixture play a vital role in the stability and formation of the arc. Too much CO2 can cause spatter in MIG welds due to thermal conductivity and reactivity.
- Inadequate Wire Feeding Speed: An inadequate wire feed speed may result in an unstable arc and increased spatter.
- Contaminated materials or Electrode Tips: Dirt, oil on the workpiece, or rust or contaminants on the electrode can cause a spatter. These contaminants interfere with the steady flow of the weld arc.
- Electrode Angle or Distance: Holding the welding torches or electrodes at an incorrect angle or distance can lead to a spatter.
Tips for Reducing Spatter
Reduced spatter improves weld appearance and reduces the time required to clean up after the weld. Here are a few tips on how to reduce spatter.
- Optimize Welding Settings: Begin with the recommended settings of your welding machine based on what you are working with. To minimize spatter, adjust the voltage and amperage.
- Use the Right Shielding Gas Mixture: If you are experiencing excessive spatter when using CO2, consider using a shielding gas mixture that contains a higher percentage of argon. Argon-based blends tend to have less spatter.
- Adjust the Wire Feed Speed: Make sure your wire feeding speed matches the welding current. A wrong speed can cause an unstable arc or increased spatter.
- Cleaning the Surface: Clean the surface thoroughly before welding to remove contaminants. Remove rust, dirt, and oil with a wire brush or chemical cleaner.
- Check and replace Consumables: Regularly inspect consumables such as tips and nozzles for damage or spatter. This will help maintain a stable arc.
- Use the Correct Technique: Maintain the correct electrode angle (generally between 10 and 15 degrees).
#11 Distortion
Welding materials can cause them to warp or bend. This can happen during the welding process or even after. This can have a significant impact on the overall integrity and dimensional accuracy of the finished product.
Why do welds distort
Distortion results from the metal in the welding area and surrounding base metals expanding and contracting unevenly during heating and cooling. This is due to several factors:
- Thermal Expansion: Metal expands when heated. Rapid heating during welding can cause localized expansion. The cooling process then results in contraction. This cycle can cause uneven stresses to the metal, which may lead to warping or distorting.
- Material Type: Different materials exhibit different thermal conductivity and expansion rates. Materials with a high thermal conductivity are more likely to distort than those with a lower melting point and a higher thermal conductivity.
- Welding technique: The sequence of welds and the welding method significantly affect distortion levels. For example, a continuous weld on one side of the sheet will cause more distortion than if it is staggered or done in smaller segments.
- Design of Joint: The design and distribution of the weld metal in the joint can influence how heat is absorbed.
- Heat input and welding speed: High welding speeds can increase thermal stress and temperature gradients.
Techniques for Minimizing Distortion
It is essential to control the heat input during welding and ensure an even stress distribution. Here are some methods to accomplish this:
- Joint Design: Implementing a joint design requiring less weld metal can reduce heat input and distortion.
- Use Intermittent welding: Use shorter intermittent welds instead of one continuous long weld.
- Preheating: Preheating can reduce cooling rates, reducing the gradient of temperature and reducing the risk for distortion.
- Use Welding Clamps and Fixtures: Fixtures can hold workpieces during welding. They counteract the contraction forces and help maintain desired alignments and dimensions.
- Plan the Welding Sequence strategically: A well-planned sequence of welding that distributes heat uniformly can reduce distortion. An asymmetrical welding sequence will help balance stresses in large assemblies.
- Control Welding Speed and Heat Input: You can control the welding speed by adjusting the voltage and welding speed to achieve the best possible fusion. Modern welding equipment with pulse welding capability can provide better control of heat input.
- Backstep Welding: This technique involves segment-by-segment welding in the opposite direction to the general progress. It can counter the forces of distortion.
- Heat Treatment After Weld: A controlled heat treatment after welding can reduce residual stresses and the risk of distortion.
Inspection
In many industries, ensuring the integrity and quality of welds are crucial. This is especially true in those that place safety and reliability as a priority. Weld inspection and testing fall into two categories: Non-Destructive Tests (NDT) and Destructive Tests.
Non-Destructive Testing (NDT) Techniques
The NDT method assesses the material, component, or system properties without causing any damage. These techniques are essential for quality control and ongoing maintenance since they allow the inspection of welds without damaging the component. Standard NDT techniques include:
- Inspection Visual: This involves inspecting the weld using magnification or the naked eye to detect surface defects.
- Ultrasonic Testing: UT is a method of detecting internal flaws using high-frequency sound waves.
- Radiographic Testing (X-ray and Gamma Rays): This technique uses ionizing rays to capture an image on a digital sensor or film of the weld. Radiographs show variations in contrast due to differences in density or thickness of the material.
- Magnetic Particle Inspection: MPI detects surface and near-surface discontinuities of ferromagnetic material. The area is magnetized, and iron particles are applied. These particles collect at flaws to make them visible.
- Liquid Penetrant Inspection (LPI): This method suits non-ferromagnetic and non-porous materials. It involves applying a liquid with a high surface penetration capability to the weld. After removing the excess liquid, a developer is applied to reveal the flaws.
When and how to use Destructive Testing
The destructive testing method measures the mechanical properties of welds, including their tensile strength and impact resistance. These tests usually destroy or alter the sample to the point that it is unsuitable for final use. Destructive tests are essential for developing welding procedures, periodic audits of production quality, or failure analysis. Standard destructive tests include:
Tensile testing: This test assesses weld strength by pulling the weld apart until it breaks. The maximum force the weld can withstand before breaking is recorded to determine its tensile strength.
- Bend tests: These are used to determine the strength and flexibility of a joint. The test involves bending the piece to a specific angle or until failure, exposing any cracks or defects.
- Charpy V Notch Test: Measures impact toughness. The energy needed to break a notched specimen is measurable.
- Hardness testing: Tests the resistance to indentation of the weld metal and the heat-affected zones (HAZ). It gives insight into how welding affects material properties.
Destructive Testing
- When developing new welding procedures, it is vital to establish performance baselines.
- Periodic sampling of all production welds ensures consistent quality.
- Failure analysis is needed to determine the reason for a component’s failure.
How to Use Destructive Testing:
- Select representative samples identical to the production samples regarding material and welding conditions.
- To ensure consistency and reliability, perform tests by relevant standards and procedures.
- Analyze results to identify deviations from the expected performance. Corrective action may be necessary.
Repairing Welding Defects
The repair of welding defects is an essential aspect of welding, as it ensures the structural integrity and durability of welded joints. Repairing welding defects depends on the severity and type of defect and specific requirements for the welded construction.
Repairing Welds with Common Methods
- Rewelding and Grinding: Surface defects, such as cracks and undercuts, can be repaired by rewelding.
- Repair: A repair patch may be necessary when defects are significant or structural components are damaged.
- Heat Treatment: Post-weld heat treatments (PWHT) can address certain defects, such as residual stresses or hardness issues.
- Peening: This technique enhances welds’ fatigue resistance and minimizes crack formation. Mechanically working the weld surface or toe creates compressive stress, counteracting the tensile stress that leads to cracking.
- Filler metal selection: The filler metal chosen should have compatible mechanical characteristics and be suitable for the base materials and the welding method.
Challenges in Weld Repair
Repairing weld defects can be challenging. The decision to repair should consider the repair’s impact on the integrity and performance. Weld repair can be challenging for several reasons.
- Material properties: Heat during repair can affect the material’s mechanical properties, including strength and toughness.
- Defect Access: In some cases, the defect may be in an area that is difficult to reach, which makes the repair process complex and time-consuming.
- Deformation: Additional heat input during the repair process may distort thin-section materials.
- Compliance with Codes and Specifications: Weld Repairs must comply with relevant codes and specifications. These may place restrictions on the types and methods of repairs.
Conclusion
By preventing these common welding defects, you can increase the strength and longevity of your welds and improve your skills. You can overcome any welding challenge with the proper knowledge and practice.
Do you need a reliable sheet metal parts manufacturer? Shengen is the place to go. We specialize in sheet metal laser cutting, bending, surface finish, and sheet metal welding. Reach out to Shengen Today and seek help from professionals!
More Resources:
Non-Destructive Testing (NDT) Methods – Source: Flyability
Environmental impacts of welding methods – Source: Trumpf
Welding Design – Source: Welding-advisers
Weld Metal Properties – Source: Weldingforless
Hey, I'm Kevin Lee

For the past 10 years, I’ve been immersed in various forms of sheet metal fabrication, sharing cool insights here from my experiences across diverse workshops.
Get in touch
Kevin Lee
I have over ten years of professional experience in sheet metal fabrication, specializing in laser cutting, bending, welding, and surface treatment techniques. As the Technical Director at Shengen, I am committed to solving complex manufacturing challenges and driving innovation and quality in each project.
Related Resource

Fingerprint Resistant Stainless Steel: How It Works,and How to Choose


