Tack welding is an integral component of welding that serves as a temporary hold before final welding is performed. This comprehensive guide seeks to fully understand this critical technique by covering its definition, purpose, and importance during welding.
Understanding the Fundamentals of Tack Welding
Tack welding sets the foundation for successful welding projects. Let’s explore the core concepts that make this technique invaluable.
What is Tack Welding?
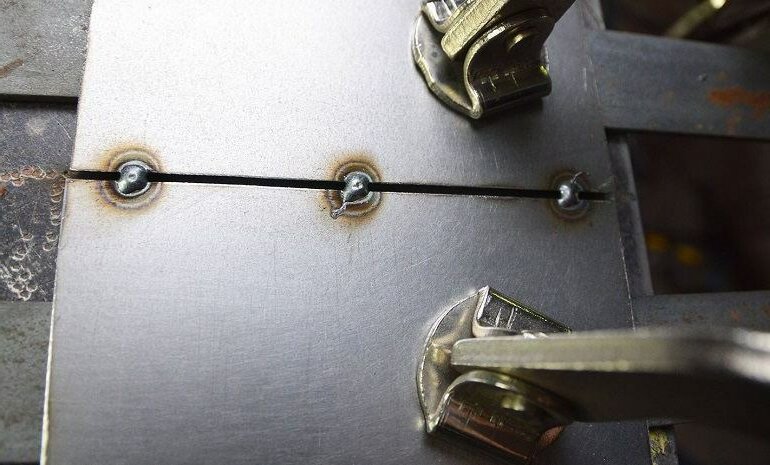
A tack weld works like a temporary spot weld – think of it as a precise stitch that holds metal pieces together. These small welds secure parts in position while maintaining proper fit-up and alignment before the final weld.
The Purpose of Tack Welds
Tack welding creates small, strategic welds that temporarily secure metal pieces in position before final welding. These precise connections act like pins, allowing welders to establish proper alignment and make adjustments as needed.
Tack Weld vs. Full Weld: Key Differences
Tack welds are smaller and faster to create than full welds. They’re temporary, allowing for adjustments. Full welds are permanent and provide complete joint strength. Tack welds set up the structure, while full welds finish the job.
How Does Tack Welding Work?
Tack welding is a temporary welding technique used to hold metal pieces in place before final welding. Here’s a detailed step-by-step guide:
Step 1:Prepare the Materials
- Clean the metal surfaces thoroughly to remove dirt, rust, or debris that could interfere with the weld.
- Ensure the workpieces are free of oil or grease to avoid contamination.
Step 2:Position and Clamp the Workpieces
- Align the parts according to the design specifications.
- Use clamps or fixtures to hold them securely in place during the welding process.
Step 3:Set Up Welding Equipment
- Choose the appropriate welding technique (MIG, TIG, or Stick) based on the materials and project requirements.
- Adjust the welding machine settings for lower heat input to avoid warping.
Step 4:Make the Tack Weld
- Start at one end of the joint and apply a small tack weld.
- Maintain consistent size and spacing of tack welds for uniformity.
Step 5:Inspect and Adjust
- Check alignment after each tack weld to ensure parts remain correctly positioned.
- Make adjustments if necessary before proceeding with final welding.
Challenges to Overcome
While essential, tack welding comes with its own set of challenges that can affect the quality and reliability of the final weld. Understanding these issues is critical to ensuring successful outcomes.
Distortion and Misalignment
Tack welds placed too far apart or in improper sequences can lead to joint distortion and misaligned parts. This is especially problematic for long seams or thin materials.
Cracking and Brittle Zones
Rapid cooling or insufficient heat input during tack welding can create brittle, crack-sensitive areas in the heat-affected zone (HAZ). These cracks may propagate during final welding or under stress.
Residual Stress
Tack welding introduces localized heating and cooling, which can create residual stresses in the workpiece. These stresses may lead to warping, cracking, or weakened joints.
Inconsistent Weld Quality
Uneven tack welds caused by poor clamping, incorrect angles, or improper technique can result in weak joints that fail to hold alignment during final welding.
Troubleshooting and Prevention
- Proper Spacing and Sequence: Space tack welds evenly and follows a balanced sequence to control distortion.
- Preheating and Cooling Control: Preheat materials when necessary and allow slow cooling to prevent brittle zones.
- Clamping and Alignment: Use secure clamps or fixtures to maintain alignment and reduce movement during welding.
Types of Tack Welds
Tack welding is a versatile process with various techniques tailored to specific applications. Each type of tack weld serves a unique purpose, ensuring proper alignment, stability, and minimal distortion during the welding process.
Spot Tack Welds
Spot tack welds are small, dot-like welds placed at strategic points along the joint. These are commonly used for temporary fixation and are ideal for thin materials or when minimal heat input is required. Spot tacks are quick to apply and easy to break if adjustments are needed.
Continuous Tack Welds
Continuous tack welds involve creating a series of closely spaced tacks along the entire length of the joint. This method provides a stronger hold and is particularly useful for thicker materials or long seams where additional stability is required.
Corner and Edge Tack Welds
Corner and edge tack welds are used to secure metal pieces at corners or along edges. These welds ensure proper alignment for joints that form angles, such as T-joints or L-shaped assemblies, maintaining structural integrity during final welding.
Butt Tack Welds
Butt tack welds are applied to align two metal pieces end-to-end. These welds help maintain the correct gap and alignment in butt joints, which are critical for achieving strong, uniform final welds in applications like pipelines or sheet metal fabrication.
Materials Used for Tack Welding
Tack welding is a versatile process that can be applied to a wide range of metals. The choice of material and filler metal plays a crucial role in ensuring strong, precise, and distortion-free welds.
Metals Commonly Tack Welded
The most commonly used metals for tack welding include:
- Steel
- Stainless Steel
- Aluminum
- Cast Iron
- Copper and Brass
- Titanium and Magnesium Alloys
Choosing the Right Filler Material for Tack Welding
Selecting the correct filler material is essential for ensuring compatibility with the base metal and achieving strong tack welds:
Base Metal Compatibility:
- Use filler metals that match or complement the base material’s properties (e.g., ER70S-6 for mild steel and ER4043 for aluminum).
Welding Process Requirements:
- For TIG welding, choose filler rods with diameters suitable for the material thickness.
- For MIG welding, select wire sizes that balance heat input and deposition rate.
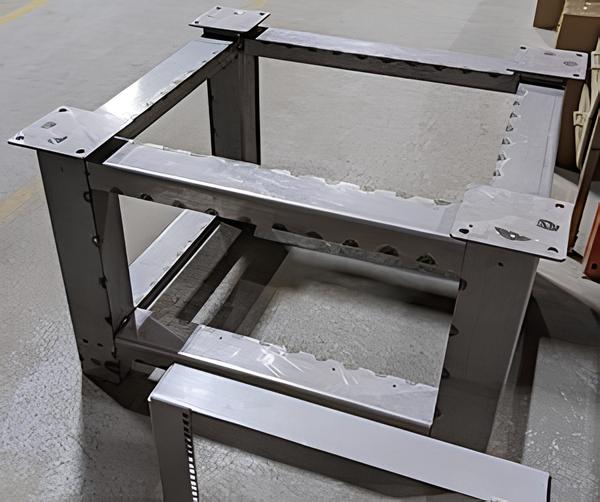
Tack Welding in Structural Steel Construction
Tack welds are vital in steel construction such as scaffolding equipment. They hold beams and columns in place. Tacks allow for adjustments before final welding. They help manage stress during the building process. Proper tacking ensures structural integrity.

Factors Influencing Tack Weld Quality
The quality of tack welds depends on several critical factors, including heat settings, electrode selection, and material thickness. Proper control and understanding of these elements ensure strong, accurate, and distortion-free tack welds.
Heat Settings and Their Impact on the Weld
Heat input plays a vital role in tack welding. Insufficient heat can lead to weak welds with poor penetration, while excessive heat may cause warping or burn-through, especially on thin materials.
Adjusting the welding machine’s amperage to match the material thickness is essential. Lower heat settings are recommended for thinner metals to prevent distortion, while higher settings are necessary for thicker materials to achieve adequate penetration.
Proper Electrode Selection
Choosing the right electrode is crucial for achieving quality tack welds. The electrode must be compatible with the base metal to ensure proper fusion and strength. For example:
- Thin Metals: Use smaller diameter electrodes (e.g., E6013) for shallow penetration and reduced risk of burn-through.
- Thicker Metals: Opt for low-hydrogen electrodes (e.g., E7018) to provide deeper penetration and minimize cracking risks.
Material Thickness and Its Effect on Tack Welding
Material thickness directly influences tack welding techniques and settings:
- Thin Materials: Require lower amperage, faster travel speeds, and smaller tacks to prevent overheating and distortion.
- Thick Materials: Demand higher amperage, slower travel speeds, and larger tacks to ensure sufficient penetration and stability.
Benefits of Tack Welding
Tack welding is an essential technique in metal fabrication. It offers numerous advantages that improve the efficiency, precision, and overall quality of welding projects.
Improved Precision and Structural Integrity
Tack welding ensures precise alignment of components, which is critical for achieving accurate and high-quality final welds. Properly placed tack welds prevent movement during the welding process, maintaining joint gaps and structural integrity.
Time and Cost Efficiency
Tack welding reduces the need for complex clamping systems and fixtures, streamlining the setup process. It also allows welders to secure parts in place quickly, saving time during assembly.
Reducing Rework and Scrap
By maintaining alignment and preventing errors during welding, tack welding minimizes the likelihood of defects or misalignments that would require rework. This reduces material waste and lowers the risk of scrapping valuable components, ultimately improving project efficiency and reducing overall costs.
Conclusion
Tack welding is a critical step in metal fabrication, offering improved precision, reduced distortion, and enhanced efficiency. By mastering the techniques and understanding the factors that influence its quality, you can ensure reliable and high-quality welds for your projects.
Do you have questions about tackling specific welding challenges or improving your fabrication process? If you’re looking for expert advice or support with your next project, feel free to contact us—we’re here to help.
FAQs:
What’s the Difference Between a Tack Weld and a Regular Weld?
A tack weld is a small, temporary weld used to hold metal components in place before final welding. In contrast, a regular weld is a permanent, continuous weld designed to provide structural strength and durability.
When to Tack Weld?
Tack welding secures parts in position during the initial stages of assembly. It is essential for projects involving complex geometries, large components, or materials prone to warping. It’s also ideal when clamps or fixtures cannot be used effectively.
What is a Bridge Tack Weld?
A bridge tack weld is applied when there’s a gap between two components, such as in pipe welding or misaligned joints. Small tacks are alternated on each side of the gap to prevent overheating and distortion. These welds temporarily bridge the gap until the final weld is completed.
Can You Tack Weld Aluminum?
Yes, aluminum can be tack welded, but it requires careful handling due to its high thermal conductivity and low melting point. Using filler material is recommended for stronger tacks, as aluminum without filler can crack under thermal stress. TIG welding is often preferred for precise aluminum tack welds.
Can You Tack Weld Stainless Steel?
Yes, stainless steel can be tack welded effectively. A tight fit-up with no gaps is crucial to prevent warping or heat distortion. Quick, high-heat bursts are typically used to create clean tacks without overheating the material.
Hey, I'm Kevin Lee

For the past 10 years, I’ve been immersed in various forms of sheet metal fabrication, sharing cool insights here from my experiences across diverse workshops.
Get in touch
Kevin Lee
I have over ten years of professional experience in sheet metal fabrication, specializing in laser cutting, bending, welding, and surface treatment techniques. As the Technical Director at Shengen, I am committed to solving complex manufacturing challenges and driving innovation and quality in each project.
Related Resource

Fingerprint Resistant Stainless Steel: How It Works,and How to Choose


