Comparing a machined block to a sheet metal component is like comparing a brick to a spring. Sheet metal is not rigid; it holds stress, releases tension, and reacts to gravity.
For engineers and shop owners, this makes “precision” a difficult target. A part may look perfect in your CAD software, but physical reality is often different. This guide provides a roadmap to help you transition from simply identifying defects to actively managing your process—ensuring quality without compromising speed.
Understanding the Core Challenges
Before selecting specific tools, we must address the fundamental differences between sheet metal and other manufacturing methods. Most inspection failures occur when we treat flexible parts as if they were rigid blocks.
Spring-Back and Material Memory
Metal has “memory.” When you bend a sheet, it stretches and compresses. However, once the tooling releases, the metal attempts to return to its original shape. This is known as spring-back.
You might program a precise 90-degree bend, but depending on the material’s tensile strength or grain direction, the result might be 89 or 91 degrees. This variance is difficult to predict perfectly. If your inspection plan does not account for this natural behavior, your data will always be at odds with the process.
The High Cost of Late Detection
In sheet metal fabrication, timing is everything. A minor dimensional error at the press brake is inexpensive to fix. However, if that error is not caught until the welding or assembly stage, the cost skyrockets.
Consider the “1-10-100 Rule” of quality costs: catching a defect during fabrication costs $1. Catching it during assembly costs $10. Catching it after shipping to the customer costs $100 (plus reputation damage). Effective inspection planning is your primary defense against these compounding costs.
Thin Walls vs. Contact Measurement
Traditional Coordinate Measuring Machines (CMMs) are well-suited for solid components, such as engine blocks, but they pose risks for sheet metal. Sheet metal is often thin (0.8mm – 2mm) and flexible. The physical contact force of a CMM probe can unintentionally push or deflect the edge of the part during measurement. This leads to false readings—you are measuring the deflection, not the actual dimension.
Pre-Inspection Planning: Defining Success Criteria
The most effective inspection tool is a clear definition. Misunderstandings between suppliers and clients often arise because the inspection standards were not clearly defined before production began.
Free State vs. Restrained State
This is the most critical definition in your inspection plan. You must specify how the part should be held during measurement.
- Free State: The part is measured resting on the table without clamps. This reveals the part’s natural shape but is susceptible to distortion due to gravity and warping.
- Restrained State: The part is clamped to a fixture, simulating its installation in the final assembly.
The Risk: If your drawing does not specify “Restrained,” inspectors will typically measure in the “Free State.” For flexible parts that are designed to be bolted flat, this can result in good parts being rejected.
The Solution: Clearly mark the state on the print. If the part functions in a restrained state, allow the inspection team to clamp it in place.
Smart GD&T (Prioritizing Critical Features)
Measuring every single dimension creates unnecessary bottlenecks. Use Geometric Dimensioning and Tolerancing (GD&T) to focus resources on what truly matters.
Identify the Critical to Quality (CTQ) features:
- Does an outer curve define the product’s aerodynamics or aesthetics? Measure it 100%.
- Is an internal flange merely a support bracket? Apply a wider tolerance.
- Action: Highlight these critical points on the drawing. Direct your quality team to focus 80% of their effort on these key dimensions.
Establishing Alignment Protocols
Do not use inspection reports merely to point out errors. Use them to align expectations before manufacturing begins.
Before production, agree on the measurement setup:
- Which points will serve as the datums (zeros)?
- How many clamps are permitted for fixation?
- Will alignment be based on hole patterns or part edges?
Defining the method early prevents disputes about the results later. This simple step eliminates the majority of quality disagreements between suppliers and customers.

Selecting the Right Technology Stack
Many manufacturers make the mistake of using a “one-size-fits-all” approach. They use the same tool for a precision-machined block as they do for a flexible car door panel. This mismatch creates bottlenecks. To optimize your inspection process, you need to match the technology to the specific challenges of sheet metal.
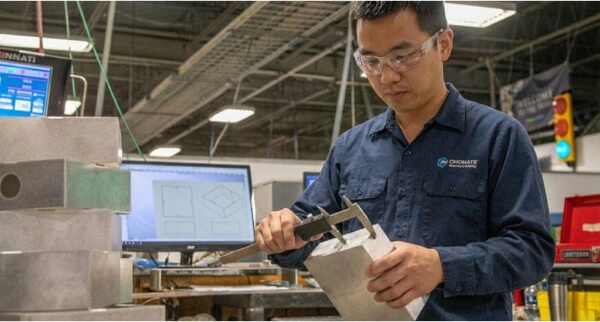
Manual Hand Tools: The Baseline
Every shop floor relies on calipers, micrometers, and protractors. They are inexpensive and immediately accessible.
- Best Use: Quick in-process checks for simple linear dimensions (e.g., flange length, material thickness).
- The Limitation: Hand tools rely entirely on the operator. One inspector might apply heavy pressure to the calipers, compressing a flexible flange, while another holds it loosely.
- The Risk: For complex geometries, hand tools offer low repeatability. They produce a single number, not a comprehensive view of the part shape. Relying on them for the final validation of complex parts is a liability.
Traditional CMM (Coordinate Measuring Machine)
For decades, the CMM has been the gold standard for quality control. It excels at measuring rigid, machined features, such as bore diameters and flat surfaces.
- The Sheet Metal Problem: Speed and coverage. A CMM measures by touching one point at a time. To accurately check a curved sheet metal profile, the probe must make contact with the part hundreds of times.
- The Bottleneck: This process is slow. While your laser cutter is churning out parts every 30 seconds, your CMM might take 20 minutes to inspect one piece. Furthermore, as discussed in Part 1, the contact force of the probe can deflect thin walls, leading to inaccurate data.
- Verdict: Use CMMs for checking rigid welded assemblies or critical hole locations. Avoid them for profiling large, thin surfaces.
High-Speed 2D Optical Scanning
This technology has revolutionized the inspection of flat blanks. The machine functions like a digital light table. You place the flat part on the glass, and an overhead camera captures its silhouette in a matter of seconds.
- The Advantage: Instant Verification. The system overlays the captured image against the DXF/CAD file. It instantly identifies if a hole is missing or if the laser profile has drifted.
- The ROI: This is the ultimate tool for First Article Inspection (FAI). By verifying the flat blank in seconds before it moves to the press brake, you prevent the expensive mistake of bending an entire batch of bad parts. It shifts quality control from “reactive” to “preventative.”
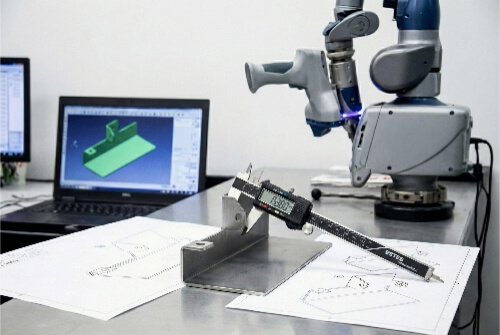
3D Laser Scanning and Portable Arms
For complex bent parts and assemblies, non-contact laser scanning is the modern industry standard. Instead of touching the part with a probe, the operator “paints” the surface with a laser line, capturing millions of data points per second.
The Advantage: The Color Map. Instead of a spreadsheet of confusing numbers, the software generates a 3D color map.
- Green: Perfect.
- Red: Too much material (e.g., the flange is not bent enough).
- Blue: Not enough material (e.g., the flange is over-bent).
The Persuasion: This visual report is undeniable. It eliminates arguments between the quality department and the shop floor. An operator can look at the screen, see a red zone, and immediately know, “I need to adjust my bend angle by 1 degree.”
Selection Guide: Matching Tool to Application
You do not always need the most expensive equipment. Use this logic to maximize your budget efficiency:
Scenario A: High-Mix, Low-Volume (Prototypes)
- Tool: Hand Tools + Portable Laser Scanner.
- Why: Flexibility is key. A portable arm can move around large, awkward prototypes without the need for complex fixtures.
Scenario B: High-Volume Production (Flat Parts)
- Tool: 2D Optical Scanner.
- Why: Speed is the priority. You need to check 100% of the blanks without slowing down the laser cutters.
Scenario C: Complex Assemblies with Strict Tolerances
- Tool: Automated 3D Scanning Cell.
- Why: Repeatability is critical. Removing the human operator ensures that every part is measured consistently, providing data for Statistical Process Control (SPC).
The Environment and Fixturing Strategy
In sheet metal inspection, accuracy has two invisible enemies: Temperature and Gravity. If you do not account for these forces, your inspection results will fluctuate, leading to false rejections and confusion on the shop floor.
Controlling the Environment: The Thermal Factor
Metal is reactive. It expands when heated and contracts when cooled. While this is fundamental physics, it is often overlooked in daily manufacturing, leading to significant quality issues.
The “Hot Shop” Scenario: Imagine a laser cutter running at full capacity. The operator removes a warm aluminum part and measures it immediately. It is within tolerance. He then walks it to the Quality Control lab, which is kept at a cool 68°F (20°C). An hour later, the Quality Manager measures it. The part has cooled and shrunk. Now, it is undersized and rejected.
The Solution:
- Acclimatization: Ideally, parts should stabilize to room temperature before final inspection.
- Data Compensation: If in-process measurement on a hot floor is necessary, use software that allows for thermal compensation. You enter the ambient temperature, and the system calculates what the dimensions would be at 68°F.
- Consistency: The goal is repeatability. If the environment changes, the data changes. Eliminate the variable to trust the result.
The Art of Fixturing: Managing Gravity
Sheet metal is not rigid. If you hold a thin panel on the left side, the right side will sag. If you clamp it too tightly, you induce stress and warp the surface.
You need a strategy for “Zero-Stress” Fixturing. The goal is to support the part without distorting it.
- For Free-State Inspection: Traditional clamps are often too aggressive. Modern inspection utilizes specialized, modular fixtures equipped with magnets or vacuum cups. These tools “float” the part in space, supporting it against gravity while allowing the laser scanner to see the part’s natural, relaxed shape.
- For Restrained Inspection: This requires a dedicated fixture that mimics the final assembly. If the part will be bolted to a chassis using four M6 screws, your fixture must clamp the part at those exact four points. This proves functional fit—verifying that the part will work when it reaches the assembly line, regardless of its free-state shape.
3. Improving Gage R&R (Removing the Human Variable)
The ultimate test of an inspection process is not accuracy, but Repeatability and Reproducibility (Gage R&R).
- The Problem: If Operator A holds the part and gets a “Pass,” but Operator B holds it slightly differently and gets a “Fail,” you do not have a part problem. You have a process problem. This ambiguity destroys trust between the production team and the quality department.
- The Fix: A standardized fixture removes the human element. It ensures that “Part #100” is positioned in the exact location as “Part #1.”
- The Business Case: Investing in proper fixtures stops the “It was good when I measured it!” arguments. It turns inspection from a subjective opinion into an objective fact.
Data as a Manufacturing Asset
Collecting data is useless if it simply sits in a filing cabinet. To truly modernize your operation, you must stop treating inspection as a final “test” and start using it as a manufacturing tool. This is called Closing the Loop.
From “Gatekeeper” to “Guide”
Traditionally, the Quality Department acts as a gatekeeper. They examine a part, stamp it “Fail,” and discard it in the scrap bin. This protects the customer, but it does not help the factory. It is purely reactive.
Modern inspection changes the goal. It is not about judging the part; it is about correcting the process.
- The Scenario: Your 3D scanner generates a color map showing that a flange is consistently bent 1.5 degrees too open (a “blue” zone).
- The Old Way: Reject the parts. Scold the operator.
- The New Way: Feed that data immediately back to the press brake. The operator (or automated software) adjusts the bend allowance by exactly 1.5 degrees.
- The Result: The next part is perfect. You stopped measuring the problem and started fixing the root cause. This transforms your Quality team from the “Department of No” into the “Department of Optimization.”
SPC: The Smoke Detector for Your Factory
Inspecting one part tells you about that specific piece of metal. Inspecting 100 parts tells you the future of your machinery.
This is Statistical Process Control (SPC). You don’t need to be a mathematician to use it; you just need to spot the trend.
- The Trend: Imagine a punch press making a 10mm hole. Part 1 is 10.0mm. Part 50 is 9.98mm. Part 100 is 9.95mm. All are within tolerance, but the hole is shrinking.
- The Insight: Your tool is wearing out.
- The Action: SPC acts like a smoke detector. It warns you before the fire starts. You can sharpen the tool during a scheduled break, rather than shutting down the line for an emergency fix when parts start failing. This shifts your maintenance strategy from “reactive firefighting” to “proactive control.”
The Real ROI: Calculating the Value of Precision
We know the hesitation: “Advanced 3D scanners and inspection software are expensive.” The capital cost is high. However, competent managers calculate Return on Investment (ROI) based on what they save, not just what they spend.
Consider these three “hidden currencies” in your shop:
- 1. Setup Time: If a 2D optical scanner allows your laser operator to verify a First Article in 30 seconds instead of 20 minutes, you gain valuable machine uptime. If you run 4 setups a day, that is over 200 hours of extra production capacity per year. That is essentially “free” revenue.
- 2. Scrap Reduction: Scraping a single complex assembly at the end of the line often costs more than the raw material for 50 parts. Catching the error early at the blanking stage pays for the equipment rapidly.
- 3. The Cost of Reputation: What is the cost of a customer return? It is not just the shipping fee. It includes mandatory corrective action reports, audits, and the potential loss of future contracts. Reliability is a premium product.
Conclusion
Dimensional inspection for sheet metal is not just about identifying defective parts; it is about ensuring engineering certainty. Precision is not an accident. It is the result of planning, technology, and discipline. By implementing these strategies, you stop being a “firefighter” reacting to problems and become a “controller” of your production line.
You have read the theory. Now, let’s put it into practice. At Shengen, we don’t just cut and bend metal; we engineer confidence. Get Your Precision Quote Now!Upload your drawings and see the difference a data-driven partner makes.
Hey, I'm Kevin Lee

For the past 10 years, I’ve been immersed in various forms of sheet metal fabrication, sharing cool insights here from my experiences across diverse workshops.
Get in touch
Kevin Lee
I have over ten years of professional experience in sheet metal fabrication, specializing in laser cutting, bending, welding, and surface treatment techniques. As the Technical Director at Shengen, I am committed to solving complex manufacturing challenges and driving innovation and quality in each project.
Related Resource

Fingerprint Resistant Stainless Steel: How It Works,and How to Choose


