Are you interested in adding a unique touch to your metal products through laser engraving? It’s a fantastic way to personalize or brand jewelry, promotional products, or industrial parts. The process involves precision and a bit of creativity, but the outcome is invariably impressive and adds significant value to any piece.
Laser engraving metal involves a few critical steps to ensure the best results. Firstly, you’ll need the right equipment: a laser engraver suitable for metal. Then, you’ll prepare your design, set the correct power and speed settings on the machine, focus the laser, and perform the engraving. Finally, cleaning the metal post-engraving is crucial for a pristine finish.
Stay tuned as I walk you through each step in detail. This will make the process straightforward and ensure that you achieve professional-quality results.
Step 1: Understanding Laser Engrave Metal
What is Laser Engraving?
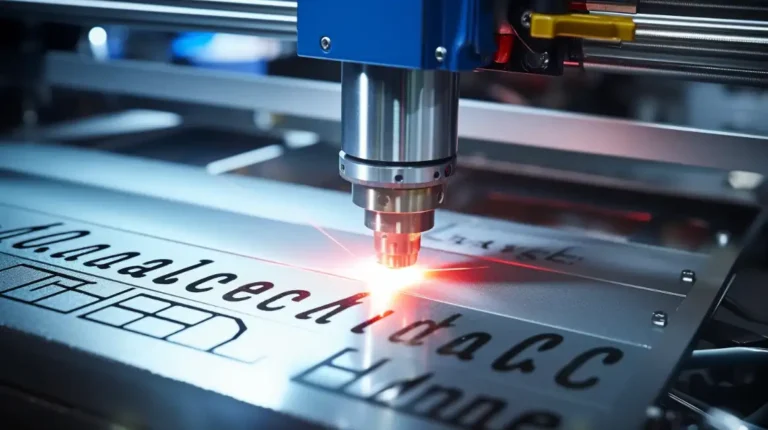
Laser engraving is a process where lasers are used to engrave an object. The technique does not involve tool bits, which contact the engraving surface and wear out. The impact of laser engraving has been more pronounced for specially designed “laserable” materials and some paints.
Types of Lasers Used in Engraving
Fiber Lasers
Fiber lasers are particularly effective for metal engraving due to their high-intensity beam, which easily etches into metal surfaces. They are known for their efficiency and precision in detailed graphics, making them ideal for industrial applications, including tool marking and part identification.
CO2 Lasers
While CO2 lasers are generally used for engraving materials like wood, plastic, and glass, they can also be modified to mark metals when used with a metal marking solution.
Step 2: Preparing for Laser Engrave Metal
Choosing the Right Metal
Selecting the appropriate metal is crucial for successful laser engraving. Metals with a smooth, uniform surface yield the best results because they reflect the laser consistently. Common choices include stainless steel, aluminum, brass, and copper.
Common Metals Suitable for Laser Engraving
- Stainless Steel: Highly corrosion-resistant, making it ideal for industrial applications and consumer products.
- Aluminum: Lighter than stainless steel and excellent for high-contrast engravings.
- Brass and Copper: These softer metals allow for deeper and more visible engravings.
Metals to Avoid
Metals with high reflectivity, like specific grades of aluminum and fragile metals, can be challenging because they reflect the laser’s energy away from the surface. Tough metals may also require specialized lasers beyond the typical fiber or CO2 laser.
Preparing the Metal Surface
Ensuring the metal surface is clean and properly prepared is critical to achieving a high-quality engraving. Any contaminants on the surface can interfere with the laser’s ability to create a consistent mark.
Cleaning Techniques
- Wiping with Solvents: Use isopropyl alcohol or acetone to clean the surface thoroughly. This removes oils, dirt, and residues.
- Mechanical Cleaning: For more rigid residues, a light abrasive pad can be used to clean the surface without damaging it.
Applying a Marking Compound (If Necessary)
Applying a laser marking compound can facilitate the engraving process for metals that are difficult to mark, like specific grades of aluminum. These compounds create a chemical reaction when the laser hits, leaving a permanent mark. Apply the compound evenly and allow it to dry before engraving to ensure the best results.
Step 3: Designing Your Engraving
Selecting Design Software
Choosing the right software is essential to bring your engraving ideas to life. The software should be capable of precise adjustments and support various file formats for compatibility with laser engravers.
Popular Software Options
- Adobe Illustrator: Renowned for its vector editing capabilities, making it ideal for detailed designs.
- CorelDRAW: Offers powerful graphic design tools that are user-friendly for both beginners and professionals.
- AutoCAD: Best for technical drawings, commonly used in industrial applications where precision is critical.
Tips for Design Preparation
- Use vector formats: These allow for scalable, precise designs without losing detail.
- Simplify your design: Avoid overly complex details that might translate poorly when scaled down.
- Check the resolution: Ensure your design is set to the highest resolution to avoid pixelation during engraving.
Transferring the Design to the Laser
Once your design is ready, the next step is to transfer it to the laser engraving machine. This involves ensuring the file format is compatible and setting up the laser’s software to interpret the design correctly.
File Formats and Compatibility
- Vector files (.SVG, AI, DXF): Preferred for their scalability and precision.
- Raster files (JPG, PNG, and BMP): They can be used but could be better due to potential quality loss at high zoom levels.
Setting Up the Laser Software
- Load the design: Import your design into the laser software.
- Set parameters: Adjust the power, speed, and frequency settings according to the desired metal type and effect.
- Preview the path: Most software offers a preview function to simulate the engraving path.
Step 4: Setting Up the Laser Engrave Metal
Safety Measures
Ensuring safety during the engraving process is paramount. Laser engravers can be dangerous if not handled correctly, so taking the appropriate precautions is essential.
Personal Protective Equipment
- Safety Glasses: Specifically designed to protect your eyes from laser exposure.
- Protective Gloves: Useful when handling metal pre and post-engraving to prevent cuts and burns.
- Respiratory Masks: It is recommended to avoid inhaling any fumes or dust produced during the engraving process.
Safety Features of Laser Engraving Machines
- Emergency Stop Button: Allows for immediate machine shutdown in an emergency.
- Protective Enclosure: Many lasers have a built-in enclosure that helps contain the laser beam and reduce exposure.
- Fume Extraction Systems: These systems help to ventilate fumes away from the work area, which is crucial for maintaining a safe working environment.
Configuring the Machine
Setting up your laser engraver is critical to achieving the best results and ensuring the process runs smoothly.
Adjusting Power Settings
- Power: Higher power settings are used for metals to ensure the laser penetrates appropriately.
- Speed: Adjusting the speed affects how much the laser interacts with the metal; slower speeds result in deeper engravings.
Determining Focus and Depth
- Focus: Properly focusing the laser is crucial for crisp, precise engravings. This usually involves adjusting the height of the laser to align with the surface of the metal.
- Depth: Setting the depth of the engraving depends on the material and the desired effect. Deeper engravings require multiple passes or slower speeds.
Test Runs on Scrap Metal
Before engraving the final piece, conduct a few test runs on similar scrap metal. This allows you to adjust the settings based on the output and ensure everything is set perfectly before proceeding with the project.
Step 5: The Laser Engrave Metal Process
Starting the Engraving
You can begin the engraving process once the laser engraver is set up and the design is correctly loaded. Ensure the metal is securely in place and all settings are correctly adjusted for the specific type of metal you’re working with.
What to Monitor During Engraving
- Laser Path: Watch the laser’s path to ensure it follows the intended design without deviation.
- Smoke and Fumes: Monitor the amount of smoke or fumes being generated. Excessive amounts may indicate a need for adjustments in power or speed.
- Temperature: Keep an eye on the temperature of the laser and the metal, especially for longer engraving sessions.
Troubleshooting Common Issues
- Incomplete Engraving: If the engraving is not as deep or complete as expected, consider increasing the power or slowing down the speed.
- Excessive Burning: If the metal burns too much, reduce the power or increase the speed.
- Design Misalignment: Ensure the metal hasn’t moved and the laser is correctly focused.
Finishing Touches
After the engraving is complete, it’s essential to finish the process with proper cleaning and any needed post-treatment to ensure the best results and durability of the engraving.
Cooling and Cleaning the Engraved Metal
- Cooling: Allow the metal to cool down naturally. Avoid using water or other liquids as they can cause warping or damage.
- Cleaning: Wipe down the engraved area with a clean cloth and an appropriate cleaning solution to remove any residue or debris.
Post-Engraving Treatments
- Protective Coatings: A protective coating, such as a clear lacquer, can help protect the engraving against wear and corrosion.
- Polishing: If a shinier finish is desired, polishing the engraved area can enhance its appearance and brightness.
The Benefits of Laser Engrave Metal
Laser engraving processes are preferred for their precision, versatility, and efficiency. Here’s why incorporating laser engraving or etching into your production or customization projects can be highly beneficial:
Precision and Quality
- High Resolution: Laser engraving can achieve incredibly detailed designs that are impossible with traditional methods.
- Consistent Results: Once the design is set up in the laser equipment, each piece is produced precisely, ensuring uniformity across all items.
Durability
- Permanent Markings: The laser beam physically alters the surface of the metal, resulting in markings that are resistant to fading, wear, and heat.
- Corrosion Resistance: Laser engraving maintains the integrity of the metal, often enhancing its resistance to rust and corrosion.
Speed and Efficiency
- Fast Processing Time: Laser systems can swiftly produce designs, significantly reducing the time from concept to production compared to other engraving methods.
- No Need for Tooling: Laser engraving does not require custom tools for different designs, further speeding up the production process and reducing costs.
Versatility
- Material Compatibility: Lasers can work with various metals, including hard-to-mark materials like titanium and precious metals.
- Adaptable Designs: Changing designs can be as simple as updating the software settings, making it easy to switch between engraving requests without physical tool changes.
How to Engrave Metal with Color?
Engraving metal with color adds a vibrant dimension to custom artwork, promotional items, and personalized gifts. Here’s a step-by-step guide on how to incorporate colors into your metal engraving projects:
Choose the Right Metal
- Compatibility: Not all metals can achieve color effects equally. Aluminum, stainless steel, and titanium are among the best candidates for color marking due to their reaction to heat and ability to form oxide layers.
Prepare the Surface
- Cleaning: Ensure the metal surface is clean and free from oils or debris. Use a solvent like acetone or isopropyl alcohol for thorough cleaning.
- Polishing: A polished surface can help enhance the color contrast and brightness of the final engraving.
Use a Fiber Laser with MOPA Technology
- Laser Type: A fiber laser with MOPA (Master Oscillator Power Amplifier) technology is ideal for color engraving on metals. It allows fine control over pulse durations and frequency, which is crucial for creating colors.
- Settings Adjustment: Experiment with different frequencies, speeds, powers, and focal heights to achieve the desired color. These parameters will vary depending on the type of metal and the specific color you aim to produce.
Engraving Process
- Layering: Color on metal is often achieved by creating thin oxide layers on the surface. The laser’s heat causes an oxide layer to form, and the color seen is due to light interference effects within this layer.
- Controlled Oxidation: By carefully adjusting the laser settings, you can control the thickness of these oxide layers, which changes the color reflected. For example, standard colors achievable on stainless steel include blues, golds, and pinks.
Post-Processing
- Cleaning Again: After engraving, clean the surface to remove any residual debris and to brighten the color.
- Sealing: Although not always necessary, applying a clear protective coating can help preserve the color and protect it from wear and corrosion.
Conclusion
Laser engrave metal technology have revolutionized how we design and customize various materials, particularly metals. From intricate jewelry and personalized gifts to industrial applications requiring precision and durability, the versatility of laser engraving is unparalleled. Not only does it allow for detailed artistic expression, but it also enhances product functionality through durable markings that withstand harsh conditions.
Do you need a reliable sheet metal parts manufacturer? Shengen is the place to go. We specialize in sheet metal laser cutting, bending, surface finish, and CNC Machining. Reach out to Shengen Today and seek help from professionals!
FAQs
How Long Does Laser Engraving Take?
Straightforward designs on small objects might take only a few minutes, while intricate patterns over large areas can take hours. Additionally, different materials respond differently to the laser; more complex materials may require slower speeds or multiple passes, thereby increasing the time required.
Can Laser Engraving Be Removed or Undone?
Laser engraving is considered a permanent marking method. However, it is possible to remove laser engravings from some materials by grinding down the surface layer, though this can damage the material or alter its dimensions and appearance.
How to Maintain a Laser Engraving Machine?
Maintaining a laser engraving machine involves several routine checks and cleanings to ensure optimal performance:
- Regular Cleaning: Keep the machine clean from dust and debris, especially the lenses and mirrors, which must be free of obstructions and contaminants to ensure the laser path is clear.
- Lens and Mirror Inspection: Check and clean the lenses and mirrors regularly, as dirt or damage can affect the quality of the engravings.
- Alignment Checks: Periodically check and adjust the alignment of the laser beam to ensure accuracy.
- Software Updates: Update the engraving software to take advantage of the latest improvements and features.
- Mechanical Parts Maintenance: Lubricate moving parts as needed and check for any signs of wear or mechanical issues.
More Resources:
Fiber Lasers Explained – Source: Wikipedia
How to Remove Laser Engravings – Source: Furnells
Maintaining Your Laser Engraver – Source: Thunder
Hey, I'm Kevin Lee

For the past 10 years, I’ve been immersed in various forms of sheet metal fabrication, sharing cool insights here from my experiences across diverse workshops.
Get in touch
Kevin Lee
I have over ten years of professional experience in sheet metal fabrication, specializing in laser cutting, bending, welding, and surface treatment techniques. As the Technical Director at Shengen, I am committed to solving complex manufacturing challenges and driving innovation and quality in each project.
Related Resource

Fingerprint Resistant Stainless Steel: How It Works,and How to Choose


