Many sheet metal parts don’t fail because of overload. They fail because of something invisible—fatigue. Fatigue happens when a metal part faces thousands or even millions of repeated load cycles. Each small cycle changes the metal just a little. Over time, these changes create tiny cracks that grow until the part breaks.
It’s a slow and silent process. Studies show that around 70% of mechanical failures in machines, vehicles, and enclosures come from fatigue. The good news is that fatigue failure can be predicted and prevented through good design, proper materials, and better control during manufacturing.
This article explains what fatigue is, why sheet metal parts are more vulnerable, and how engineers can design and build parts that last longer.

What Is Fatigue Failure?
Fatigue failure is the gradual cracking of metal under repeated stress that stays below its yield strength. Each time a part flexes, bends, or vibrates, microscopic changes form inside the metal’s structure. The material weakens little by little until a visible crack forms and spreads.
This type of failure is dangerous because it often happens without warning. A part may look fine one day and suddenly break the next.
The Three Stages of Fatigue
Crack Initiation
Cracks usually start at surface imperfections such as tool marks, sharp corners, or punched edges. Research shows that over 90% of fatigue cracks begin at or near the surface, where stress is highest.
Crack Growth
Once a crack forms, it grows slightly with every load cycle. The growth rate depends on stress level, surface finish, and environment. Engineers often use S–N data or the Paris Law to estimate how fast a crack will move through a part.
Final Fracture
When the remaining cross-section becomes too small to carry the load, the part snaps. This last break is sudden and often catastrophic, leaving a rough surface with visible patterns.
Recognizing Fatigue Damage
Fatigue cracks leave clear visual signs. You might see smooth, curved lines called beach marks that show how the crack expanded over time. Under a microscope, fine parallel lines—fatigue striations—reveal the crack’s progress with each load cycle.
These clues help engineers diagnose failures, identify stress concentrations, and redesign parts for better fatigue performance.
Why Sheet Metal Parts Are Especially Vulnerable?
Sheet metal is strong, lightweight, and versatile. But its thin geometry and complex fabrication steps make it more prone to fatigue. Small design details or processing errors can greatly shorten its life.
Thin Walls and Stress Concentration
Thin sheets carry load through a limited cross-section. That makes them sensitive to local stress peaks. Holes, notches, and bends act as stress amplifiers.
A sharp corner can double or even triple the local stress compared with a smooth curve. For instance, a 0.5 mm corner radius in a steel bracket can raise stress intensity by more than 2×. Over many load cycles, these spots become the birthplace of cracks.
Adding small fillets, rounded holes, and consistent wall thickness helps distribute stress evenly and increases fatigue life.
Residual Stress from Manufacturing
Every forming or cutting process leaves hidden stress inside the metal. Bending, stamping, welding, and laser cutting all change the metal’s structure near the surface.
Laser cutting, for example, produces a heat-affected zone (HAZ) where tensile stress remains. That area becomes a weak link during vibration. A tight bend radius without proper tooling can stretch the outer fibers too far, forming micro-cracks before the part even goes into service.
If these residual stresses are not relieved, the part’s fatigue life can drop by 30 – 50 %. Stress-relief annealing or controlled forming parameters can restore strength and consistency.
Vibration and Changing Loads
Most sheet metal components face dynamic loads—vibration, impact, or motion. Machine brackets, control panels, and enclosures near motors vibrate continuously. Each vibration cycle adds another stress pulse to the same weak areas.
Temperature changes make the situation worse. A 90°F (≈ 50°C) rise can reduce a carbon steel’s fatigue limit by 10 – 15 %, because heat lowers its yield strength and causes expansion strain.
Designers should always account for these real-world conditions. Parts tested only under static loads in a lab often fail earlier in the field if vibration and temperature cycles are ignored.
Common Causes of Fatigue Failure in Sheet Metal
Fatigue doesn’t happen by accident. It results from specific design, material, and manufacturing decisions. By understanding where cracks begin, engineers can stop failures before they start.
Poor Design Features
The way a part is shaped affects how it handles repeated stress. Sharp corners, thin transitions, and abrupt cutouts act as stress concentrators. When stress repeats, these spots collect the load and start small cracks.
Adding a radius spreads the load and lowers peak stress. Even a 2 mm fillet can reduce local stress by nearly 50% compared to a sharp corner. Avoid placing holes or slots near bends—keep them at least two times the sheet thickness away.
Uneven wall thickness can also shorten fatigue life. A sudden change in cross-section forces stress to focus on a small area. Use gradual transitions or reinforcing ribs to carry load smoothly through the structure.
💡 Design Tip: Think about how the load travels through the part. Every time it changes direction sharply, stress increases.
Surface Imperfections
Surface finish is one of the biggest factors in fatigue resistance. Scratches, tool marks, and burrs act like miniature cracks. Under cyclic loading, these flaws grow fast.
Tests show that a surface roughness of 50 microns can cut fatigue life by up to 40% compared with a polished finish. Simple improvements such as deburring, sanding, or shot peening make a huge difference.
Shot peening introduces compressive stress on the surface, which blocks crack formation. Polishing reduces surface peaks where cracks start. Both methods are inexpensive and extend fatigue life by several times.
Improper Material Selection
Not all metals handle repeated stress equally. Aluminum has no defined fatigue limit—it can fail at low stress after enough cycles. Steel, by contrast, has an endurance limit, meaning it can survive infinite cycles if stress stays below a threshold.
If a part will face vibration, select materials with a high endurance ratio (fatigue limit divided by tensile strength). Medium-carbon and alloy steels perform well here. Fine-grain materials resist crack growth better than coarse-grain ones because cracks must pass through more grain boundaries.
Heat treatment also matters. A properly tempered alloy can have 20–30% higher fatigue strength than one that’s untreated. When in doubt, consult S–N curves for your chosen metal to match expected stress levels.
💡 Engineering Note: Material choice affects not only cost but also how a part behaves under long-term cyclic stress.
Assembly and Tolerance Issues
Even a perfect design can fail if assembly introduces new stress. Misalignment, over-tightening, or uneven bolt pressure can distort sheet metal panels. These locked-in stresses combine with working loads and accelerate fatigue.
When a bracket is forced into position, the metal stays slightly bent. That bend becomes a constant preload. Each vibration cycle adds more strain to the same area. Over time, cracks appear around mounting holes or fastener edges.
To prevent this, use proper torque control and precise fixtures during assembly. Check flatness and alignment before fastening. In high-vibration systems, apply locking washers or thread adhesives to avoid loosening and impact loads.

Fatigue Testing and Evaluation Methods
Testing is the best way to confirm how a part behaves under repeated stress. It helps engineers find weak zones, validate materials, and predict service life.
Laboratory Testing Techniques
Laboratory fatigue tests expose samples to controlled cyclic loads until failure. Common methods include:
- Rotating Bending Test: The specimen bends under rotation to simulate vibration in shafts or brackets.
- Axial Loading Test: The sample stretches and compresses along its axis, similar to tension-compression loads in mounting plates.
- Flexural Test: The specimen bends back and forth to represent flexing in thin sheet panels.
These tests build an understanding of how the metal responds to repeated stress. Engineers use this data to compare materials or evaluate surface treatments.
📊 Example: When comparing two identical steel samples, the one with shot peening may last five times longer under the same cyclic load.
S–N Curves and Endurance Limits
The S–N curve (stress vs. number of cycles) shows how stress level affects fatigue life. Each material has a unique curve determined through testing.
For steels, the curve flattens at a low stress value—the endurance limit. Below this level, the material can theoretically last forever. Aluminum and copper alloys don’t have this plateau, so designers must define a safe number of cycles based on use.
For example:
- Mild steel: endurance limit ≈ 0.5 × tensile strength
- Aluminum alloy: no endurance limit; design below 0.35 × tensile strength
By reading S–N data, designers can pick stress targets that ensure long fatigue life under expected load conditions.
Non-Destructive Inspection (NDT)
Small fatigue cracks can exist long before a part fails. Non-destructive tests find them without harming the part.
- Dye Penetrant Testing: Highlights surface cracks with colored liquid.
- Ultrasonic Testing: Uses sound waves to detect internal flaws.
- Eddy Current Testing: Uses magnetic fields to find surface or near-surface cracks in conductive metals.
Regular NDT inspections help spot fatigue damage early—especially in high-cycle parts such as machine brackets or frames. Detecting cracks early prevents sudden failures and unplanned downtime.
💡 Maintenance Tip: For parts under constant vibration, schedule inspection every 3–6 months, depending on load severity.
Design Strategies to Prevent Fatigue Failure
Fatigue failure is not random. It follows physical rules, and smart design can stop it before it starts. By shaping parts correctly, managing surface stress, and choosing proper materials, engineers can significantly increase fatigue resistance.
Minimize Stress Concentrations
Stress concentrations are the root of most fatigue cracks. They appear around holes, corners, or sudden geometry changes. The sharper the edge, the higher the stress.
Adding fillets and smooth transitions is the easiest way to reduce local stress. A 2 mm radius can lower stress by nearly 60% compared to a sharp edge. Use rounded holes instead of square ones. When a slot is needed, add curved ends rather than flat ones.
Avoid abrupt thickness changes. A smooth taper allows stress to flow evenly through the part. Reinforcing ribs or gussets can also spread load across a wider area, lowering local strain.
💡 Design Tip: Before finalizing a model, trace how the load travels through the part. Any sharp red zone in simulation means the geometry needs smoothing.
Optimize Material Selection
Material strength alone doesn’t guarantee good fatigue life. What matters is how the material behaves under cyclic stress.
Metals with high fatigue ratio (endurance limit ÷ tensile strength) perform best. Alloy steels, titanium alloys, and certain stainless grades have high ratios. Aluminum is lighter but less fatigue-resistant, so designers must control stress carefully.
Fine-grain materials resist crack propagation better than coarse-grain ones. Each grain boundary acts like a barrier that slows crack growth. Heat treatments such as tempering or solution hardening can increase fatigue limit by 20–40%.
Also consider the part’s forming behavior. If the material work-hardens too quickly, it can crack during bending or forming. Choose metals with balanced formability and fatigue resistance.
Apply Surface Treatments
Most fatigue cracks start at the surface. Improving surface conditions is one of the most effective ways to extend life.
Shot peening creates a thin compressive layer that stops cracks from forming. It can increase fatigue strength by 300–400% in steel parts.
Polishing or electropolishing removes machining marks and burrs. Smooth surfaces reduce micro-notches where cracks can start.
Coatings and finishes—such as anodizing, plating, or painting—protect against corrosion. Corrosion pits act like crack starters, so keeping moisture and chemicals away from the metal surface helps preserve fatigue life.
💡 Engineering Note: Combine polishing and shot peening for parts under heavy cyclic stress. One smooths the surface; the other strengthens it.
Control Residual Stress
Residual stress from forming, welding, or machining can weaken fatigue resistance. These stresses stay inside the part even when it’s unloaded.
Use stress-relief heat treatment or low-temperature annealing after heavy forming or welding. This helps balance internal forces and restores ductility.
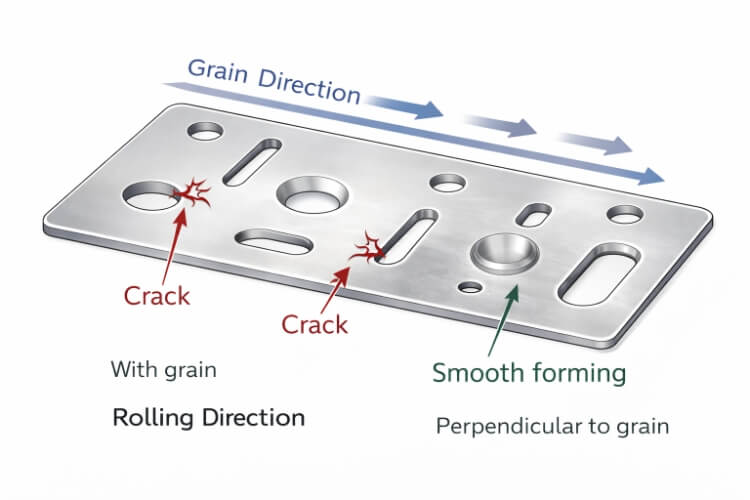
During bending, align the bend direction with the metal’s grain whenever possible. Bending across the grain raises the risk of micro-cracks along the bend line.
Also, ensure consistent press force and die alignment during forming. Uneven pressure introduces local hard spots and variable stress zones, which can later act as crack origins.

Manufacturing and Process Considerations
Even a well-designed part can fail early if the manufacturing process adds hidden stress or defects. Consistent process control is critical for fatigue reliability.
Forming and Bending
Forming changes metal structure. Too tight a bend radius stretches the outer surface beyond its elastic limit, leaving micro-cracks. These cracks later grow under cyclic stress.
A safe rule is to keep the bend radius at least 1–1.5× material thickness for mild steel and up to 2× for stainless steel. Using proper lubricants reduces friction and prevents scratches.
Always inspect the outer bend surface for signs of tearing. Even small cracks visible under magnification are warning signs for future fatigue issues.
💡 Shop Tip: If a bend feels too stiff, it’s likely too tight for the material thickness.
Welding and Heat-Affected Zones
Welds are common fatigue weak points. The rapid heating and cooling during welding create a heat-affected zone (HAZ) that changes metal properties.
Cracks often start at the weld toe, where the base metal meets the weld bead. Smooth, uniform welds reduce this risk. Grinding or polishing the weld toe removes sharp transitions and lowers local stress.
Preheating thicker materials and controlling cooling rates reduce residual tension in the HAZ. When possible, design joints so the main loads pass through shear instead of tension along the weld line.
💡 Engineering Note: A smooth weld contour can improve fatigue strength by up to 30% compared with an uneven bead.
Cutting and Machining
Cutting and machining steps also affect fatigue performance. Dull tools or excessive speed create heat, rough edges, and micro-cracks.
Laser cutting is precise but produces a small heat-affected zone. Adjusting laser power and speed minimizes that effect. Waterjet cutting removes material without heat, which eliminates thermal stress altogether—ideal for fatigue-critical components.
Deburring, edge rounding, and surface cleaning after cutting are simple but powerful steps. A smooth edge can double fatigue life compared to a sharp, burr-filled one.
Environmental and Operational Factors
Real-world conditions such as corrosion, temperature change, and vibration accelerate fatigue damage. Knowing how these factors affect sheet metal helps engineers plan better protection.
Corrosion and Fatigue Interaction
Corrosion and fatigue often occur together. Tiny corrosion pits on the surface become stress concentration points. When cyclic loading occurs, cracks start and grow from these pits much faster.
This combined effect is known as corrosion fatigue. It is common in outdoor machinery, HVAC systems, and marine equipment. Studies show that corroded steel parts can lose up to 70% of their fatigue strength compared to clean ones.
Protective coatings and finishes slow down this process. Painting, plating, or anodizing can block moisture and salt from reaching the surface. Stainless steels or aluminum alloys with proper passivation also perform well in humid environments. Regular cleaning and re-coating programs further delay corrosion fatigue.
💡 Practical Tip: When a part works near water, always protect its surface first. Prevention costs less than replacement.
Thermal and Mechanical Cycling
Parts that heat up and cool down repeatedly face thermal fatigue. Each cycle makes the metal expand and contract. Over time, this thermal strain adds to normal stress and accelerates crack growth.
The problem becomes worse when temperature changes combine with vibration. For example, exhaust shields, engine covers, or power supply enclosures often crack early because of both heat and vibration.
To reduce risk, allow room for expansion in the design. Use flexible joints, slotted holes, or heat-resistant materials. Matching the thermal expansion rate between different metals in assemblies also prevents stress buildup.
💡 Design Note: Even a 50°F temperature swing can change part dimensions enough to add unexpected stress over millions of cycles.
Lubrication and Maintenance Practices
Maintenance directly affects fatigue life. Moving or bolted sheet metal parts need regular checks to control friction, looseness, and vibration.
Dry joints increase friction and create extra stress on the surface. This repeated stress eventually causes cracks. Regular lubrication reduces wear and helps distribute loads more evenly.
Loose fasteners are another common source of fatigue. Every time a bolt moves slightly, it produces micro-impacts that grow cracks around holes. Re-torque fasteners on schedule and use locking washers or thread sealants in high-vibration areas.
Visual inspection also matters. Look for small cracks, rust spots, or discoloration around joints. Early detection can stop a minor defect from turning into full failure.
💡 Maintenance Tip: A short inspection every few months can extend part life by years.
Conclusion
Fatigue failure starts small and grows silently. It doesn’t come from a single overload but from repeated stress, poor geometry, and environmental exposure. Preventing it requires attention from design to daily operation.
By combining smart design, stable manufacturing, and consistent maintenance, engineers can avoid fatigue-related breakdowns, reduce downtime, and increase the reliability of every sheet metal product.
Designing for Durability Starts Here. Upload your CAD files or drawings to get expert feedback on fatigue-resistant sheet metal design and fabrication.
Hey, I'm Kevin Lee

For the past 10 years, I’ve been immersed in various forms of sheet metal fabrication, sharing cool insights here from my experiences across diverse workshops.
Get in touch

Kevin Lee
I have over ten years of professional experience in sheet metal fabrication, specializing in laser cutting, bending, welding, and surface treatment techniques. As the Technical Director at Shengen, I am committed to solving complex manufacturing challenges and driving innovation and quality in each project.


