Many small workshops and startups don’t have access to a press brake. Bending sheet metal by hand is valuable when you can’t access a brake. It’s also helpful for small jobs, quick fixes, or tight budgets. There are several reliable and straightforward ways to bend sheet metal without using a brake.
You can bend sheet metal using clamps, vises, wood, or angle irons. The key is to fix the material well and bend along a marked line. For sharper bends, you can score the surface first. These methods work best with thin materials and short lengths.
This guide covers practical ways to bend sheet metal using hand tools. Let’s look at techniques that work with common materials in real-world settings.
Understanding the Basics of Sheet Metal Bending
Before you start bending, it helps to know how the metal behaves. These basics can guide you to get cleaner bends with fewer mistakes.
What Is Sheet Metal Bending?
Bending is the process of shaping metal by forcing it along a straight axis. The metal stretches on one side and compresses on the other. This creates a permanent angle without cutting the sheet.
Key Properties That Affect Bending
Different metals react differently when bent. Some crack. Some spring back. Knowing the properties helps you choose the right approach.
Material Type and Thickness
Thin sheets bend more easily. Aluminum is softer and bends with less force. Steel is stronger and may need more pressure or scoring. The thicker the metal, the harder it is to bend by hand.
Grain Direction
Sheet metal has a grain, which is how the metal was rolled during manufacturing. Bends made across the grain are stronger. Bends made with the grain are more likely to crack.
Ductility and Yield Strength
Ductility is the metal’s ability to stretch without breaking. Yield strength is the force needed to start bending it. Higher ductility makes smoother bends. Lower yield strength means you can bend it more easily without tools.
Standard Tools for Manual Bending
You don’t need a press brake to get started. You can bend metal cleanly and consistently in a small workshop with a few basic tools.
Clamps and Vises
Clamps hold your sheet metal in place while you bend. A vice gives even more support. Lock the metal between flat surfaces to keep the bend line steady.
Steel Pipes and Rods
Use a steel pipe or rod to create smooth curves. Wrap the metal around it and apply pressure. It helps form round bends or cylinders.
Hammers and Mallets
A rubber mallet shapes soft metals without damaging the surface. For harder metals, a metal hammer gives more force. Tap gently along the bend line to keep it even.
Wood Blocks and Straight Edges
Wood blocks work as a bending surface or press bar. Place one along the bend line and push or hammer the metal against it. Straight edges help you guide the bend and keep angles sharp.
What You’ll Need Before You Start?
Good results depend on good prep. Gather your tools, check your material, and set up a solid workspace before you begin.
You’ll need:
- Sheet metal (thin gauge is easier to bend)
- A permanent marker or scribe for clear bend lines
- A flat surface or bench to work on
- Clamps or a vise to hold the metal tightly
- A mallet or hammer to apply bending force
- Support tools like wood blocks, steel bars, or angle iron
Clear markings and firm support are the key to accurate bends. Take a few minutes to set everything up before you start bending.
How to Bend Sheet Metal Without a Brake?
There are many ways to bend metal without a machine. Each method suits a different type of bend. Here’s how to use standard tools to shape your parts.
Bending Over the Edge of a Table
This method is one of the easiest and most common.
Steps and Setup
Choose a sturdy table or bench with a sharp, straight edge. Mark the bend line on the metal with a scribe or marker. Place the metal on the table with the bend line aligned to the edge. Clap it in place using a straight edge like a steel bar or wooden block. Let the part be bent and hang over the side. Press down slowly along the bend line using your hands.
Use a rubber mallet to tap evenly across the bend line for sharper bends. Work from one side to the other instead of hammering in just one spot.
Pros and Limitations
This is a good technique for light work. It’s quick, requires almost no setup, and works well for soft metals like aluminum and thin steel.
However, it doesn’t work well for thick or hard metals, since you can’t apply enough force by hand to make tight bends. Also, the bend radius can’t be controlled precisely, and repeatability is limited.
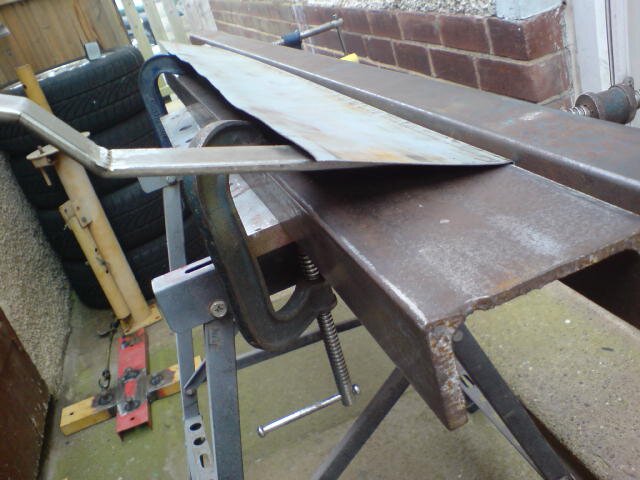
Using a Vise and Hammer
The vice method gives you more control and a tighter bend.
Step-by-Step Bending Technique
Use a heavy-duty vise with wide jaws. Mark your bend line. Clap the sheet metal in the vise with the line at the top edge of the jaws. Place a wooden board or flat steel bar on the metal surface along the bend line—this helps create a straight edge.
Use a rubber mallet to begin tapping the overhanging metal downward. Start at one end and move slowly across the width to avoid distortion. Go back and forth a few times to even out the bend. Check your angle with a protractor or angle gauge if precision matters.
Controlling Angle and Radius
To get sharper bends, make sure the clamping pressure is firm. For softer metals, you can bend to 90 degrees in one go. For harder metals, bending them in stages to reduce stress is better.
Using a press bar during hammering will help you control the bend radius and avoid marks or uneven pressure on the surface.
Pipe Bending Method
This method is helpful for round bends, like curves or rolled forms.
Best for Curved or Rounded Bends
Lay the metal sheet across a steel pipe placed on a sturdy surface or between clamps. Align your bend line with the top of the pipe. Apply pressure using your hands, or press the metal down gradually using a second pipe or mallet.
You can also use multiple clamps and gently bend the metal around the pipe by tightening them in small steps.
How to Choose the Right Pipe Diameter?
The pipe diameter determines the bend radius. For larger curves, use bigger pipes. For tight curves, use smaller ones. Make sure the pipe is strong enough not to flex under pressure.
Match the curve of the pipe to your drawing or final part requirement. Use uniform force across the sheet to avoid kinking and never bend too fast.
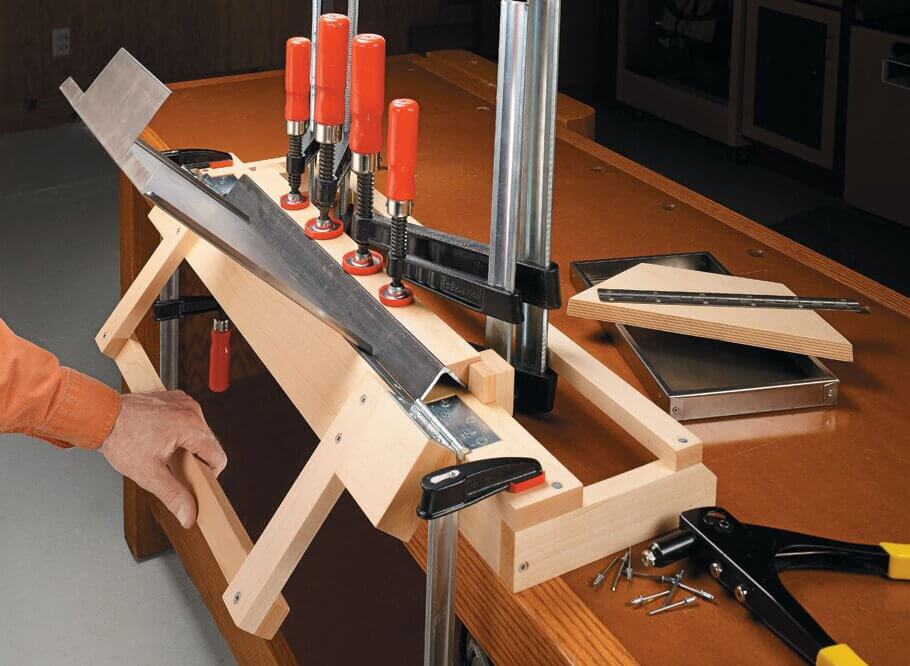
Bending with Wooden Forms
Wood jigs are great for controlled, repeatable bending.
Custom Wooden Jig Creation
Cut a wooden block to the desired bend angle or curve using a bandsaw or jigsaw. Secure the block on a flat surface. Place your metal sheet on top, lining up the bend line.
Use clamps to press a second wooden block over the metal. Then, gently use hand pressure or gently tap the metal to form it around the block. This method is perfect for making U-shaped, L-shaped, or curved parts.
Ideal for Repeated Shapes
Wooden jigs give you consistent results across many parts. They’re cheap to make and quick to set up. This is helpful if you’re fabricating the same shape multiple times in a small batch. You can also sand the block edges to adjust the bend radius.
Freehand Bending Over a Knee or Rounded Edge
This is the most basic technique for field fixes or fragile metal.
Lightweight and Thin Sheet Applications
Grip the sheet metal with both hands and place your knee under the bend line. Gently pull both sides toward you to create a curve. You can also use a smooth, round pipe or ball to shape the metal by hand.
Best Practices to Avoid Warping
Keep your bend line centered. Move slowly and evenly to avoid forming a crease or an unwanted kink. Make several light bends rather than one hard one.
Enhancing Precision Without a Brake
Getting accurate bends by hand is possible if you focus on setup and control. A little extra time spent before bending improves results and reduces mistakes.
Marking Accurate Bend Lines
Start with a clean, flat sheet. Use a fine-tip marker, scribe, or scoring tool to draw your bend line. Measure twice from multiple reference points. Keep your markings sharp and thin. Wide lines lead to guesswork and uneven bends. If the part has tight tolerances, use calipers for layout.
Using a Straightedge or Ruler for Alignment
Place a straightedge directly along your marked line. This helps align the bend and acts as a guide. During clamping or setup, double-check that the edge lines up perfectly. Any slight misalignment will affect the final angle. Metal rulers or angle irons work best because they stay flat and don’t flex.
Pre-Scoring the Bend Line (for Thin Metals)
Scoring weakens the bend area slightly, which helps you get a cleaner, sharper fold. Use a utility knife or sharp scribe to cut the bend line lightly. Only use thin materials like aluminum or brass under 1mm thick. Don’t press too deep. The goal is to guide the bend, not to cut through the sheet.
Clamping Techniques to Prevent Movement
Always clamp the sheet tightly. Use C-clamps, bar clamps, or a vise to hold the sheet and backing block (like wood or steel). Place clamps close to the bend line. Too far away, and the metal may shift or flex. Use padding (like cardboard or cloth) to avoid clamp marks when working with softer metals.
Managing Bend Quality in Manual Sheet Metal Bending
Once you start bending, keeping the shape accurate and the surface clean is the next challenge. These tips help you make smoother, stronger bends.
Achieving a Consistent Bend Angle
Apply force evenly across the full length of the bend. Don’t bend in just one spot. Use a straight press bar, like a steel flat or wooden block, to distribute pressure. If using a hammer or mallet, start tapping from one side and move slowly across. Check your angle with a square or angle gauge as you go.
Minimizing Springback
Springback happens when the metal tries to return to its original shape after bending. To correct this, slightly over-bend the material. For example, if you need a 90° angle, bend to 93°–95°. Test this with scrap first to find the correct offset.
Avoiding Cracks or Breaks
Cracks often appear when bending too close to the grain direction or using too hard metal. Always bend across the grain when possible. For tight bends in tougher materials, use a larger bend radius or preheat the metal slightly. Also, avoid scoring too deep if you’re using the score-and-bend method.
Conclusion
You don’t need a press brake to bend sheet metal well. You can create accurate bends for prototypes, repairs, and small production runs with basic tools like clamps, vises, pipes, and wood blocks. Pay close attention to the setup—mark clean lines, align your tools, and apply even pressure. Understand the metal’s thickness, ductility, and grain direction for better results.
Need custom bent sheet metal parts but don’t have the tools or time? Contact our team today—we deliver fast, accurate, and cost-effective metal fabrication for projects of any size.
Hey, I'm Kevin Lee

For the past 10 years, I’ve been immersed in various forms of sheet metal fabrication, sharing cool insights here from my experiences across diverse workshops.
Get in touch
Kevin Lee
I have over ten years of professional experience in sheet metal fabrication, specializing in laser cutting, bending, welding, and surface treatment techniques. As the Technical Director at Shengen, I am committed to solving complex manufacturing challenges and driving innovation and quality in each project.
Related Resource

Fingerprint Resistant Stainless Steel: How It Works,and How to Choose


