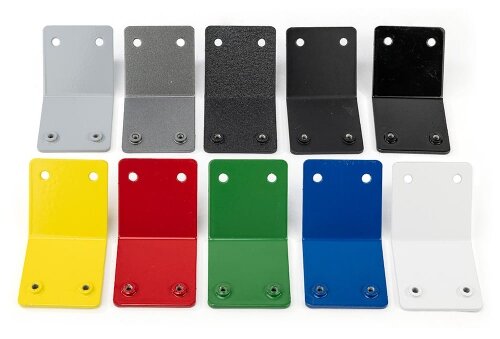
Una verniciatura a polvere impeccabile non inizia nella cabina di verniciatura. Inizia nel modello CAD. La verniciatura a polvere conferisce ai pezzi una finitura forte e resistente alla corrosione, dall'aspetto pulito. Crea uno strato più spesso e uniforme rispetto alla vernice liquida e resiste bene a graffi, scheggiature e raggi UV.
Il risultato finale dipende da scelte progettuali azzeccate. Anche un rivestimento sottile può cambiare il modo in cui i pezzi si adattano o si muovono. Gli ingegneri evitano i problemi pianificando per tempo il rivestimento. Regolano la geometria, il materiale e le tolleranze prima di iniziare la fabbricazione. Questa guida dimostra come un'attenta progettazione garantisca che ogni pezzo verniciato a polvere si adatti bene, abbia un aspetto pulito e duri più a lungo nell'uso reale.
Perché progettare per la verniciatura a polvere fin dall'inizio?
Progettare tenendo conto del processo di rivestimento evita costosi problemi di adattamento in un secondo momento. I punti seguenti dimostrano come una pianificazione tempestiva migliori la precisione, la coerenza e la durata a lungo termine.
L'impatto dello spessore del rivestimento
La verniciatura a polvere aggiunge spessore a ogni superficie rivestita. La maggior parte dei rivestimenti misura circa 0,003-0,004 pollici per lato (circa 75-100 μm, come da ISO 2360). Una fessura che inizia a 0,25″ può ridursi a circa 0,242″ dopo il rivestimento. Senza uno spazio sufficiente, il pezzo potrebbe piegarsi, disallinearsi o graffiarsi durante l'assemblaggio.
Gli ingegneri possono evitare questo problema modellando lo spessore del rivestimento al CAD o aggiungendo un gioco supplementare in corrispondenza dei giunti chiave. Questi piccoli accorgimenti eliminano la rilavorazione e proteggono sia le prestazioni che l'aspetto.
Prevenzione dei problemi di rilavorazione e adattamento
Se l'accumulo di rivestimento non è previsto, i tecnici potrebbero dover carteggiare o raschiare i pezzi per assicurarsi che si adattino correttamente. Questo danneggia la finitura e aumenta i costi. I risultati migliori si ottengono fissando tolleranze precise e definendo nel progetto le aree non rivestite. Gli angoli arrotondati e i raggi uniformi aiutano la polvere a scorrere senza problemi, riducendo i difetti durante l'indurimento.
Migliorare la qualità della superficie
I bordi affilati attirano più polvere perché il campo elettrico si concentra negli angoli. Questo porta a un rivestimento spesso con un'adesione più debole. Un raggio minimo dei bordi di 0,015 pollici assicura che il rivestimento rimanga uniforme e più resistente. Le transizioni lisce aiutano inoltre la polvere a depositarsi in uno strato uniforme, riducendo problemi come la buccia d'arancia o le bruciature.
Da qui il risultato: La pianificazione dello spessore del rivestimento aumenta la precisione, riduce la rilavorazione e migliora la qualità della superficie.
Selezione del materiale e dello spessore
La scelta del materiale influisce sul modo in cui la polvere aderisce, polimerizza e protegge. Le sezioni seguenti spiegano quali sono i metalli più performanti e come evitare le distorsioni dovute al calore.
Scegliere il giusto metallo di base
I metalli rispondono alla verniciatura a polvere in modi diversi. L'acciaio dolce aderisce bene ed è conveniente, ma richiede un trattamento per evitare la ruggine sotto il rivestimento. L'acciaio inossidabile resiste alla corrosione, ma la sua superficie liscia può ridurre l'adesione, per cui è utile una leggera sabbiatura. Le leghe di alluminio, come il 5052 e il 6061, sono comunemente utilizzate per le custodie, ma richiedono uno sgrassaggio e un rivestimento di conversione prima dell'uso.
Una superficie leggermente opaca migliora l'adesione perché permette alla polvere di fare più presa. Le superfici molto lucide possono riflettere il calore durante l'indurimento, causando l'ammorbidimento del rivestimento.
| Materiale | Pretrattamento | Adesione del rivestimento | Resistenza al calore | Uso tipico |
|---|---|---|---|---|
| Acciaio dolce | Zinco/fosfato | Eccellente | Alto | Cornici, pannelli |
| Acciaio inox | Esplosione di luce | Moderare | Alto | Parti decorative |
| Alluminio 5052/6061 | Cappotto di conversione | Bene | Moderare | Involucri, alloggiamenti |
Gestione del calore e dello spessore della lastra
La verniciatura a polvere polimerizza a temperature comprese tra 160 °C e 220 °C. Le lamiere sottili possono deformarsi se non sono ben sostenute. Nervature, flange o rinforzi aiutano a mantenere la forma durante il riscaldamento. I fori di sospensione devono essere bilanciati in modo che i pezzi si espandano uniformemente nel forno.
Gli assemblaggi di materiali misti richiedono una maggiore attenzione. L'alluminio e l'acciaio si espandono a velocità diverse, il che può causare tensioni o vuoti tra di loro. Fasi di polimerizzazione separate o leghe diverse possono ridurre la distorsione.
Da qui il risultato: Il metallo, lo spessore e le caratteristiche di supporto giuste mantengono i pezzi stabili e precisi dopo la polimerizzazione a caldo.
Pianificazione dimensionale e adattamento dopo il rivestimento
Anche un sottile strato di polvere modifica le dimensioni dei pezzi. Ecco come gestire l'accumulo, il gioco e la qualità dei bordi per ottenere un prodotto liscio. Assemblea e prestazioni durature.
Contabilizzazione dell'accumulo di rivestimento
Il rivestimento è spesso uniforme sulle superfici aperte, ma più sottile nelle aree strette. Per i fori, le fessure e le linguette, l'aggiunta di 0,010″-0,015″ di gioco supplementare aiuta l'assemblaggio a rimanere liscio. Se si adatta alla stampa è necessario mascherare le superfici di contatto o assemblarle prima del rivestimento.
| Caratteristica | Prima del rivestimento | Dopo il rivestimento | Regolazione consigliata |
|---|---|---|---|
| Ø del foro | 0.250″ | 0.242″ | +0.010″ |
| Larghezza dello slot | 0.500″ | 0.492″ | +0.015″ |
| Raggio del bordo | 0.005″ | - | ≥ 0.015″ |
Manutenzione di superfici e bordi critici
I bordi e le aree di contatto devono essere oggetto di grande attenzione. Gli angoli spessi possono staccarsi sotto carico e le filettature rivestite possono incepparsi. Le piastre di messa a terra, le superfici di scorrimento o i contatti elettrici devono rimanere non rivestiti. Note chiare sui disegni aiutano l'officina a evitare errori.
Esempio: Una staffa in alluminio da 2 mm necessitava di 0,012″ in più per l'inserimento della linguetta. Questa piccola modifica ha eliminato tutte le operazioni di limatura manuale e ha permesso di risparmiare circa 15 minuti per ogni lotto.
Da qui il risultato: Piccole modifiche dimensionali risolvono grandi problemi di assemblaggio.
Hardware, filettature e dispositivi di fissaggio
Filettature, inserti e accoppiamenti stretti reagiscono in modo diverso al calore e a diversi spessori di rivestimento. Esaminiamo come una progettazione innovativa garantisca che gli assemblaggi rimangano funzionali e puliti dopo il completamento.
Protezione di filettature e accoppiamenti stretti
Le filettature devono rimanere non rivestite. Tappi e tappi di mascheramento li mantengono puliti. Se la polvere entra in un foro filettato, la post-tappatura dopo la polimerizzazione la rimuove. Quando si usano inserti o dadi PEM, è meglio installarli dopo il rivestimento, poiché le temperature di polimerizzazione possono indebolirli.
Se la ferramenta deve essere installata in anticipo, scegliere tipi ad alta temperatura e assicurare una messa a terra adeguata per evitare che la polvere si accumuli intorno alla elementi di fissaggio.
Progettazione per l'assemblaggio
Il rivestimento cambia spessore e attrito, quindi i giunti devono avere uno spazio extra per adattarsi a questa variazione. Le linee di mascheratura devono essere chiare sui disegni. Saldatura e rivettatura prima del rivestimento, poiché il calore applicato successivamente può danneggiare la finitura.
Anche gli attrezzi hanno bisogno di spazio. Le parti verniciate a polvere si graffiano facilmente, quindi assicuratevi che le chiavi o i morsetti abbiano uno spazio sufficiente per evitare danni.
Da qui il risultato: Una buona progettazione protegge la ferramenta e garantisce una finitura finale pulita.
Appendimento, mascheratura e manipolazione nel processo di rivestimento
Il successo del rivestimento dipende dal modo in cui il pezzo viene appeso, spostato e protetto. I seguenti suggerimenti dimostrano come semplificare l'impostazione, garantendo al contempo una copertura completa e uniforme.
Progettato per essere appeso facilmente
I pezzi devono essere appesi durante il processo di rivestimento e polimerizzazione. Se il pezzo non è bilanciato, si muove e può lasciare segni sulla superficie. L'aggiunta di fori o linguette di sospensione (≥ 0,063″) in aree nascoste può essere utile. I fori simmetrici mantengono i pezzi stabili e favoriscono un flusso d'aria uniforme.
L'utilizzo delle stesse caratteristiche di sospensione in tutta la linea di prodotti rende il caricamento più veloce e migliora la coerenza.
Zone di mascheramento e caratteristiche critiche
Alcune aree dovrebbero rimanere in metallo nudo. Tra queste, i punti di massa, le superfici di scorrimento e le sedi dei cuscinetti. Nastri ad alta temperatura, cappucci in silicone o maschere tagliate al laser aiutano a proteggere queste zone. Le linee di mascheramento naturali, come le flange o le aree incassate, riducono il lavoro manuale e aumentano la ripetibilità.
Da qui il risultato: Un buon design di appendimento e mascheratura consente di risparmiare tempo e di evitare difetti di rivestimento.
Preparazione della superficie e specifiche del rivestimento
Una forte adesione inizia con un metallo pulito e istruzioni chiare. Di seguito sono riportati i principali metodi di preparazione e i dettagli della documentazione che garantiscono una qualità di rivestimento affidabile e ripetibile.
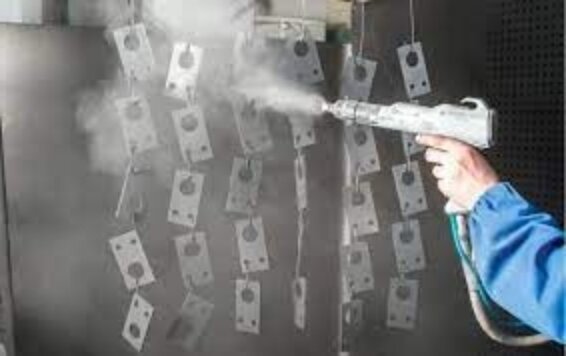
Il pre-trattamento è importante
Una forte adesione richiede un metallo pulito. Olio, polvere o ossidazione indeboliscono il rivestimento. Le fasi più comuni comprendono lo sgrassaggio, il risciacquo e il trattamento chimico o meccanico. L'acciaio viene spesso rivestito con fosfati o cromati, mentre l'alluminio richiede una pulizia alcalina e un film di conversione.
Specificare il colore, la struttura e la lucentezza
I disegni devono indicare il colore (con il codice RAL), la struttura, la brillantezza e lo spessore del film. Le gamme di lucentezza comprendono l'opaco (30%), il semilucido (60%) e il lucido (90%). La texture influisce sull'aspetto e sulla resistenza ai graffi. Le texture sottili nascondono le impronte digitali, mentre le superfici lisce riflettono maggiormente la luce.
Note chiare evitano la rilavorazione. Una buona nota di rivestimento comprende:
- Colore e tipo di polvere
- Livello di lucentezza
- Spessore del film (esempio: 80 ± 10 μm)
- Processo di pretrattamento
- Mascheratura e aree non rivestite
Discutere in anticipo le esigenze del partner di rivestimento aiuta a garantire la coerenza e a evitare ritardi.
Da qui il risultato: Le note dettagliate eliminano le congetture e migliorano la qualità.
Integrazione dei processi ed efficienza produttiva
Una volta finalizzato il progetto, il flusso di produzione determina i costi e la coerenza. Queste strategie aiutano a integrare il rivestimento nella produzione automatizzata o a lotti con ritardi minimi.
Progettazione per linee di verniciatura automatizzate o in batch
La geometria dei pezzi influisce sulla velocità di caricamento e sulle prestazioni del forno. Fori coerenti, forme bilanciate e punti di sospensione ripetibili migliorano il flusso d'aria e la polimerizzazione. Questi passaggi riducono la variazione di colore e consistenza.
Riduzione del mascheramento e del tempo di cambio colore
La mascheratura e i cambi di colore possono rallentare la produzione. Le aree non rivestite incassate aiutano a evitare il nastro adesivo. Quando si utilizzano più colori, applicare prima quelli più chiari. La scelta di colori standard per una linea di prodotti può ridurre i cambi fino a 25%.
Gestione dei costi e dei tempi di consegna
La maggior parte dei costi di rivestimento sono associati alla manipolazione, non alla polvere stessa. Mascherature complesse, piccoli lotti o parti instabili aggiungono manodopera. Raggruppate i pezzi per colore e definite finiture standard per accelerare la produzione. Forme semplici con un buon accesso possono ridurre i tempi di rivestimento di 20-30%.
Da qui il risultato: Progettare tenendo conto del rivestimento riduce i costi e rispetta le scadenze.
Conclusione
Progettare per la verniciatura a polvere non significa solo migliorare l'aspetto dei pezzi, ma anche garantirne le prestazioni ottimali. Si tratta di costruire precisione e prevedibilità in ogni fase. Quando gli ingegneri pianificano per tempo la verniciatura, il processo diventa fluido e affidabile, invece di essere un problema dell'ultimo minuto.
In Shengen, il nostro team combina una lavorazione avanzata della lamiera con un'abile finitura delle superfici. Lavoriamo a stretto contatto con acquirenti e ingegneri per rivedere i disegni, affinare le tolleranze e consegnare pezzi che si adattano e si assemblano senza bisogno di ulteriore lavoro.
Caricare i file CAD o i disegni per una revisione gratuita del DFM e del rivestimento. I nostri ingegneri vi aiuteranno a migliorare la resistenza del rivestimento, a controllare i costi e ad accelerare la produzione, in modo che ogni pezzo funzioni bene come sembra.
Domande frequenti
La verniciatura a polvere è in grado di gestire l'esposizione all'esterno?
Sì. Con un pretrattamento adeguato e polveri stabili ai raggi UV, le parti rivestite resistono alla corrosione e allo sbiadimento per anni. Per gli ambienti esterni o difficili, utilizzare polveri di tipo marino o poliestere.
In che modo la verniciatura a polvere influisce sulle dimensioni dei pezzi e come posso specificare colori e texture?
Il rivestimento aggiunge uno spessore misurabile a ogni superficie. Aggiornare sempre le tolleranze nei modelli CAD e nei disegni. Specificare il colore (codice RAL), il livello di lucentezza e la struttura per garantire una finitura e una qualità visiva uniformi.
Quando è necessario richiedere i pretrattamenti prima della verniciatura a polvere?
Includere sempre un pretrattamento per le parti in acciaio e alluminio per migliorare l'adesione e la resistenza alla corrosione. Le fasi tipiche comprendono lo sgrassaggio, la fosfatazione o la conversione chimica prima della spruzzatura.
La ferramenta può essere aggiunta prima o dopo la verniciatura a polvere?
Se possibile, aggiungere elementi di fissaggio, inserti o dadi PEM dopo il rivestimento, per evitare danni da calore durante l'indurimento. Le filettature devono essere mascherate o post-tagliate per garantire un accoppiamento pulito e funzionale.
Ciao, sono Kevin Lee

Negli ultimi 10 anni mi sono immerso in varie forme di lavorazione della lamiera, condividendo qui le mie esperienze in diverse officine.
Contattate
Kevin Lee
Ho oltre dieci anni di esperienza professionale nella fabbricazione di lamiere, con specializzazione nel taglio laser, nella piegatura, nella saldatura e nelle tecniche di trattamento delle superfici. In qualità di direttore tecnico di Shengen, mi impegno a risolvere sfide produttive complesse e a promuovere innovazione e qualità in ogni progetto.
Risorsa correlata

Acciaio inossidabile resistente alle impronte digitali: come funziona e come sceglierlo

OEM e produzione a contratto: Come scegliere il modello giusto per il vostro progetto

Costo di allestimento e costo unitario nella produzione di lamiere
