Vous avez une idée de produit géniale, mais vous ne savez pas comment la transformer en un véritable prototype en plastique ? En l'absence d'un processus approprié, on perd du temps et de l'argent. Heureusement, une fois que vous connaissez les principales étapes et les choix à faire, le processus devient beaucoup plus facile à gérer. Il existe plusieurs techniques éprouvées pour faire passer votre idée de l'esquisse à la forme physique rapidement et à moindre coût.
Pour fabriquer un prototype en plastique, vous pouvez utiliser plusieurs méthodes telles que l'impression 3D, l'usinage CNC, le moulage par injection,ou le moulage sous vide. Choisissez le processus en fonction de la forme de la pièce, de la quantité et du délai. Commencez par un modèle CAO, sélectionnez un matériau qui correspond à vos besoins d'utilisation finale et travaillez avec un fournisseur ou des outils internes pour produire et affiner la pièce.
Le prototypage peut sembler technique, mais c'est plus facile que vous ne le pensez. Voyons étape par étape comment les pièces en plastique sont fabriquées pour être testées en situation réelle et obtenir un retour d'information.
Qu'est-ce qu'un prototype en plastique ?
Un prototype en plastique est un échantillon de pièce fabriqué en matière plastique. Il représente la forme, la taille et la fonction d'un produit final. Il sert à tester des idées avant de créer des moules coûteux ou de lancer de grandes séries de production. Les prototypes peuvent être bruts ou polis, selon l'étape à laquelle vous vous trouvez. Certains servent à vérifier la forme du produit. D'autres ont un aspect et un fonctionnement proches de ceux du produit final.
Vous pouvez les fabriquer à l'aide de différentes méthodes. Les plus courantes sont l'impression 3D, l'usinage CNC, le moulage par injection, et le moulage sous vide. Chacune a son utilité, en fonction de la forme, de l'objectif et de la quantité de la pièce.
Pourquoi les prototypes en plastique sont-ils importants pour le développement de produits ?
Les prototypes vous permettent d'identifier les défauts de conception avant la production en série. Cela permet de gagner du temps et de l'argent. Vous pouvez tenir la pièce dans votre main, vérifier comment elle s'adapte à d'autres pièces ou voir à quoi elle ressemble.
Ils facilitent également la communication. Il est plus facile d'expliquer votre idée lorsqu'il y a un échantillon sur la table. Les ingénieurs, les concepteurs et les clients peuvent fournir un retour d'information plus efficace lorsqu'ils voient le produit et interagissent avec lui.
L'essai d'un prototype permet également de réduire les risques. Vous pouvez tester les matériaux, la résistance ou la fonction. Si quelque chose ne fonctionne pas, vous pouvez l'ajuster rapidement, avant de dépenser de l'outillage ou de passer des commandes en gros.
Phase de planification et de conception
Commencez par un plan clair. Sachez ce que vous voulez que le prototype montre. Cela permet d'éviter les retouches et de maintenir le processus sur la bonne voie.
Définir l'objectif du prototype
Demandez-vous pourquoi vous avez besoin du prototype. S'agit-il d'un examen visuel, d'un essai d'ajustement ou d'une utilisation fonctionnelle ? Connaître l'objectif permet d'orienter les décisions de conception. Un modèle d'exposition peut être axé sur l'aspect visuel. Un test d'ajustement nécessite une taille précise. Un échantillon fonctionnel doit être capable de supporter des contraintes ou des mouvements.
Création de conceptions CAO et de modèles 3D
Utilisez un logiciel de CAO pour transformer votre idée en un modèle numérique. Ce fichier est à la base de tout le processus de prototypage. Il doit indiquer la taille, la forme et toutes les caractéristiques. Incluez les trous, les courbes et les surfaces clés. Un modèle propre et bien conçu réduit les erreurs et accélère la production.
Choisir la bonne méthode de prototypage
Choisissez la méthode qui répond le mieux à vos besoins. Pour des échantillons rapides et peu coûteux, envisagez l'impression 3D. Pour des pièces de haute précision, optez pour l'usinage CNC. Pour les petites séries avec des détails fins, le moulage sous vide peut être une meilleure option. Adaptez le processus à l'objectif, au matériau et au budget.
Comment réaliser un prototype en plastique ?
Il existe plusieurs méthodes pour créer des prototypes en plastique. Chacune d'entre elles répond à des besoins spécifiques. Vous trouverez ci-dessous les quatre méthodes les plus courantes, ainsi que leurs avantages.
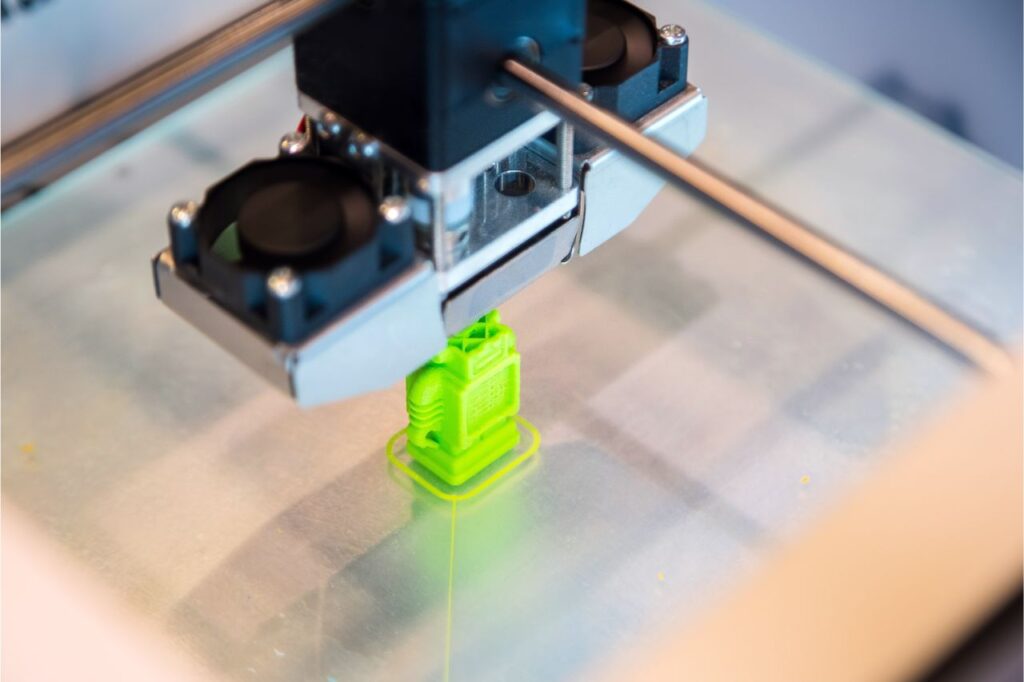
Impression 3D pour les prototypes en plastique
impression en 3D construit des pièces couche par couche. C'est une méthode rapide, rentable et idéale pour les échantillons en phase de démarrage. Vous n'avez pas besoin de moules. Vous pouvez convertir un fichier CAO en une pièce en quelques heures seulement.
FDM (Fused Deposition Modeling)
FDM est la méthode d'impression 3D la plus courante. Elle consiste à faire fondre du filament plastique et à le déposer couche par couche. Elle convient pour les pièces simples et les maquettes grossières. La FDM est peu coûteuse et rapide, mais la surface peut nécessiter un travail supplémentaire.
SLA (stéréolithographie)
Le SLA utilise un laser pour polymériser la résine liquide en formes solides. Elle permet d'obtenir des surfaces lisses et des détails fins. Cette méthode est excellente pour les modèles visuels. Cependant, les pièces SLA peuvent être fragiles et ne sont pas idéales pour les tests de résistance à la charge.
SLS (frittage sélectif par laser)
Le SLS utilise un laser pour fusionner de la poudre de plastique. Elle permet de créer des pièces solides et complexes sans structure de support. Elle convient parfaitement aux essais d'ajustement et à l'utilisation fonctionnelle. La surface présente une finition granuleuse, qui peut être améliorée ultérieurement.
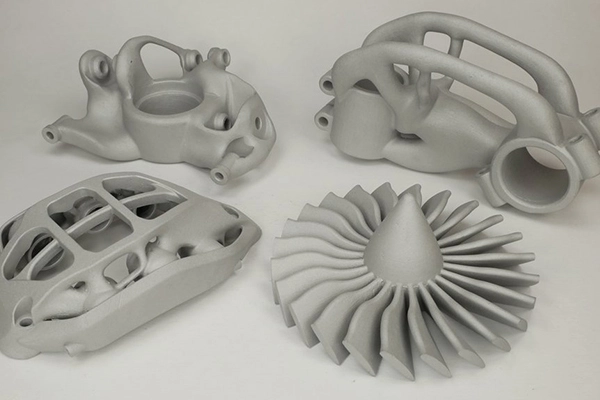
Usinage CNC de prototypes en plastique
Usinage CNC enlève la matière d'un bloc de plastique solide. Il permet d'obtenir une grande précision, des tolérances étroites et un bon état de surface. C'est la meilleure solution lorsque les pièces doivent être solides ou que leur taille doit être contrôlée de près.
Plastiques adaptés à l'usinage CNC
Les plastiques courants sont l'ABS, le nylon, le POM (également connu sous le nom de Delrin), l'acrylique et le polycarbonate. Chacun d'entre eux possède des propriétés différentes. L'ABS est un matériau robuste et facile à usiner. Le nylon est adapté à l'usure. L'acrylique est transparent. Le polycarbonate est résistant aux chocs.
Capacités en matière de tolérance et d'état de surface
L'usinage CNC offre des tolérances serrées, souvent de l'ordre de ±0,05 mm. Vous obtenez des arêtes nettes et des surfaces lisses, en particulier avec des outils de coupe fine. Cette méthode fonctionne bien lorsque les pièces doivent s'ajuster exactement ou doivent correspondre à la qualité d'utilisation finale.
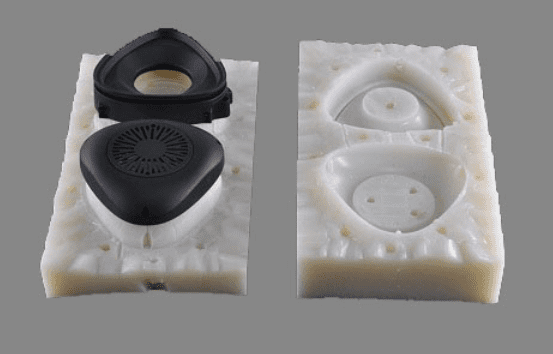
Coulée sous vide pour les prototypes en plastique
Coulée sous vide utilise des moules en silicone pour produire de petits lots de pièces en plastique. C'est une méthode efficace lorsque vous avez besoin de plusieurs échantillons qui ressemblent étroitement au produit final.
Création de moules en silicone à partir de modèles de référence
Tout d'abord, vous avez besoin d'un modèle principal. Celui-ci est généralement réalisé par impression 3D ou par usinage CNC. Le silicone est ensuite coulé autour du modèle pour créer le moule. Après durcissement, le modèle est retiré. Le moule est maintenant prêt à couler des pièces en plastique à l'aide de polyuréthane liquide ou de matériaux similaires.
Ces moules peuvent produire environ 15 à 25 pièces avant de s'user. Le processus est simple, rapide et fonctionne pour les pièces transparentes, colorées ou en caoutchouc.
Quand et pourquoi utiliser la coulée sous vide?
Utilisez le moulage sous vide lorsque vous avez besoin de petites séries de prototypes qui imitent les pièces de production. C'est la solution idéale pour la validation de la conception, les modèles d'exposition ou les premiers échantillons de commercialisation. Les pièces présentent une bonne finition de surface et des détails précis. Vous pouvez également tester l'ajustement et la fonction avant de passer à un outillage complexe.
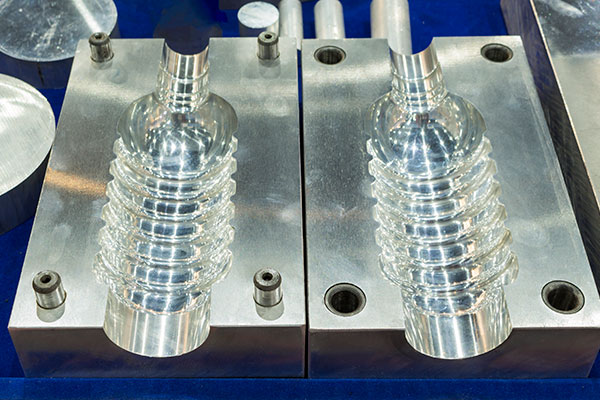
Moulage par injection pour les prototypes
Moulage par injection est souvent utilisé pour la production à grande échelle. Mais avec l'outillage doux, c'est également possible pour le prototypage. Il est plus lent et plus coûteux à mettre en place, mais il permet d'obtenir des résultats au niveau de la production.
Outillage souple et outillage dur
L'outillage souple utilise des moules en aluminium ou en acier de qualité inférieure. Il est plus rapide et moins coûteux à fabriquer que l'outillage complexe. Ces moules ne durent pas aussi longtemps, mais ils sont suffisants pour le prototypage ou les petites séries. L'outillage complexe utilise de l'acier trempé et est conçu pour la production en grande série. Il n'est pas pratique pour les premiers stades du prototypage en raison de son coût élevé et de son long délai d'exécution.
Scénarios idéaux pour l'utilisation du moulage par injection dans le prototypage
Choisissez le moulage par injection si vous avez besoin de dizaines ou de centaines de pièces de haute qualité correspondant à des produits d'utilisation finale. C'est la meilleure solution pour tester la fonction, l'assemblage ou les réactions des clients. Il est également utile lorsque votre équipe souhaite valider la conception du moule avant la production en série.
Sélection des matériaux pour les prototypes en plastique
Le choix du bon matériau plastique influe sur l'aspect, la sensation et les performances de votre prototype. Choisissez en fonction de la résistance, de la flexibilité, de l'état de surface et de votre budget.
Matières plastiques courantes et leurs propriétés
- abdos: Robuste, facile à usiner et peu coûteux. Il convient aux pièces mécaniques.
- PLA: Courant dans l'impression 3D FDM. Facile à imprimer mais fragile.
- Nylon: Solide, flexible et résistant à l'usure. Utilisé pour les engrenages et les charnières.
- Polycarbonate (PC): Très solide et résistant aux chocs. Il convient parfaitement aux pièces transparentes ou résistantes.
- Acrylique (PMMA): Transparent, rigide et brillant. Idéal pour les pièces d'exposition.
- POM (Delrin): Lisse, solide et résistant à l'usure. Utilisé pour les pièces à contact mobile.
- TPU: Souple et semblable à du caoutchouc. Il convient pour les pièces souples, telles que les joints ou les poignées.
Chaque matériau se comporte différemment sous l'effet de la chaleur, de la pression et de l'usure. Certains sont mieux adaptés aux pièces d'exposition. D'autres sont conçus pour tester la force ou le mouvement.
Comment choisir en fonction de la durabilité, de la flexibilité et du coût?
Commencez par réfléchir à ce que le prototype doit faire. S'il doit se plier, choisissez le TPU ou le nylon. S'il doit conserver sa forme, optez pour l'ABS ou le polycarbonate. Pour les parties transparentes, choisissez l'acrylique ou le PC.
Pour les premiers essais, des matériaux comme le PLA ou l'ABS conviennent. Pour les tests fonctionnels ou les échantillons de vente, il est plus judicieux d'utiliser des plastiques plus résistants ou plus attrayants sur le plan visuel.
Test et validation de votre prototype en plastique
Une fois le prototype terminé, il est temps de tester ses performances. Cette étape permet de confirmer la conception ou d'apporter les modifications nécessaires avant la production.
Tests fonctionnels de performance
Tester le fonctionnement du prototype en situation réelle. Vérifiez la solidité, le mouvement et l'adaptation aux autres pièces. S'il craque, vacille ou se casse, prenez des notes. Essayez de répéter l'action pour voir si elle tient le coup. Assurez-vous que toutes les fonctions clés fonctionnent comme prévu. Cela permet d'éviter des problèmes plus importants par la suite.
Évaluation esthétique et ergonomique
Observez la surface, la couleur et la forme. Tenez la pièce. Voyez la sensation qu'elle procure. Demandez si elle est confortable à utiliser ou facile à tenir. Vérifiez s'il correspond à votre concept. Pour les produits de consommation, cette étape est cruciale. Une pièce qui semble gênante peut nécessiter un changement de forme ou de taille.
Recueillir des informations pour les itérations
Permettre à d'autres personnes de voir et d'utiliser le prototype. Demandez l'avis d'ingénieurs, de concepteurs ou d'utilisateurs. Posez des questions claires. Qu'est-ce qui fonctionne ? Qu'est-ce qui ne fonctionne pas ? Recueillez les commentaires et ajustez la conception. Parfois, même de petits changements peuvent faire une grande différence.
Considérations clés pour le prototypage en plastique
Avant de réaliser un prototype, réfléchissez à quelques points clés. Ils guideront vos choix et vous permettront d'éviter les retards et les gaspillages.
Sélection des matériaux
Le matériau influe sur la résistance, l'aspect et le coût. Adaptez-le à l'utilisation de la pièce. Souple ou rigide ? Transparent ou opaque ? Utilisation légère ou portante ? Choisissez celui qui convient le mieux.
Complexité de la conception
Les formes complexes peuvent nécessiter des méthodes spéciales. Les conceptions simples sont délicates pour le FDM ou la CNC. Les pièces complexes avec des courbes ou des contre-dépouilles conviennent mieux aux méthodes SLA, SLS ou au moulage sous vide. Veuillez noter que les conceptions plus complexes peuvent augmenter le prix et le délai de réalisation.
Exigences de tolérance
Certaines pièces nécessitent un contrôle strict de la taille. D'autres non. Si la pièce est compatible avec d'autres, une tolérance serrée est importante. L'usinage CNC offre le meilleur contrôle. L'impression 3D et le moulage ont des limites. Choisissez en fonction du niveau de précision requis pour la pièce.
Temps et budget
Les délais courts peuvent limiter vos options. Les techniques FDM et SLA sont rapides et bon marché pour les premiers modèles. La CNC et le moulage prennent plus de temps, mais ils produisent une meilleure qualité. Trouvez un équilibre entre ce dont vous avez besoin et ce que vous pouvez dépenser.
Utilisation finale
Demandez à quoi servira le prototype. Sera-t-il montré à un client ? Testé sur le plan fonctionnel ? Utilisé dans le cadre d'une démonstration ? Cette réponse vous aidera à choisir la méthode, le matériau et la finition. Certaines pièces doivent être esthétiques. D'autres doivent fonctionner comme les vraies.
Conclusion
La réalisation d'un prototype en plastique ne doit pas être complexe. Commencez par définir l'objectif, puis créez un modèle CAO clair. Choisissez la bonne méthode - impression 3D, usinage CNC, moulage sous vide ou moulage par injection - en fonction de l'utilisation, des détails et de la quantité de la pièce. Sélectionnez les matériaux qui répondent à vos exigences en matière de résistance, d'apparence et de budget.
Vous avez besoin d'aide pour choisir la méthode ou le matériau de prototypage approprié ? Faites-nous part de votre dessin ou de votre idée-Nous vous répondrons rapidement avec des conseils d'experts et un devis gratuit.
Hey, je suis Kevin Lee

Au cours des dix dernières années, j'ai été immergé dans diverses formes de fabrication de tôles, partageant ici des idées intéressantes tirées de mes expériences dans divers ateliers.
Prendre contact
Kevin Lee
J'ai plus de dix ans d'expérience professionnelle dans la fabrication de tôles, avec une spécialisation dans la découpe au laser, le pliage, le soudage et les techniques de traitement de surface. En tant que directeur technique chez Shengen, je m'engage à résoudre des problèmes de fabrication complexes et à favoriser l'innovation et la qualité dans chaque projet.
Ressources connexes

Acier inoxydable résistant aux empreintes digitales : comment fonctionne-t-il et comment le choisir ?

OEM ou fabrication en sous-traitance : Comment choisir le bon modèle pour votre projet

Coûts d'installation et coûts unitaires dans la fabrication de tôles
