Chaque projet a besoin de filets solides et fiables. Pourtant, de nombreuses équipes luttent pour conserver la précision et la cohérence qu'exige l'usinage de précision. Si vous voulez créer des filetages parfaits à chaque fois, vous devez comprendre les principes de base du taraudage. Vous devez également connaître les outils et les meilleures méthodes à suivre pour obtenir des résultats propres et précis.
Vous voulez cesser de commettre des erreurs de taraudage courantes ? Continuez à lire pour apprendre les étapes et les conseils qui vous aideront à réussir.
Qu'est-ce que le taraudage ?
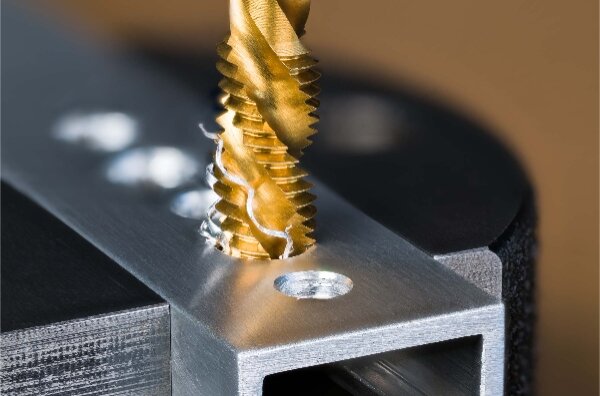
Le taraudage consiste à couper des filets à l'intérieur d'un trou à l'aide d'un taraud. Le taraud possède des arêtes de coupe adaptées au profil du filet. Lorsqu'il tourne dans un trou percé, il enlève les rainures pour former une trajectoire filetée.
Le taraudage est utilisé lorsqu'un composant doit recevoir un élément de fixation, tel qu'une vis ou un boulon. Le résultat est une connexion sûre et réutilisable. Le taraudage peut être effectué à la main ou à la machine. Le taraudage manuel est plus lent mais idéal pour les petites séries. Taraudage CNC est rapide, précis et adapté à la production en grande quantité.
Filets internes et externes
Il existe deux types de filets : les filets internes et les filets externes.
- Filets internes sont coupés à l'intérieur d'un trou. Ils sont réalisés à l'aide d'un taraud. On les trouve dans des pièces telles que les supports, les boîtiers et les carters d'engrenage.
- Filets externes sont coupés autour de l'extérieur d'un cylindre. Ils sont réalisés à l'aide d'une filière ou d'un outil de filetage sur un tour. Les boulons, les vis et les goujons ont tous un filetage extérieur.
Normes relatives au fil conducteur
Les normes de filetage permettent de s'assurer que les pièces fabriquées dans différents ateliers ou pays s'emboîtent les unes dans les autres. Voici les normes les plus courantes :
- Métrique (ISO) : Mesuré en millimètres. Commun dans le monde entier. Une taille typique peut être M6 × 1,0.
- unifié (UNC/UNF) : Utilisé principalement aux États-Unis et mesuré en pouces. UNC correspond à un filetage grossier ; UNF à un filetage fin. Exemple : ¼"-20 UNC.
- BSP (British Standard Pipe) : Utilisé pour l'étanchéité des filetages de tuyaux. Courant dans la plomberie et les systèmes de fluides.
- NPT (National Pipe Thread) : Filets coniques pour une étanchéité parfaite dans les systèmes de tuyauterie. Largement utilisé aux Etats-Unis.
Terminologie et géométrie des fils
Connaître les termes du fil permet de travailler avec plus de précision. Voici quelques notions de base :
- Diamètre principal : Le diamètre extérieur du filet.
- Diamètre mineur : Le diamètre à la base de la rainure du filet.
- Pas: La distance d'un fil à l'autre. Un pas plus petit = un fil plus fin.
- Diriger : La distance à laquelle un fil avance en un tour. Identique au pas dans les filetages à départ simple.
- Angle du fil : L'angle entre les côtés du filetage. L'angle le plus courant est de 60° pour les filetages métriques et unifiés.
Types de méthodes de taraudage
Le choix de la bonne méthode de taraudage dépend de vos besoins en termes de configuration, de matériau et de volume. Vous trouverez ci-dessous les types de taraudage les plus utilisés, chacun présentant des avantages et des inconvénients différents.
Taraudage manuel
Le taraudage manuel est la méthode la plus élémentaire. Elle utilise une clé à tarauder et un jeu de tarauds, généralement en trois étapes : conique, bouchon et fond.
Cette méthode est lente mais très flexible. Elle est idéale pour les petits travaux, les réparations ou lorsque les outils électriques ne peuvent pas atteindre la pièce. Elle fonctionne bien sur les matériaux plus tendres comme l'aluminium ou l'acier doux.
Cependant, il est facile de désaligner le taraud et il y a un risque de rupture si vous ne faites pas attention à la force ou à l'élimination des copeaux. Il est également moins précis en ce qui concerne la profondeur et la régularité du filetage.
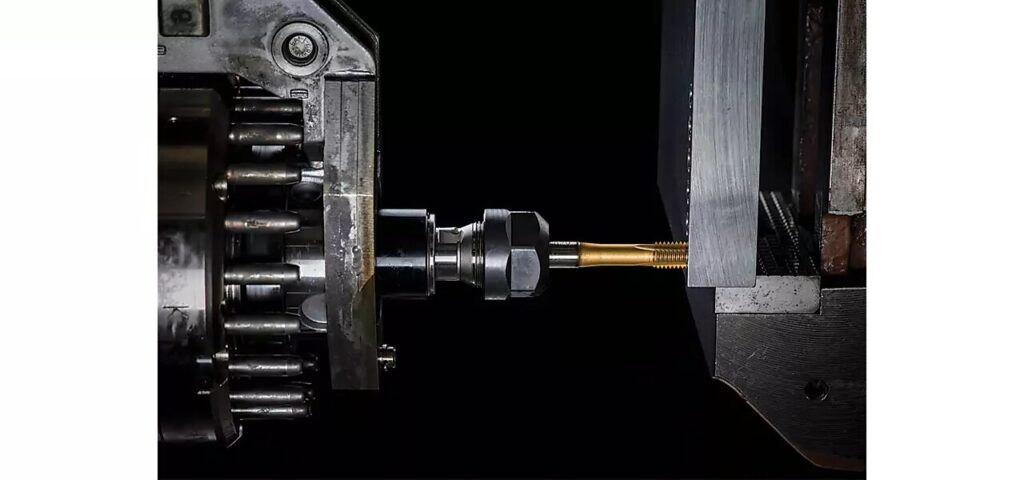
Taraudage à la machine
Le taraudage mécanique utilise un équipement motorisé tel qu'une perceuse à colonne, une tête de taraudage ou une machine à commande numérique. Le taraud tourne et s'introduit automatiquement dans le trou.
Cette méthode est plus rapide, plus cohérente et meilleure pour la production. Il est également plus facile de contrôler la vitesse d'avance et la profondeur. Le taraudage à la machine réduit les erreurs de l'opérateur et permet des tolérances plus étroites.
La plupart des ateliers utilisent cette méthode pour les travaux de volume moyen à élevé. Elle permet également de traiter des matériaux plus résistants avec une lubrification et une vitesse de coupe adéquates.
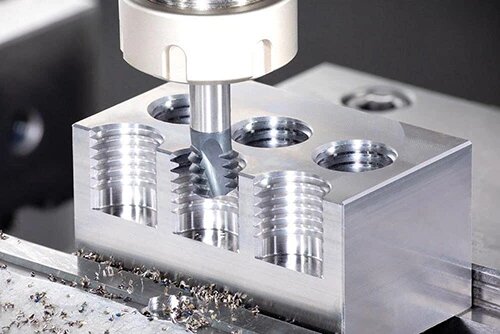
Taraudage de forme (taraudage par roulage) et taraudage par coupe
Il existe deux méthodes principales pour créer des fils : la coupe et le formage.
- Couper le taraudage enlève de la matière pour créer des filets. Elle fonctionne sur la plupart des métaux et constitue la norme pour de nombreux travaux. Elle produit des copeaux, il est donc essentiel de bien les enlever.
- Taraudage de la forme (taraudage par roulage) déplace la matière plutôt que de la couper. Il nécessite des métaux ductiles comme l'aluminium ou l'acier doux. Il permet d'obtenir des filetages plus résistants, car le flux des grains n'est pas interrompu.
Le taraudage de forme ne crée pas de copeaux. Il réduit également l'usure du taraud et améliore l'état de surface. Mais il nécessite une taille de trou précise et un couple plus élevé.
Taraudage rigide ou flottant
Ils se réfèrent à la manière dont le taraud est tenu et déplacé pendant le taraudage de la machine.
- Taraudage rigide bloque le porte-taraud sur la broche. L'avance et la vitesse de la broche sont synchronisées. Cette méthode permet d'obtenir une grande précision et est souvent utilisée dans les machines à commande numérique.
- Taraudage flottant utilise un porte-taraud avec un mouvement axial ou radial. Il permet un léger désalignement ou une variation de l'avance. Cette méthode est préférable pour les machines plus anciennes ou les installations manuelles.
Le taraudage rigide est plus rapide et plus précis, mais il nécessite un alignement parfait. Le taraudage flottant est plus tolérant et permet de protéger le taraud contre la casse.
Outils et équipements de taraudage
La réussite du taraudage dépend de l'utilisation des bons outils. Différents tarauds, matériaux et supports conviennent à différents travaux. Cette section explique ce qu'il faut utiliser et pourquoi c'est important.
Types de robinets
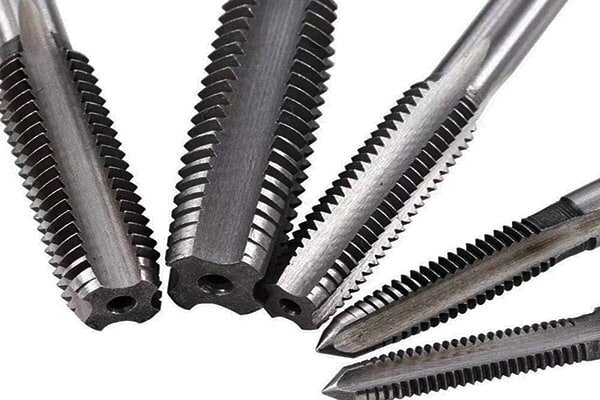
Il existe trois types de tarauds, chacun ayant une pointe et une trajectoire de copeaux différentes. Ces types sont souvent utilisés par étapes pour un meilleur contrôle et des filetages plus nets :
- Taraud conique : Il a une longue entrée en matière avec environ 8 à 10 fils qui se coupent progressivement. Il démarre facilement et se centre bien. Idéal pour commencer les trous à la main ou pour les matériaux souples.
- Plug Tap : Il s'agit d'un chanfrein de longueur moyenne avec une coupe de 3 à 5 filets. C'est le type le plus courant et il permet d'équilibrer la facilité de démarrage avec le filetage en profondeur.
- Bottoming Tap (robinet à bascule) : Il n'y a pratiquement pas d'amorce, juste 1 à 1,5 filets. Il est conçu pour être enfilé au fond des trous borgnes. Généralement utilisé en dernier lieu après qu'un taraud conique ou un taraud à bouchon ait entamé le filetage.
Matériaux de robinetterie et revêtements pour différentes pièces à usiner
Le matériau de base et le revêtement du robinet influent sur les performances, l'usure et la durabilité. Voici un aperçu des choix les plus courants :
- Acier rapide (HSS) : Abordable et adapté à un usage général sur les métaux tendres à moyens comme l'aluminium, le laiton ou l'acier doux.
- Acier au cobalt : Plus résistante que l'acier rapide. Meilleur pour les matériaux plus durs comme l'acier inoxydable ou la fonte. Résiste mieux à la chaleur et aux contraintes.
- Carbure: Très dur et résistant à l'usure. Il convient mieux aux installations rigides et au taraudage à grande vitesse de matériaux abrasifs ou résistants. Il est également fragile et n'est donc pas idéal pour le taraudage à la main.
Revêtements courants:
- TiN (nitrure de titane) : Réduit l'usure, diminue le frottement et augmente la durée de vie du taraud.
- TiCN (carbonitrure de titane) : Plus solide et plus résistant à la chaleur que le TiN.
- TiAlN (nitrure de titane et d'aluminium) : Idéal pour le taraudage à sec et à grande vitesse d'alliages résistants.
Porte-tarauds, mandrins et adaptateurs
Les porte-tarauds maintiennent le taraud aligné et lui permettent de tourner en douceur. Le type de porte-taraud a une incidence sur la précision, la durée de vie de l'outil et la sécurité.
- Porte-tarauds rigides : Utilisé dans les machines à alimentation synchronisée. Idéal pour le taraudage CNC. Permet un contrôle précis de la profondeur et de l'alignement.
- Porte-tapis flottants : Permettent un léger mouvement. Permet d'éviter la rupture du taraud en cas de désalignement. Utile pour les machines manuelles ou anciennes.
- Porte-tarauds à changement rapide : Gagner du temps lors de la configuration ou des travaux en plusieurs parties. Réduisez les temps d'arrêt en production.
Préparation du taraudage
Un bon taraudage commence avant même que le taraud ne touche la pièce. Une planification et une préparation adéquates rendent le taraudage plus facile, plus sûr et plus précis. Cette section traite du choix des bonnes tailles et de l'installation correcte.
Sélection de la taille de taraud et de la taille de perçage correctes
Avant de tarauder, vous devez adapter la taille du taraud au filetage souhaité. Ensuite, choisissez la bonne taille de mèche pour réaliser le trou.
La taille du taraud est fonction de la vis ou du boulon qui entrera dans le trou. Par exemple, un taraud ¼"-20 UNC est utilisé pour une vis de ¼" avec 20 filets par pouce.
Chaque taraud nécessite une taille de perçage spécifique. Si le trou est trop petit, le taraud risque de se casser. S'il est trop grand, les filets ne s'accrocheront pas bien.
Des graphiques sont largement disponibles, mais voici deux exemples courants :
- ¼"-20 UNC a besoin d'un Mèche #7 (0.201″)
- M6 × 1.0 a besoin d'un Foret de 5,0 mm.
Vérifiez toujours le type de taraud et le matériau avant de déterminer la taille du foret.
Calcul du diamètre de perçage du taraud en fonction des spécifications du filetage
Si vous n'avez pas de tableau à portée de main, vous pouvez également calculer la taille du taraud. Voici comment procéder :
Pour les filetages métriques :
- Taille du foret = Diamètre principal - Pas du filetage
- Exemple : M10 × 1,5 → 10 - 1,5 = 8,5 mm de foret
Pour les filetages en pouces :
- Taille du foret = diamètre principal - (1 ÷ filets par pouce)
- Exemple : ½"-13 → 0,5 - (1 ÷ 13) = 0,423″ foret
Cela donne un engagement du filetage d'environ 75%, ce qui est bon pour la plupart des applications.
Augmentez légèrement la taille pour les matériaux durs ou les tarauds difficiles. Ne choisissez un diamètre inférieur que si vous avez besoin d'une résistance maximale et que le couple de taraudage n'est pas un problème.
Préparation de la pièce et alignement des trous
Des trous nets et précis rendent le taraudage plus fluide et plus sûr.
- Ébavurage du trou pour éliminer les arêtes vives.
- Chanfreiner l'ouverture légèrement. Cela permet au robinet de démarrer en ligne droite.
- Vérifier la profondeur du trou pour les trous borgnes. Laissez suffisamment d'espace pour la pointe du taraud et les copeaux.
- Aligner le robinet avec le centre du trou. Un mauvais alignement peut casser le taraud ou dénuder les filets.
Démarrez le robinet en exerçant une légère pression et tournez-le lentement si vous le faites à la main. Veillez à ce que le taraud soit bien d'équerre par rapport à la surface. Pour le taraudage à la machine, confirmez l'alignement de la broche avant de commencer.
Processus de taraudage étape par étape
Chaque étape du processus de taraudage est importante. Se précipiter ou sauter des étapes peut conduire à des tarauds cassés, à des filetages défectueux ou à des pièces mises au rebut. Voici comment procéder correctement, du début à la fin.
Marquage et perçage du trou
Commencez par marquer clairement l'emplacement du trou. Utilisez un poinçon de centrage pour guider la mèche. Cela permet d'éviter que la perceuse ne se déplace, en particulier sur des surfaces dures ou lisses.
Choisissez le bon foret pour votre robinet. Pour une meilleure précision, utilisez une perceuse à colonne ou une machine à commande numérique. Si vous percez à la main, maintenez la mèche droite et exercez une pression constante.
Percez à la profondeur appropriée. Pour les trous borgnes, prévoir un espace supplémentaire au fond pour les copeaux et la pointe du taraud. Après le perçage, nettoyez le trou. Enlevez les bavures ou les copeaux qui pourraient gêner le taraud.
Alignement et démarrage du robinet
Placez soigneusement le robinet dans le trou. Veillez à ce qu'il soit parfaitement vertical (ou dans l'axe du trou s'il est incliné).
Pour le taraudage manuel, utilisez un guide de taraudage ou une équerre pour vérifier l'alignement. Appliquez une légère pression et tournez le taraud lentement au début. Il devrait commencer à couper de lui-même.
Arrêtez si vous avez l'impression que le taraud force trop tout de suite. Vérifiez la taille du trou ou essayez un taraud conique pour faciliter le démarrage.
Avancer, éliminer les jetons et maintenir la précision
Une fois le taraud engagé, continuez à tourner lentement et régulièrement. Pour le taraudage manuel, tournez d'environ un demi-tour vers l'avant, puis d'un quart de tour vers l'arrière. Cela permet de briser et de dégager les copeaux.
Utilisez un liquide de coupe pour réduire la friction et prolonger la durée de vie de l'outil. Il permet également de garder les filetages lisses et propres. Vérifiez régulièrement que le taraud reste aligné. Même une légère inclinaison peut entraîner des filetages de travers ou la rupture du taraud.
Lors du taraudage à la machine, veillez à ce que la vitesse d'avance corresponde au pas du filet. Utilisez des porte-outils appropriés pour maintenir la rectitude.
Casser la puce et éviter les blocages
Utilisez la méthode du retournement (un demi-tour vers l'avant, un quart de tour vers l'arrière) pour briser les copeaux lorsque vous tapez à la main.
Le taraudage par piquage peut aider à tarauder à la machine. Il s'agit de rétracter le taraud après quelques tours pour dégager les copeaux avant de continuer.
L'accumulation de copeaux n'est pas un problème pour les tarauds de forme, mais un couple élevé l'est. Utilisez suffisamment de lubrifiant et réglez la machine correctement pour éviter les blocages.
Facteurs affectant la qualité du fil
Un bon filetage ne dépend pas seulement d'un taraudage bien aiguisé. De nombreuses variables influent sur la propreté, la solidité et la régularité des filetages. Examinons les principales d'entre elles.
Propriétés des matériaux et dureté
Certains métaux sont plus faciles à tarauder que d'autres.
- Matériaux souples comme l'aluminium et le laiton se taraudent facilement mais peuvent se déchirer si le taraud est émoussé.
- Matériaux plus durs comme l'acier inoxydable, le titane ou les aciers à outils nécessitent un couple plus important et usent les tarauds plus rapidement.
- Matériaux fragiles comme la fonte produisent des copeaux fins mais peuvent se fissurer sous l'effet de la contrainte.
Une dureté élevée augmente l'usure de l'outil. Une faible ductilité augmente le risque d'écaillage ou de mauvaise forme du filetage. Il faut toujours adapter le type de taraud et le revêtement au matériau à tarauder.
Notez également que les pièces traitées thermiquement sont plus difficiles à tarauder. Le pré-perçage avant le traitement thermique peut être un meilleur choix pour ces pièces.
Géométrie du taraud et état de l'arête de coupe
La forme du robinet et l'état de ses arêtes de coupe sont très importants.
- Les tarauds à goujures hélicoïdales aident à extraire les copeaux des trous borgnes.
- Les goujures droites conviennent bien pour les trous de passage et les coupes courtes.
- Les tarauds à pointe hélicoïdale poussent les copeaux vers l'avant, ce qui est idéal pour tarauder des trous à la machine.
Les tarauds usés entraînent des filetages de mauvaise qualité, un couple élevé et un risque de rupture. Les arêtes de coupe émoussées salissent le matériau au lieu de le cisailler proprement.
Inspectez souvent les tarauds, en particulier dans les séries de production. Remplacez-les dès les premiers signes d'usure ou de finition rugueuse du filetage.
Liquide de refroidissement, lubrification et évacuation des copeaux
La lubrification permet de contrôler la chaleur et de réduire les frottements. Elle rend également les filetages plus propres et améliore la durée de vie des tarauds.
- Utiliser de l'huile de coupe pour le taraudage à la main ou pour les petites séries.
- Utilisez un liquide de refroidissement synthétique ou soluble dans l'eau pour le taraudage à commande numérique ou à grande vitesse.
- Appliquer suffisamment de liquide pour recouvrir le robinet et éliminer les copeaux.
L'élimination des copeaux est tout aussi importante. Les copeaux laissés dans le trou peuvent obstruer les cannelures, bloquer le taraud ou endommager les filets. Utilisez de l'air comprimé ou un taraud équipé d'un dispositif de contrôle des copeaux si nécessaire.
Pour les trous profonds ou borgnes, reculez périodiquement le taraud ou utilisez un taraud à goujure hélicoïdale conçu pour l'évacuation des copeaux.
Problèmes courants dans le taraudage
Même s'il est planifié, le taraudage peut mal tourner. Les problèmes liés à l'outil, à la configuration ou au matériau se traduisent souvent par des tarauds cassés ou des filetages défectueux. Voici comment reconnaître les problèmes et leurs causes.
Rupture de robinet
Il s'agit de l'un des échecs les plus frustrants en matière d'écoutes.
Causes courantes :
- Utilisation d'un foret de taille incorrecte (trou trop petit)
- Taraudage trop rapide ou avec un couple trop élevé
- Robinet terne ou usé
- Mauvais enlèvement des copeaux
- Désalignement lors du taraudage manuel
- Matériau dur sans lubrification appropriée
Pour éviter cela, vérifiez toujours l'état de votre taraud, utilisez la bonne vitesse d'avance et cassez souvent les copeaux lorsque vous taraudez à la main. Utilisez des supports flottants ou des guides de taraud pour réduire la pression latérale.
Filets surdimensionnés ou sous-dimensionnés
Des filetages trop lâches ou trop serrés peuvent entraîner des problèmes d'ajustement et affaiblir l'assemblage.
Fils surdimensionnés résultent souvent de :
- Utilisation de la mauvaise mèche (trop grande)
- Robinet usé
- Usure excessive du taraud au niveau des arêtes de coupe
Filets surdimensionnés peut se produire en raison de :
- Mèche trop petite
- Un taraud de forme est utilisé sans que la taille du trou ne soit appropriée.
- Mauvais pas de vis ou mauvais taraud
Vérifiez toujours la taille du trou à l'aide d'une jauge et confirmez les spécifications du taraud avant de commencer.
Filetages croisés et désalignement
Le taraudage transversal se produit lorsque le taraud pénètre dans le trou en biais. Il en résulte des filets endommagés et des joints fragiles.
Causes :
- Taraudage sans alignement correct
- Démarrage du taraud sans chanfrein
- Ne pas utiliser de guide ou d'équerre de taraudage
Utilisez un bloc ou un guide pour maintenir le taraud droit pendant les premiers tours de taraudage manuel. Pour le taraudage à la machine, assurez-vous que la broche est bien d'équerre par rapport à la surface du trou.
Mauvais état de surface ou formation de bavures
Les filets rugueux ou les bavures excessives réduisent la résistance des filets et rendent l'assemblage plus difficile.
Cela peut se produire pour les raisons suivantes
- Taraud usé ou arête de coupe ébréchée
- Revêtement ou matériau du robinet inadapté à la tâche
- Manque de lubrification
- Taraudage à grande vitesse sans évacuation correcte des copeaux
Utilisez des tarauds pointus, appliquez suffisamment de liquide de refroidissement et nettoyez et inspectez les filets après le taraudage. Si nécessaire, un ébavurage rapide à l'aide d'une fraise peut nettoyer le trou.
Solutions et meilleures pratiques
Pour réduire les problèmes de taraudage et améliorer la qualité des filets, il faut suivre des méthodes éprouvées. Ces meilleures pratiques permettent d'éviter l'usure des outils, d'améliorer la régularité et de réduire les rebuts.
Sélection correcte des tailles de tarauds et de forets
Il faut toujours faire correspondre la taille du foret à la norme du taraud et du filetage. Utilisez les tableaux de perçage des tarauds ou faites un calcul rapide basé sur le pas de vis.
- Un trou trop petit entraîne des ruptures de robinets.
- Un trou trop grand affaiblit les fils.
Si vous utilisez un taraud de forme, faites encore plus attention à la taille du trou. Le taraudage de forme dépend du déplacement de la matière et non de l'enlèvement des copeaux.
Vérifiez le marquage des outils et confirmez à l'aide d'un pied à coulisse ou d'une jauge en cas de doute. N'essayez pas de deviner.
Contrôle correct de la vitesse, de l'avance et de la profondeur
Utiliser la vitesse de coupe adaptée au matériau. Une vitesse trop élevée entraîne une augmentation de la chaleur. Une vitesse trop lente rend les filets rugueux.
Par exemple :
- Aluminium : vitesse élevée, faible couple
- Acier inoxydable : vitesse plus faible, couple plus élevé
Sur les machines à commande numérique, il convient de régler la vitesse de rotation et l'avance en fonction du pas de filetage. Pour le taraudage rigide, la broche et l'avance doivent rester synchronisées.
Évitez la suralimentation. Descendez juste assez profondément pour que le fil ait toute sa longueur, puis arrêtez. Pour les trous borgnes, prévoyez un espace pour les copeaux au fond.
Techniques de lubrification pour différents matériaux
Utilisez du liquide de coupe pour réduire les frottements, refroidir l'outil et éliminer les copeaux.
- Aluminium : Utiliser une huile de coupe légère ou un liquide de refroidissement en brouillard
- Acier et inox : Utiliser des huiles de coupe à base de soufre ou à haute pression
- Laiton ou fonte : Généralement sec, mais une huile légère peut aider à prolonger la durée de vie du robinet.
Appliquer le fluide directement sur le robinet, et pas seulement sur le trou. Renouveler l'application pour chaque trou dans le cas d'un travail manuel. Pour les installations à commande numérique, utilisez du liquide de refroidissement par inondation ou à travers le taraud si vous en disposez.
Inspection et entretien périodiques des outils
Vérifiez régulièrement que les robinets ne présentent pas de signes d'usure, d'écaillage ou de ternissement. Les tarauds usés rendent les filets rugueux et augmentent le risque de rupture. Nettoyez les tarauds après utilisation. Retirez les copeaux coincés dans les cannelures. Rangez-les dans des supports étiquetés pour éviter les mélanges et protéger les arêtes de coupe.
Remplacez les tarauds en fonction du nombre de filets, et pas seulement au toucher. En production, suivez la durée de vie de l'outil pour éviter les défaillances inattendues. Inspectez toujours les pièces filetées à l'aide de jauges pour confirmer la qualité. Détecter rapidement les problèmes avant qu'ils n'affectent d'autres pièces.
Conclusion
Le taraudage est une étape clé de l'usinage de précision. Du choix de la taille du taraud et du foret à la maîtrise de la vitesse, de l'avance et de la lubrification, chaque détail influe sur la qualité du filetage final. Une bonne préparation, une technique et des outils propres permettent d'éviter les casses, les désalignements et les filetages de mauvaise qualité.
Vous avez besoin de pièces métalliques taraudées sur mesure pour votre prochain projet ? Nous proposons des services de taraudage CNC, de taraudage manuel et de traitement complet des métaux pour répondre aux spécifications de votre projet. Veuillez nous envoyer vos dessins pour obtenir un devis rapide et précis dès aujourd'hui.
Hey, je suis Kevin Lee

Au cours des dix dernières années, j'ai été immergé dans diverses formes de fabrication de tôles, partageant ici des idées intéressantes tirées de mes expériences dans divers ateliers.
Prendre contact
Kevin Lee
J'ai plus de dix ans d'expérience professionnelle dans la fabrication de tôles, avec une spécialisation dans la découpe au laser, le pliage, le soudage et les techniques de traitement de surface. En tant que directeur technique chez Shengen, je m'engage à résoudre des problèmes de fabrication complexes et à favoriser l'innovation et la qualité dans chaque projet.
Ressources connexes

Acier électro-galvanisé : guide de fabrication et de sélection

Poinçonnage ou découpe laser : Coût, vitesse et compromis DFM

Usinage d'angle : Ce qui détermine le coût et la qualité des pièces
