Avez-vous déjà eu du mal à fabriquer des pièces acryliques précises et propres ? Les méthodes traditionnelles produisent souvent des bords irréguliers, des fissures ou des finitions troubles, ce qui entraîne des frustrations et un gaspillage de ressources. L'usinage CNC de l'acrylique résout ces problèmes en fournissant rapidement et efficacement des pièces précises, claires et durables. Cette méthode garantit que vos conceptions sont exactement comme prévu, ce qui vous permet d'économiser du temps et de l'argent.
Si vous êtes novice en matière d'usinage CNC, ce guide explique clairement comment sont créées les pièces usinées en acrylique. Vous en apprendrez rapidement les bases et les avantages, alors continuez à lire pour en savoir plus.
Qu'est-ce que l'usinage CNC de l'acrylique ?
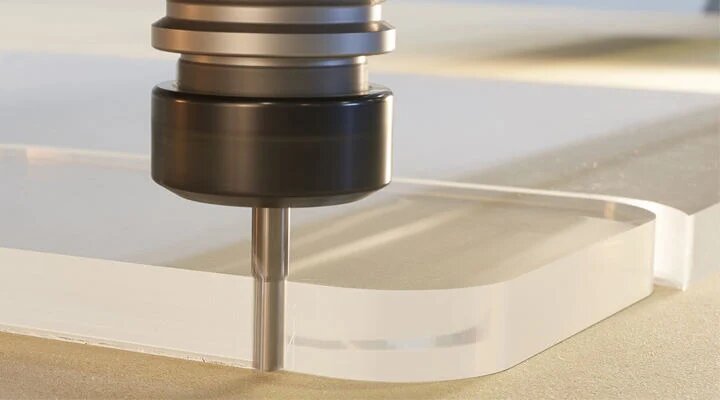
L'usinage CNC de l'acrylique est un processus soustractif. À l'aide d'outils rotatifs à grande vitesse, une machine CNC enlève de la matière d'une feuille d'acrylique solide. La machine suit un fichier de conception numérique pour couper, percer ou fraiser l'acrylique avec précision.
Cette méthode permet de créer des bords lisses, des trous nets et des formes complexes. Elle convient aussi bien aux prototypes qu'aux produits finis. L'acrylique est solide, léger et présente une excellente clarté optique, ce qui en fait un choix populaire.
Pourquoi l'acrylique (PMMA) est-il populaire pour l'usinage ?
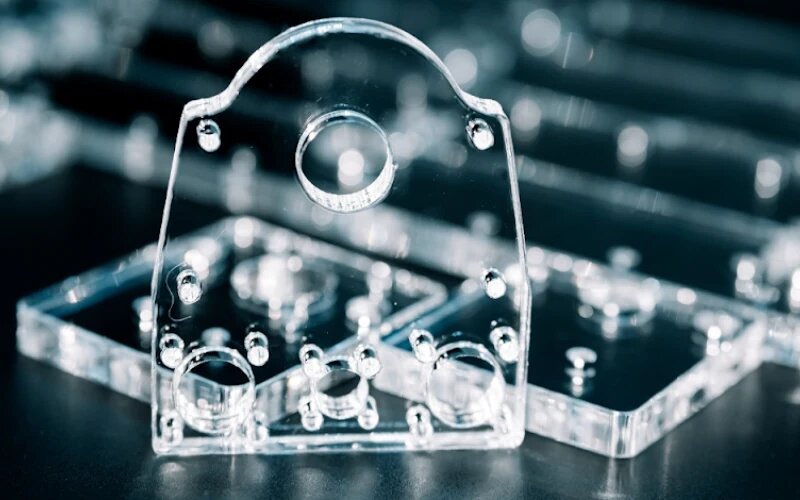
L'acrylique, ou PMMA, est largement utilisé parce qu'il est transparent, résistant et facile à usiner. Il convient aussi bien aux prototypes qu'aux produits finis.
Géométries complexes
L'usinage CNC permet de créer des angles vifs, des coupes détaillées et des tolérances serrées dans l'acrylique. Le matériau conserve bien sa forme et ne se déforme pas facilement pendant la découpe.
Flexibilité
L'acrylique existe en différentes qualités et épaisseurs. Il convient à de nombreux produits, des simples couvercles aux boîtiers de lentilles détaillés. Vous pouvez le fraiser, le percer ou le graver avec précision.
Finition de surface fine
Avec la vitesse et l'outil adéquats, la CNC peut produire des bords lisses et brillants sur l'acrylique. Polissage ou un traitement à la flamme permet d'améliorer encore la finition des pièces visuelles.
Augmentation du taux de production
L'usinage CNC permet d'obtenir des résultats reproductibles avec des temps de cycle rapides. Cela permet de réduire les délais d'exécution et de répondre aux commandes en petites séries ou en grands volumes sans coûts d'outillage supplémentaires.

Types de matériaux acryliques
Il existe plusieurs types de matériaux acryliques, chacun ayant ses points forts. Le choix du bon type de matériau influe sur l'aspect, le toucher et les performances de la pièce.
Acrylique coulé
L'acrylique coulé est plus transparent et plus résistant. Il s'usine proprement et résiste aux fissures, ce qui le rend idéal pour les pièces nécessitant un aspect poli ou des tolérances serrées.
Acrylique extrudé
L'acrylique extrudé est moins cher et plus facile à former. Il présente davantage de variations d'épaisseur et est plus souple que l'acrylique coulé. Il convient bien aux pièces qui ne nécessitent pas une grande précision.
Acrylique de qualité optique
Ce type est utilisé pour les lentilles, les guides de lumière et les couvercles d'affichage. Il offre une transmission élevée de la lumière et une distorsion minimale. Pour conserver sa clarté, il doit être manipulé avec soin pendant l'usinage.
Acrylique modifié pour résister aux chocs
Cet acrylique est plus résistant, ce qui le rend moins susceptible de se fissurer sous l'effet de la contrainte. Il convient aux pièces exposées à des vibrations ou à des manipulations répétées, comme les boîtiers ou les couvercles de sécurité.
Propriétés de l'acrylique relatives à l'usinage CNC
L'acrylique présente des caractéristiques spécifiques qui le rendent adapté au travail sur CNC. En les connaissant, vous pourrez choisir les réglages et les outils adéquats pendant l'usinage.
Résistance aux UV
L'acrylique résiste au jaunissement et à la dégradation sous l'effet de la lumière du soleil, ce qui en fait un bon choix pour les enseignes extérieures, les couvercles et les pièces d'éclairage.
Solidité et rigidité
L'acrylique est solide et conserve bien sa forme. Il ne fléchit pas beaucoup, ce qui permet de maintenir la précision lors de la coupe ou du perçage.
Transparence
L'acrylique offre une transmission élevée de la lumière. Les qualités transparentes ressemblent au verre mais pèsent moins lourd. Avec un usinage et un polissage appropriés, les bords peuvent rester clairs et lisses.
Comportement thermique
L'acrylique se ramollit lorsqu'il est chauffé. Une chaleur trop importante pendant l'usinage peut entraîner une fonte ou une déformation. Des outils bien affûtés et des vitesses contrôlées permettent d'éviter l'accumulation de chaleur.
Résistance chimique
L'acrylique résiste à de nombreux nettoyants et produits chimiques doux. Toutefois, certains solvants peuvent provoquer des fissures ou un voile, d'où l'importance du choix du matériau.
Caractéristiques de l'état de surface
L'acrylique se prête bien au polissage et à la finition au chalumeau. Après l'usinage CNC, il est possible d'obtenir des arêtes et des surfaces lisses et brillantes avec un minimum de travail supplémentaire.
Procédés d'usinage CNC de l'acrylique
Différents procédés d'usinage CNC sont utilisés pour façonner les pièces en acrylique. Chaque procédé présente des caractéristiques uniques et s'avère le plus efficace pour des tâches spécifiques.
Fraisage
Fraisage est un outil de coupe rotatif qui enlève la matière acrylique. Il permet de créer des surfaces planes, des formes complexes, des fentes et des poches. Le fraisage CNC est précis et efficace, permettant un contrôle exact de la profondeur et de la forme.
Tournant
Tournant façonne des pièces rondes en acrylique en faisant tourner le matériau tandis qu'un outil de coupe fixe enlève les couches. Ce procédé est idéal pour les composants cylindriques tels que les tiges, les tubes ou les anneaux. Il permet d'obtenir des surfaces lisses rapidement et avec précision.
Forage
Le perçage permet de créer des trous nets et précis dans les pièces en acrylique. Perçage CNC garantit que les trous sont positionnés exactement comme prévu. Il évite les fissures et l'écaillage, ce qui permet d'obtenir de bons résultats, même pour les trous de petit diamètre.
Gravure
Gravure utilise des outils CNC pour graver des textes ou des motifs précis sur des surfaces acryliques. Ce procédé permet d'obtenir des marquages précis et clairs, faciles à lire. Il est souvent utilisé pour les logos, les étiquettes ou les détails décoratifs sur les produits acryliques.
Coupe
Découpe CNC utilise des outils tels que des fraises ou des lasers pour découper des feuilles d'acrylique en formes précises. Les fraises produisent des bords nets et polis, tandis que les lasers créent rapidement des coupes précises. Les deux méthodes garantissent des résultats lisses et cohérents, idéaux pour les pièces finales ou les prototypes.
")
Considérations de conception pour l'usinage CNC de l'acrylique
Une bonne conception facilite l'usinage et permet d'éviter des problèmes tels que des fissures, un mauvais ajustement ou des pièces fragiles. Ces règles de base permettent de s'assurer que les pièces en acrylique sont bien fabriquées.
Épaisseur de la paroi et support
Les parois minces peuvent se fissurer lors de la coupe ou sous l'effet d'une contrainte. Les parois doivent être suffisamment épaisses pour rester solides - en général, pas moins de 1,5 mm. Ajoutez des nervures ou des structures de soutien si nécessaire. Cela permet d'éviter les déformations ou les ruptures en cours d'utilisation.
Rayons d'angle et arêtes vives
L'acrylique n'aime pas les angles internes aigus. Ajoutez toujours un rayon correspondant à la taille de l'outil. Cela réduit les contraintes et permet à l'outil de se déplacer en douceur. Évitez autant que possible les arêtes vives pour réduire le risque de fissures.
Dimensions des trous et tolérances
L'acrylique peut s'écailler si les trous sont trop petits ou si des tolérances serrées sont appliquées sans précaution. Utilisez des trous légèrement plus grands lorsque c'est possible. Concevez des trous de taille standard et laissez de la place pour l'alésage final si la précision est nécessaire.
Filetage et inserts
Couper des fils directement dans l'acrylique n'est pas idéal. Le matériau peut se décoller ou se fissurer. Pour une meilleure durabilité, utilisez des inserts métalliques filetés. En fonction de la conception de la pièce, les inserts thermofixés ou pressés sont deux bonnes options,
Paramètres d'outillage et de coupe
Lors de l'usinage de l'acrylique, il est essentiel de choisir les bons outils et les bons réglages pour obtenir des pièces propres et précises. L'acrylique est sensible à la chaleur et à la pression, de sorte que même de petites modifications peuvent affecter le résultat.
Outils de coupe
Les meilleurs outils pour l'acrylique sont les fraises à simple cannelure ou les fraises en plastique à cannelure en O. Ces outils éliminent rapidement les copeaux et créent moins de chaleur. Ces outils éliminent rapidement les copeaux et dégagent moins de chaleur, ce qui permet d'éviter la fonte et de conserver des bords lisses. Les outils à double cannelure peuvent également fonctionner si vous avez besoin d'une surface plus fine, mais ils ont besoin de vitesses d'avance plus lentes pour rester froids.
Les outils émoussés doivent toujours être évités. Ils produisent de la chaleur, endommagent les arêtes et peuvent fissurer le matériau. Il est préférable d'utiliser des outils en carbure, car ils restent affûtés plus longtemps et conservent bien leur forme.
Vitesses et alimentations optimales
L'acrylique se découpe mieux avec des vitesses de broche élevées et des vitesses d'avance lentes. La plupart des installations tournent entre 12 000 et 24 000 tr/min, en fonction de la taille de l'outil. Des vitesses d'avance plus faibles permettent de contrôler la taille des copeaux et de réduire la chaleur.
Si l'avance est trop rapide, vous risquez d'obtenir des bords fondus ou rugueux. Veillez également à ce que la profondeur de chaque coupe soit faible. Les coupes profondes peuvent entraîner la fissuration ou la fonte du matériau, en particulier sur les pièces les plus fines.
Utilisation du liquide de refroidissement et décapage à l'air comprimé
Évitez d'utiliser des liquides de refroidissement sur l'acrylique. Les liquides de refroidissement peuvent pénétrer dans le plastique et provoquer des fissures ou des dommages de surface par la suite. Utilisez plutôt de l'air comprimé.
L'air permet de refroidir l'outil et de dégager les copeaux de la trajectoire de coupe. Un flux d'air régulier est un bon moyen de garder le plastique clair et d'éviter les brûlures de l'outil pour les travaux de longue durée ou les pièces de grande taille.
Élimination des copeaux et gestion de la chaleur
Si les copeaux restent dans la coupe, ils sont recoupés et créent de la chaleur. Cela peut endommager la surface et rendre la pièce trouble. Les outils à goujures polies et les machines équipées de systèmes d'aspiration ou d'air sont les plus efficaces pour éliminer les copeaux.
Essayez de maintenir l'outil en mouvement régulier. Si l'outil reste trop longtemps au même endroit, il risque de surchauffer le matériau. Des trajectoires d'outils lisses, avec moins de virages serrés, permettent d'éviter les tensions et l'accumulation de chaleur.
Techniques de finition de surface
Les pièces en acrylique ont souvent besoin d'un aspect lisse et propre, en particulier pour l'affichage ou les utilisations en contact avec la clientèle. Ces méthodes de finition permettent d'améliorer l'aspect et la fonction.
Polissage (flamme, vapeur, mécanique)
Le polissage rend la surface acrylique transparente et brillante.
- Polissage à la flamme utilise une flamme pour faire fondre et lisser les bords rapidement.
- Polissage à la vapeur utilise des vapeurs chimiques pour adoucir la surface, souvent pour des pièces optiques.
- Polissage mécanique utilise des meules et des pâtes à polir pour obtenir une finition très brillante.
Choisissez en fonction de la clarté nécessaire et de la forme de la pièce.
Méthodes d'ébavurage
L'usinage peut laisser de petites bavures ou des bords rugueux. Utilisez des brosses douces, un grattage manuel ou un léger ponçage pour les éliminer. Cette étape améliore la sécurité et donne à la pièce un aspect propre et fini.
Compatibilité avec les peintures et les revêtements
L'acrylique peut être peint ou enduit si la surface est préparée correctement. Utilisez des revêtements en plastique. Évitez les peintures contenant des solvants qui peuvent provoquer des fissures. La peinture au pistolet fonctionne bien avec les finitions lisses, tandis que le masquage permet d'obtenir des bords nets.
Sérigraphie et impression UV
Sérigraphie est remarquable pour les couleurs unies et les grandes séries. Impression UV imprime des images en couleur et les durcit instantanément à la lumière UV. Les deux options adhèrent bien à l'acrylique et sont souvent utilisées pour les enseignes, les panneaux et les couvertures de marque.
Applications courantes des pièces acryliques CNC
Les pièces acryliques CNC sont utilisées dans de nombreux domaines parce qu'elles sont claires, solides et faciles à façonner. On les trouve dans les produits fonctionnels et décoratifs.
Affichage et signalisation
L'acrylique est transparent, lisse et facile à découper en formes personnalisées. Il est idéal pour les présentoirs, les plaques d'identification, les enseignes de magasin et le matériel de point de vente. L'usinage CNC garantit des bords nets et des finitions propres pour un aspect professionnel.
Dispositifs médicaux
L'acrylique est non toxique et résiste aux produits chimiques, ce qui le rend approprié pour les plateaux médicaux, les protections ou les couvercles d'équipement. Il permet également de voir clairement les instruments ou leur contenu, ce qui est utile dans les laboratoires ou les hôpitaux.
Composants d'éclairage
L'acrylique transmettant bien la lumière, il convient parfaitement aux diffuseurs de lumière, aux lentilles et aux panneaux LED. L'usinage CNC permet de créer des formes précises et des finitions claires sans bloquer ou déformer la lumière.
Prototypes automobiles et aérospatiaux
L'acrylique est souvent utilisé pour les pièces transparentes lors des premières étapes de la conception. Les ingénieurs l'utilisent pour les caches de phares, les panneaux de tableau de bord ou les modèles de flux d'air. L'acrylique est rapide à usiner et permet de voir clairement les détails les plus fins.
Boîtiers pour l'électronique grand public
L'acrylique peut être façonné en housses de protection ou en étuis pour téléphones, tablettes ou panneaux de commande. Il est esthétique, conserve sa forme et donne une impression de haut de gamme. L'usinage CNC garantit que toutes les découpes et caractéristiques sont placées avec précision.

Découpe CNC ou découpe laser pour l'acrylique
La découpe CNC et la découpe laser peuvent façonner l'acrylique, mais chacune a ses points forts. Le choix de la bonne solution dépend de la conception, de la finition et des besoins de production de la pièce.
Précision et finition des bords
Découpe au laser offre une très grande précision et des bords ultra lisses et brillants. Il est parfait pour les motifs détaillés ou les pièces qui nécessitent un aspect poli directement à la sortie de la machine.
La découpe CNC est également précise, mais elle peut laisser des marques d'outils ou des bords plus rugueux qui doivent être polis.
Capacités en matière d'épaisseur
Les machines CNC peuvent manipuler sans problème des feuilles d'acrylique épaisses. Elles peuvent également réaliser des coupes et des poches profondes.
La découpe au laser fonctionne mieux pour les feuilles plus fines, généralement inférieures à 25 mm. La découpe au laser d'acrylique épais peut entraîner une fusion ou des bords irréguliers.
Volume de production Adéquation
La découpe au laser est excellente pour les grandes séries de pièces plates. Elle est rapide et ne nécessite pas de changement d'outil.
L'usinage CNC est plus adapté aux pièces complexes en 3D ou aux petites séries avec des conceptions différentes. Il est plus souple pour les modifications et les caractéristiques personnalisées.
Efficacité en termes de coûts et de délais
La découpe au laser est plus rapide pour les formes simples et nécessite moins de main-d'œuvre. Elle est souvent moins chère pour les pièces plates présentant de légères variations.
L'usinage CNC prend plus de temps mais permet d'ajouter davantage de caractéristiques, comme des poches ou des trous percés. Il convient mieux lorsque les pièces nécessitent plus qu'une simple coupe en 2D.
Usinage CNC de l'acrylique : Défis et dépannage
L'usinage de l'acrylique peut entraîner quelques problèmes si l'on n'y prend pas garde. Savoir comment résoudre ces problèmes permet d'éviter les rebuts et de maintenir un niveau de qualité élevé.
Fissures et craquelures
Les fissures ou les petites lignes de surface (craquelures) sont souvent dues au stress ou à une mauvaise manipulation.
Pour éviter cela :
- Utiliser des outils tranchants avec des vitesses d'avance correctes.
- Éviter les angles serrés sans rayon.
- Maintenir l'acrylique propre et sec avant de l'usiner.
- Le recuit des pièces après l'usinage peut également soulager les tensions internes et réduire les fissures.
Fusion et formation de bavures
L'acrylique fond à basse température. La chaleur s'accumule si l'outil se déplace trop lentement ou si la vitesse est trop élevée. Cela peut entraîner des bords fondus ou des bavures.
Pour y remédier :
- Utilisez des vitesses d'avance élevées avec des vitesses de broche modérées.
- Choisissez des outils conçus pour les matières plastiques.
- Ajouter de l'air comprimé ou du liquide de refroidissement pour réduire la chaleur.
Ébréchure et mauvais état de surface
L'acrylique peut s'écailler ou se troubler si l'outil de coupe est émoussé ou si les réglages ne sont pas corrects.
Prévenir ce phénomène en :
- Utiliser des fraises tranchantes à simple cannelure.
- Réglage de la vitesse de rotation de la broche et de la vitesse d'avance.
- Éviter les plongeons agressifs ou les changements brusques de direction.
Déformation et soulagement du stress
Les grandes pièces acryliques plates peuvent se déformer après l'usinage en raison de contraintes internes ou d'un enlèvement inégal.
Pour réduire le gauchissement :
- Serrer les pièces uniformément.
- Effectuer des passes de coupe légères et régulières.
- Laisser la pièce reposer ou la recuire après l'usinage pour éliminer les tensions.
Conclusion
L'usinage CNC est un moyen fiable de créer des pièces en acrylique claires, précises et détaillées. L'acrylique est solide, léger et visuellement clair, ce qui le rend idéal pour de nombreuses industries. Avec une configuration adéquate, les pièces en acrylique usinées par CNC peuvent avoir un aspect propre et être performantes dans n'importe quelle application.
Vous recherchez des pièces en acrylique usinées avec précision ? Contactez Shengen aujourd'hui pour des devis rapides, des conseils d'experts et des résultats de haute qualité adaptés aux besoins de votre projet.
Hey, je suis Kevin Lee

Au cours des dix dernières années, j'ai été immergé dans diverses formes de fabrication de tôles, partageant ici des idées intéressantes tirées de mes expériences dans divers ateliers.
Prendre contact
Kevin Lee
J'ai plus de dix ans d'expérience professionnelle dans la fabrication de tôles, avec une spécialisation dans la découpe au laser, le pliage, le soudage et les techniques de traitement de surface. En tant que directeur technique chez Shengen, je m'engage à résoudre des problèmes de fabrication complexes et à favoriser l'innovation et la qualité dans chaque projet.
Ressources connexes
Texturation au laser des métaux : préparation, conception pour la fabrication (DFM) et maîtrise des coûts

Acier électro-galvanisé : guide de fabrication et de sélection

Poinçonnage ou découpe laser : Coût, vitesse et compromis DFM
