A satin finish can look simple on a drawing, but it is one of the easiest surface requirements to misread in production. The same note can lead to very different results if the material, starting surface, grain expectation, and finishing method are not aligned.
It is usually chosen when a metal part needs a clean, low-gloss surface without the strong reflection of polished metal. On visible parts, it can reduce glare, make light handling marks less distracting, and give the product a surface that is easier to approve than a bright polished finish.
That is why satin finish should not be treated as a vague cosmetic note. The final result depends on the material, the starting surface, the finishing route, and how tightly the process is controlled from part to part.
What a Satin Finish Looks Like?
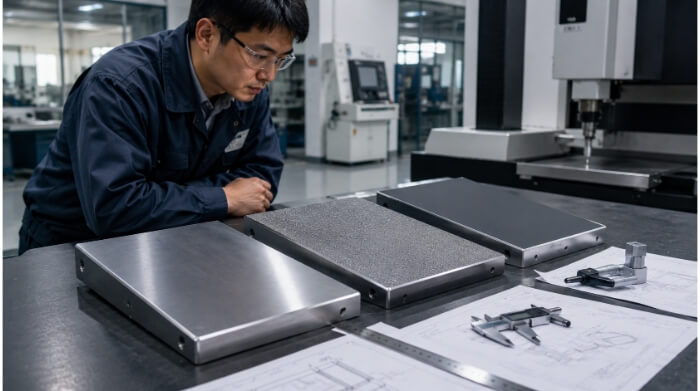
A satin finish gives metal a smooth, even look with low shine. It sits between a bright, polished surface and a rough, as-fabricated finish. The surface does not reflect light like a mirror, but it still looks finished and controlled.
This finish is common on stainless steel covers, equipment panels, decorative trim, handles, enclosures, and other visible parts. In these cases, the goal is usually to cut glare, make light surface marks less obvious, and keep the part from looking too bright or too raw.
A polished surface can show glare, fingerprints, and small scratches very quickly. Satin finish is often chosen when the part needs a quieter surface, especially on large visible areas or products used under strong lighting.
What gives metal a satin look?
The satin look comes from controlled surface abrasion. Instead of creating a highly reflective surface, the process leaves a fine, even texture that breaks up reflected light. That is what gives the metal a softer and less shiny appearance.
This effect is usually created with abrasive belts, brushing tools, non-woven abrasives, or similar finishing media. The final look depends on abrasive size, tool movement, pressure, and whether the finish is directional or non-directional.
The starting surface still sets the limit. Deep scratches, weld marks, oxide, local grinding, and uneven base material can still show through after finishing. Satin finish can soften minor surface issues, but it will not hide a poor starting surface.
How does satin differ from polished and brushed finishes?
Satin finish is often confused with polished and brushed metal, but the three are not the same. A polished finish is brighter and more reflective. Satin finish is meant to lower reflection and create a softer, more controlled surface.
Brushed finish is closer, which is why the terms are often mixed together. In many shops, a satin finish is created through a brushing process. But brushed metal often suggests a more visible linear grain, while satin finish usually points to a softer and more even final look.
That difference matters in production. If a drawing only says “satin finish,” different suppliers may picture different grain patterns, gloss levels, or surface quality on visible panels, decorative parts, or customer-facing products, which can easily lead to a mismatch.
How Satin Finish Is Done?
Satin finish is not one single step. It is the result of surface preparation followed by a controlled finishing process that creates the final texture. In production, the condition of the part before finishing often matters as much as the finishing step itself.
How is the surface prepared first?
Good satin finishing starts with surface preparation. If the surface is dirty, oxidized, scratched, or uneven, those conditions usually remain visible after finishing. Before the satin texture is created, the part may need cleaning, deburring, blending, or local correction to remove marks left by earlier processes.
For example, a laser-cut stainless steel part may still have oxide near the cut edge. A welded part may show discoloration, grinding marks, or uneven areas near the weld. A formed part may show handling marks or tooling contact. If these conditions are left in place, the final finish can look patchy or inconsistent, especially on visible faces.
Satin finishing is usually meant to refine the surface, not rebuild it from a poor starting condition. If the base surface already varies too much, the final finish often makes those differences easier to see rather than harder to see.
On visible panels, covers, and decorative components, preparation often sets the limit for finish consistency. Blending weld areas, smoothing local defects, and evening out the surface before final finishing are often what determines whether the part looks controlled or uneven.
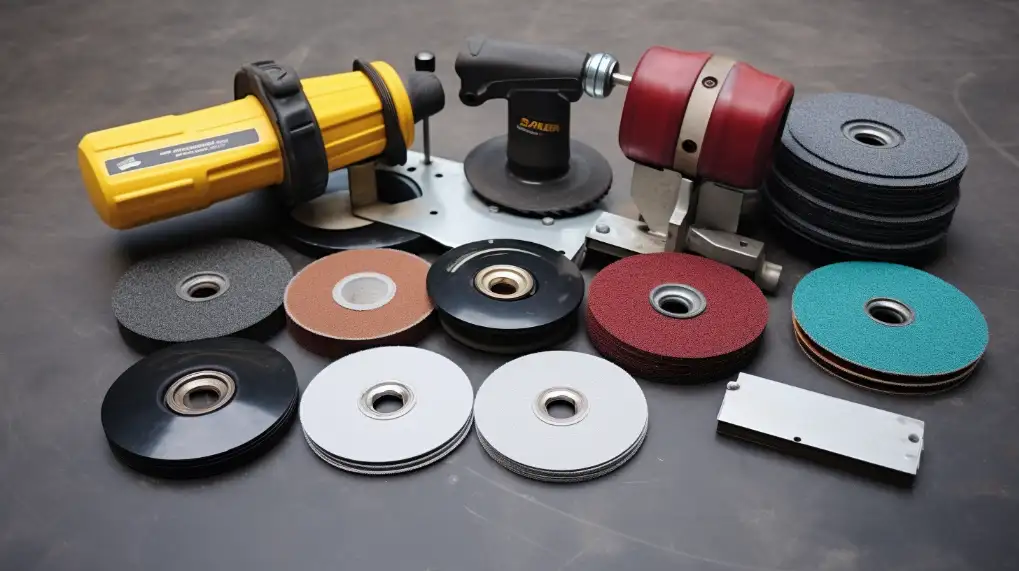
Which tools and methods are commonly used?
Most satin finishes are created with mechanical methods. Common options include abrasive belts, flap wheels, brushing tools, non-woven abrasive wheels, and hand finishing pads. The right choice depends on part shape, material, and how consistent the finish needs to be across the part or across a batch.
Wide flat parts are often better suited to belt-based finishing because it gives a straighter and more repeatable grain. Smaller parts, curved areas, corners, or welded assemblies often need hand-guided tools or flexible abrasive systems. In many shops, the main surfaces are finished by machine, while local areas are blended by hand.
The finishing tool does more than lightly mark the surface. It affects grain size, line direction, gloss level, and visual consistency. A worn abrasive can change the look. Too much pressure can create an uneven texture. Poor tool control can leave stop marks, overlap marks, or visible changes in direction.
That is why satin finish quality depends heavily on process control. It is not enough to say that a part was brushed or belt finished. Abrasive condition, movement, pressure, direction, and handling all affect the result.
Why Satin Finish Can Look Different from Part to Part?
Even when the same finish is specified, the final appearance can still vary from one part to another. In most cases, the difference comes from material condition, part geometry, and how the surface is handled before and during finishing.
How do material and surface conditions affect the result?
Material condition has a direct effect on how a satin finish looks. Even within the same metal type, differences in sheet surface, grain direction, hardness, or prior handling can change the final appearance.
In practice, the most visible problems usually come from uneven starting conditions. One area may contain deeper scratches, local grinding, leftover oxide, or slight surface waviness, while another area is cleaner and more uniform. After finishing, those areas may still reflect light differently, even if the same process was used across the full part.
This becomes more obvious on broad visible faces. Small changes in grain, reflectivity, or local blending are easier to see when the surface is large, flat, and exposed to light. A finish that looks acceptable on a small part may look inconsistent on a large panel simply because the eye has more area to compare.
Why are welds, edges, and large visible faces harder to match?
Weld areas are often the hardest places to finish well. Even after the weld is smoothed, the area around it may still differ from the base metal in texture, reflectivity, or local flatness. After satin finishing, that difference can remain visible instead of blending in fully.
Edges and corners also need more control. They are easier to over-finish, round off, or mark unevenly during handwork. Inconsistent pressure near the edge can quickly change the grain and make the finish look uneven.
Large visible faces create a different problem. They give the eye more area to compare, so stop marks, overlap marks, and local direction changes are easier to spot. A finish that looks acceptable on a small bracket may look inconsistent on a large cover or front panel.

Which Metals Work Best?
Satin finish can be applied to many metals, but not all materials are equally easy to finish well. Some are easier to keep visually even, while others show local pressure changes, blending marks, or surface variation much faster.
Why is stainless steel the most common choice?
Stainless steel is one of the most common materials for satin finish because it gives a good balance between appearance, durability, and finish control. It is widely used on equipment panels, enclosures, trim parts, and covers where the surface stays visible in use.
It also responds well to controlled abrasion. With the right preparation and finishing method, stainless steel can produce a clean, even grain that is usually easier to keep consistent on large visible parts than many softer decorative metals. That is one reason satin-finished stainless is so common in commercial, industrial, and architectural products.
Even so, stainless steel is not automatic. Weld blending, handling marks, sheet condition, and local repair can still show through after finishing. On high-visibility parts, stainless steel is often easier to control than softer metals, but it still depends on how well the surface is prepared before final finishing.
What changes when the part is aluminum, brass, or copper?
Aluminum can also be satin finished, but it usually needs more care. It is softer than stainless steel, so it picks up handling marks and local pressure changes more easily. Abrasive choice, tool pressure, and surface prep can all shift the final look faster than many buyers expect.
Brass and copper bring a different challenge. They are often chosen for decorative reasons, so small scratches, local blending differences, and finish direction changes stand out sooner. These materials can still produce attractive satin finishes, but they usually leave less room for correction once appearance becomes the priority.
When finish appearance matters, decorative metals are often less forgiving than utility-focused stainless parts. That is why sample approval is usually the safest way to lock in expectations before production.

What to Show on the Drawing?
A satin finish is hard to match if the drawing only gives a short note. If appearance matters, the drawing should show what the finished surface is expected to look like, not just name the finish.
At minimum, the drawing should identify which side is visible, whether the grain should run in one direction or appear non-directional, and whether the finish applies to the full part or only selected faces. If certain areas, such as weld zones, bends, edges, or hidden faces, can be less critical, that should be stated clearly.
If the part is appearance-sensitive, it also helps to define the visual standard. That may include an approved sample, a reference photo, or a note describing what is not acceptable, such as heavy scratch lines, inconsistent grain, or obvious blending marks. A short finish note may be enough for utility parts, but it is rarely enough for visible parts.
Why is “satin finish” alone usually too vague?
The term sounds clear, but in production, it leaves too much open to interpretation. One supplier may picture a fine directional grain. Another may picture a softer, non-directional look. A third may assume a standard brushed finish is acceptable.
That kind of variation may not matter in hidden parts. But on visible panels, decorative components, or customer-facing products, it can quickly become a problem. The finish may meet the note, but still fail the visual expectation.
If the finish matters to appearance, the drawing should usually go beyond the words “satin finish.” It should tell the supplier what face matters, what grain pattern is expected, and what kind of variation will or will not be accepted.
What buyers and engineers should confirm before production?
Before production starts, buyers and engineers should confirm more than the finish name. They should confirm which surfaces are visible, what grain direction is expected, how weld areas will be blended, and whether edges and formed zones need the same finish quality as the main face.
They should also confirm how the finish will be judged. For example, will the part be checked at close range or normal viewing distance? Is a light directional grain acceptable, or does the surface need to look more uniform? Will a local repair mark be accepted if it is on a hidden face, but rejected if it is on the front panel?
For higher-visibility parts, an approved sample is often more reliable than wording alone. It gives both sides a clear visual target and helps lock in the finish before batch production begins.
When Satin Finish Is the Right Choice?
Satin finish is a practical choice when a part needs a clean metal surface without the brightness of a polished finish. It works well when glare needs to be reduced, when light marks should be less obvious in normal use, and when a visible surface needs to look controlled without looking mirror-like.
Where does it work well on real products?
Satin finish works well on covers, panels, enclosures, handles, trim parts, and other visible metal parts used on equipment such as packing machines, where a clean surface and lower glare are both important. It is often chosen when the part needs to look clean and controlled without the strong reflection of a polished finish.
It is especially useful on products used under indoor lighting, in public-facing equipment, or on large visible surfaces where glare, fingerprints, and light scratches would stand out quickly on a brighter finish. In these cases, satin finish usually gives a surface that is easier to approve visually and less distracting in everyday use.
For many industrial and commercial products, satin finish is a practical choice because it lowers visual noise without making the part look unfinished. It also gives more tolerance in daily use than a bright polished surface, which usually shows marks faster.
When is another finish the better option?
Satin finish may not be the best choice when a part has very complex geometry, heavy weld blending, or a large visible face that demands near-perfect consistency. In those cases, the finish can still be done, but the risk of visible variation is higher because the eye has more surface area to compare.
It may also be the wrong choice when the product needs a brighter decorative surface or when another finish is easier to standardize across a batch. In some projects, bead blasting, coating, or another lower-variation finish may be easier to manage when appearance repeatability matters more than exposed metal texture.
The key is to match the finish to the part, not just to the drawing note. Satin finish works best when the surface expectation, material condition, and production method all support the same result.
Conclusion
A satin finish is often described as a simple, low-gloss surface, but in real production, it is not a single standard result. The final appearance is shaped by the starting surface, the material, the finishing method, and how consistently the process is controlled across the part.
Most problems with satin finish do not come from the last step. They usually come from uneven surface preparation, unclear drawing notes, or different assumptions about grain, gloss, and visible quality. Once those differences are built into the process, they are difficult to remove at the finishing stage.
If you are sourcing a part with visible metal surfaces, do not wait until production to define the finish clearly. Satin finish can vary more than many buyers expect, especially on large visible faces, welded areas, or decorative parts.
If you already have a drawing, sample, or product reference, send it to us. We can review the finish requirement together with the material, geometry, and visible areas of the part, so the surface expectation is clearer before quoting and production begins.
Hey, I'm Kevin Lee

For the past 10 years, I’ve been immersed in various forms of sheet metal fabrication, sharing cool insights here from my experiences across diverse workshops.
Get in touch
Kevin Lee
I have over ten years of professional experience in sheet metal fabrication, specializing in laser cutting, bending, welding, and surface treatment techniques. As the Technical Director at Shengen, I am committed to solving complex manufacturing challenges and driving innovation and quality in each project.