Ogni progetto ha bisogno di filettature robuste e affidabili. Tuttavia, molti team faticano a mantenere l'accuratezza e la coerenza che la lavorazione di precisione richiede. Se volete creare filettature sempre perfette, dovete conoscere le basi della filettatura. È inoltre necessario conoscere gli strumenti e i metodi migliori da seguire per ottenere risultati puliti e precisi.
Volete smettere di commettere i più comuni errori di maschiatura? Continuate a leggere per imparare i passaggi e i suggerimenti che vi aiuteranno a farlo bene.
Che cos'è la filettatura?
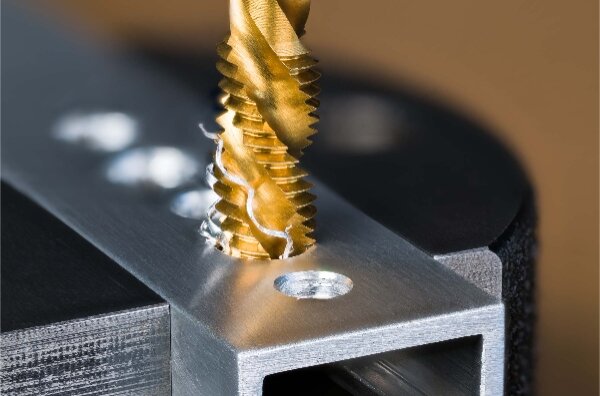
La filettatura consiste nel tagliare i filetti all'interno di un foro utilizzando un rubinetto. Il rubinetto ha bordi di taglio sagomati per adattarsi al profilo della filettatura. Quando entra in un foro, rimuove le scanalature per formare un percorso filettato.
La maschiatura viene utilizzata quando un componente deve ricevere un elemento di fissaggio, come una vite o un bullone. Il risultato è una connessione sicura e riutilizzabile. La maschiatura può essere eseguita a mano o a macchina. La maschiatura manuale è più lenta, ma è ideale per i lavori in piccoli lotti. Maschiatura CNC è veloce, preciso e adatto alla produzione di grandi volumi.
Filettature interne ed esterne
Le filettature sono di due tipi: interne ed esterne.
- Filettature interne sono tagliati all'interno di un foro. Si realizzano con un rubinetto. Si trovano in parti come staffe, involucri e alloggiamenti di ingranaggi.
- Filettature esterne sono tagliati intorno all'esterno di un cilindro. Per realizzarle si utilizza una filiera o un utensile per la filettatura su un tornio. I bulloni, le viti e i prigionieri sono tutti dotati di filettatura esterna.
Standard di filettatura chiave
Gli standard di filettatura aiutano a garantire che i pezzi prodotti in negozi o paesi diversi si adattino tra loro. Ecco i più comuni:
- Metrico (ISO): Misurato in millimetri. Comune in tutto il mondo. Una misura tipica potrebbe essere M6 × 1,0.
- Unificato (UNC/UNF): Utilizzata principalmente negli Stati Uniti e misurata in pollici. UNC indica le filettature grosse; UNF le filettature fini. Esempio: ¼"-20 UNC.
- BSP (British Standard Pipe): Utilizzato per sigillare le filettature dei tubi. Comune nei sistemi idraulici e di fluidi.
- NPT (National Pipe Thread): Filettature coniche per una tenuta perfetta nei sistemi di tubazioni. Ampiamente utilizzata negli Stati Uniti.
Terminologia e geometria della filettatura
Conoscere i termini del filo aiuta a lavorare in modo più preciso. Ecco alcune nozioni di base:
- Diametro maggiore: Il diametro esterno della filettatura.
- Diametro minore: Il diametro alla base della scanalatura del filetto.
- Pece: La distanza tra una filettatura e l'altra. Passo più piccolo = filettatura più fine.
- Piombo: La distanza di avanzamento di una filettatura in un giro. È uguale al passo nelle filettature a partenza singola.
- Angolo del filo: L'angolo tra i lati della filettatura. Il più comune è di 60° per le filettature metriche e unificate.
Tipi di metodi di filettatura
La scelta del giusto metodo di maschiatura dipende dalle esigenze di allestimento, materiale e volume. Di seguito sono riportati i tipi più utilizzati, ciascuno con diversi punti di forza e limiti.
Maschiatura a mano
La maschiatura manuale è il metodo più elementare. Utilizza una chiave per rubinetti e un set di maschi, solitamente in tre fasi: cono, spina e fondo.
Questo metodo è lento ma molto flessibile. È ottimo per piccoli lavori, riparazioni o quando gli utensili elettrici non riescono a raggiungere il pezzo. Funziona bene su materiali più morbidi come l'alluminio o l'acciaio dolce.
Tuttavia, è facile disallineare il rubinetto e la rottura è rischiosa se non si fa attenzione alla forza o all'eliminazione dei trucioli. Inoltre, è meno preciso per quanto riguarda la profondità e la consistenza della filettatura.
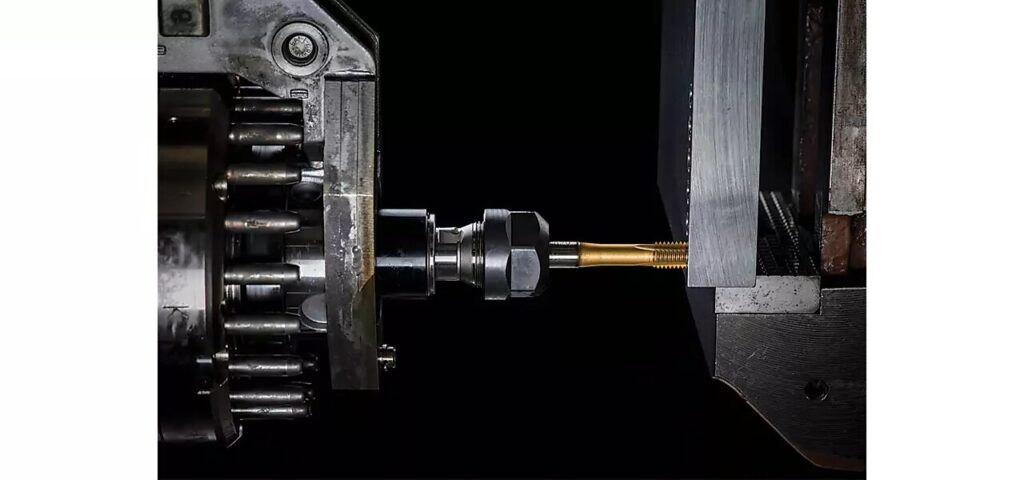
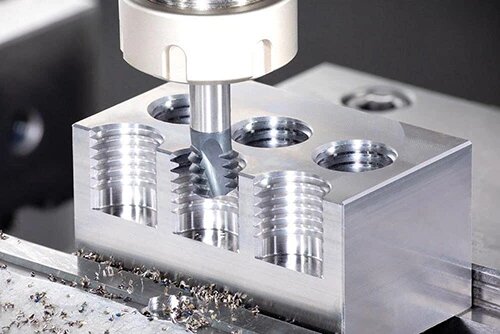
Toccatura a macchina
La maschiatura a macchina utilizza un'apparecchiatura motorizzata come una pressa per trapano, una testa di maschiatura o una macchina CNC. Il rubinetto ruota e si inserisce automaticamente nel foro.
Questo metodo è più veloce, più coerente e migliore per la produzione. È anche più facile controllare la velocità di avanzamento e la profondità. La maschiatura in macchina riduce gli errori dell'operatore e consente tolleranze più strette.
La maggior parte delle officine utilizza questo metodo per volumi di lavoro medio-alti. Inoltre, con una lubrificazione e una velocità di taglio adeguate, è in grado di gestire meglio i materiali più duri.
Maschiatura in forma (maschiatura in rotolo) vs maschiatura a taglio
Esistono due modi principali per creare fili: il taglio e la formatura.
- Taglio di maschiatura rimuove il materiale per creare filettature. Funziona sulla maggior parte dei metalli ed è lo standard per molti lavori. Produce trucioli, quindi una buona rimozione dei trucioli è fondamentale.
- Battitura del modulo (maschiatura a rullo) sposta il materiale anziché tagliarlo. Richiede metalli duttili come l'alluminio o l'acciaio dolce. Produce filettature più resistenti perché il flusso di grano non viene interrotto.
La maschiatura di forma non crea trucioli. Inoltre, riduce l'usura dei maschi e migliora la finitura superficiale. Tuttavia, richiede una dimensione precisa del foro e una coppia più elevata.
Maschiatura rigida e flottante
Si riferiscono al modo in cui il rubinetto viene tenuto e spostato durante la maschiatura della macchina.
- Maschiatura rigida blocca il portamaschi al mandrino. L'avanzamento e la velocità del mandrino sono sincronizzati. Questo sistema offre un'elevata precisione e viene spesso utilizzato nelle macchine CNC.
- Maschiatura flottante utilizza un portamaschi con movimento assiale o radiale. Consente un leggero disallineamento o una variazione dell'avanzamento. Questa soluzione è migliore per le macchine più vecchie o per le configurazioni manuali.
La maschiatura rigida è più rapida e precisa, ma richiede un allineamento perfetto. La maschiatura flottante è più permissiva e protegge il rubinetto da eventuali rotture.
Strumenti e attrezzature per la maschiatura
Il successo della maschiatura dipende dall'uso degli strumenti giusti. Maschi, materiali e supporti diversi sono adatti a lavori diversi. Questa sezione spiega cosa usare e perché è importante.
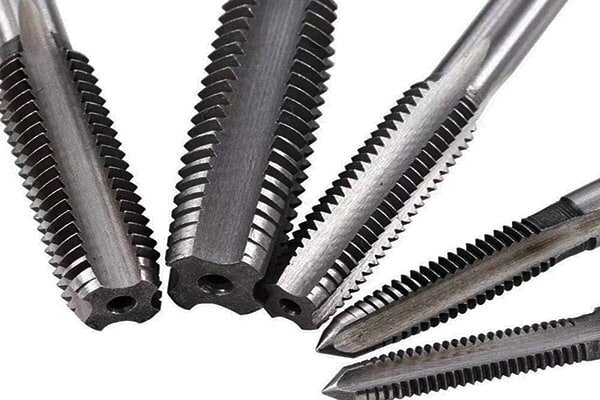
Tipi di rubinetti
I maschi sono disponibili in tre tipi comuni, ciascuno con una punta e un percorso del truciolo diversi. Questi tipi sono spesso utilizzati in fasi successive per ottenere un controllo migliore e filettature più pulite:
- Rubinetto conico: Ha un lungo anticipo con circa 8-10 fili che tagliano gradualmente. Si avvia facilmente e si centra bene. Ideale per iniziare i fori a mano o per materiali morbidi.
- Rubinetto a spina: Ha uno smusso di media lunghezza con taglio da 3 a 5 fili. È il tipo più comune e bilancia la facilità di avviamento con la filettatura a tutta profondità.
- Rubinetto di raccolta: Non ha quasi nessun vantaggio, solo da 1 a 1,5 filetti. È fatto per essere infilato nella parte inferiore di fori ciechi. Di solito viene utilizzato per ultimo dopo che un rubinetto conico o a spina inizia la filettatura.
Materiali e rivestimenti per rubinetti per diversi pezzi
Il materiale di base e il rivestimento del rubinetto influiscono su prestazioni, usura e durata. Ecco una panoramica delle scelte più comuni:
- Acciaio ad alta velocità (HSS): Economico e adatto all'uso generale su metalli morbidi e medi come alluminio, ottone o acciaio dolce.
- Acciaio al cobalto: Più duro dell'HSS. Meglio per materiali più duri come l'acciaio inossidabile o la ghisa. Resiste più a lungo al calore e alle sollecitazioni.
- Carburo: Molto duro e resistente all'usura. È ideale per le configurazioni rigide e per la maschiatura ad alta velocità di materiali abrasivi o tenaci. Inoltre, è fragile, quindi non è ideale per la maschiatura manuale.
Rivestimenti comuni:
- TiN (nitruro di titanio): Riduce l'usura, diminuisce l'attrito e aumenta la durata dei rubinetti.
- TiCN (carbonitruro di titanio): Più forte e più resistente al calore del TiN.
- TiAlN (nitruro di titanio e alluminio): Ottimo per la maschiatura ad alta velocità e a secco di leghe resistenti.
Portamaschi, mandrini e adattatori
I portamaschi mantengono il rubinetto allineato e ne consentono la rotazione senza problemi. Il tipo di portamaschi influisce sulla precisione, sulla durata e sulla sicurezza dell'utensile.
- Portamaschi rigidi: Utilizzato in macchine con avanzamento sincronizzato. Ideale per la maschiatura CNC. Garantiscono un controllo preciso della profondità e dell'allineamento.
- Porta rubinetti galleggianti: Consentono un leggero movimento. Contribuiscono a evitare la rottura del rubinetto in caso di disallineamento. Utile nelle macchine manuali o più vecchie.
- Portamaschi a cambio rapido: Risparmiare tempo durante l'impostazione o i lavori in più parti. Riduzione dei tempi di inattività della produzione.
Preparazione per la filettatura
Una buona maschiatura inizia prima ancora che il rubinetto tocchi il pezzo. Una pianificazione e una preparazione adeguate rendono la maschiatura più facile, sicura e precisa. Questa sezione tratta della scelta delle dimensioni giuste e della corretta impostazione.
Selezione delle dimensioni corrette di maschiatura e foratura
Prima di procedere alla maschiatura, è necessario adattare la dimensione del rubinetto alla filettatura desiderata. Quindi, scegliere la dimensione corretta della punta per realizzare il foro.
La dimensione del rubinetto si basa sulla vite o sul bullone che verrà inserito nel foro. Ad esempio, un rubinetto da ¼"-20 UNC viene utilizzato per una vite da ¼" con 20 filetti per pollice.
Ogni rubinetto necessita di una specifica dimensione di foratura. Se il foro è troppo piccolo, il rubinetto potrebbe rompersi. Se è troppo grande, la filettatura non farà presa.
I grafici sono ampiamente disponibili, ma ecco due esempi comuni:
- ¼"-20 UNC ha bisogno di un Punta #7 (0.201″)
- M6 × 1.0 ha bisogno di un Trapano da 5,0 mm.
Verificare sempre il tipo di rubinetto e il materiale prima di definire le dimensioni della punta.
Calcolo della dimensione della punta del rubinetto in base alle specifiche della filettatura
È anche possibile calcolare la dimensione della punta del rubinetto se non si ha a portata di mano una tabella. Ecco come fare:
Per filettature metriche:
- Dimensione della foratura = Diametro maggiore - Passo della filettatura
- Esempio: M10 × 1,5 → 10 - 1,5 = 8,5 mm di foratura
Per filettature in pollici:
- Dimensione della punta = Diametro maggiore - (1 ÷ Filettature per pollice)
- Esempio: ½"-13 → 0,5 - (1 ÷ 13) = 0,423″ trapano
In questo modo si ottiene un impegno della filettatura di circa 75%, che è buono per la maggior parte delle applicazioni.
Scegliere una misura leggermente più grande per materiali duri o per maschiature difficili. Scegliere una misura inferiore solo se è necessaria la massima resistenza e la coppia di maschiatura non è un problema.
Preparazione del pezzo e allineamento dei fori
Fori puliti e precisi rendono la maschiatura più agevole e sicura.
- Sbavare il foro per eliminare gli spigoli vivi.
- Smussare l'apertura leggermente. Questo aiuta il rubinetto a partire dritto.
- Controllare la profondità del foro per i fori ciechi. Lasciare spazio sufficiente per la punta del rubinetto e i trucioli.
- Allineare il rubinetto con il centro del foro. Un disallineamento può rompere il rubinetto o spanare la filettatura.
Avviare il rubinetto con una leggera pressione e ruotare lentamente se si batte a mano. Mantenere l'allineamento con la superficie. Per la maschiatura a macchina, verificare l'allineamento del mandrino prima di procedere.
Processo di filettatura passo per passo
Ogni fase del processo di maschiatura è importante. Affrettare o saltare i passaggi può portare a maschi rotti, filettature sbagliate o pezzi da rottamare. Ecco come farlo bene, dall'inizio alla fine.
Marcatura e perforazione del foro
Iniziare segnando chiaramente la posizione del foro. Utilizzare un punzone centrale per guidare la punta del trapano. In questo modo si evita che il trapano si muova, soprattutto su superfici dure o lisce.
Scegliere la punta giusta per il rubinetto. Per ottenere la massima precisione, utilizzare un trapano a colonna o una macchina CNC. Se si fora a mano, tenere la punta dritta ed esercitare una pressione costante.
Forare alla profondità corretta. Per i fori ciechi, assicurarsi che ci sia spazio in fondo per i trucioli e la punta del rubinetto. Dopo la foratura, pulire il foro. Rimuovere eventuali bave o trucioli sciolti che potrebbero interferire con il rubinetto.
Allineamento e avvio del rubinetto
Inserire con cura il rubinetto nel foro. Assicurarsi che sia perfettamente verticale (o in linea con il foro se angolato).
Per la maschiatura manuale, utilizzare una guida o una squadra per controllare l'allineamento. Applicare una leggera pressione e ruotare il rubinetto lentamente all'inizio. Il taglio dovrebbe iniziare da solo.
Fermarsi se si ha la sensazione che il rubinetto stia forzando troppo. Controllare le dimensioni del foro o provare un rubinetto conico per facilitare l'avvio.
Avanzamento, compensazione dei chip e mantenimento della precisione
Una volta inserito il rubinetto, continuare a girare lentamente e in modo uniforme. Per la maschiatura a mano, girare circa mezzo giro in avanti e poi un quarto di giro indietro. Questo aiuta a rompere ed eliminare i trucioli.
Utilizzare il fluido da taglio per ridurre l'attrito e prolungare la durata dell'utensile. Inoltre, aiuta a mantenere le filettature lisce e pulite. Controllate sempre che il rubinetto sia allineato. Anche una leggera inclinazione può causare filettature storte o la rottura del rubinetto.
Nella maschiatura a macchina, assicurarsi che la velocità di avanzamento corrisponda al passo del filetto. Utilizzare portautensili adeguati per mantenere la rettilineità.
Rompere il chip ed evitare l'inceppamento
Utilizzare il metodo di rotazione inversa (mezzo giro in avanti, un quarto di giro indietro) per rompere i trucioli quando si batte a mano.
La maschiatura a becco può essere utile per la maschiatura a macchina. Ciò significa ritrarre il rubinetto dopo alcuni giri per eliminare i trucioli prima di continuare.
L'accumulo di trucioli non è un problema per i maschi di forma, ma lo è la coppia elevata. Utilizzare una quantità sufficiente di lubrificante e le giuste impostazioni della macchina per evitare lo stallo.
Fattori che influenzano la qualità del filo
Una buona filettatura non si basa solo su un rubinetto affilato. Molte variabili influenzano la pulizia, la forza e la coerenza della filettatura. Vediamo le principali.
Proprietà del materiale e durezza
Alcuni metalli sono più facili da spillare di altri.
- Materiali morbidi come l'alluminio e l'ottone, ma possono strapparsi se il rubinetto è opaco.
- Materiali più duri come l'acciaio inossidabile, il titanio o gli acciai per utensili, richiedono una coppia maggiore e consumano più rapidamente i maschi.
- Materiali fragili come la ghisa producono trucioli fini, ma possono incrinarsi sotto sforzo.
L'elevata durezza aumenta l'usura degli utensili. La bassa duttilità aumenta la possibilità di scheggiature o di una cattiva forma della filettatura. Il tipo di maschiatura e il rivestimento devono essere sempre adeguati al materiale da maschiatura.
Si noti inoltre che i pezzi trattati termicamente sono più difficili da filettare. La preforatura prima del trattamento termico può essere una scelta migliore per questi pezzi.
Geometria della maschiatura e condizioni del tagliente
La forma del rubinetto e le condizioni dei suoi taglienti sono molto importanti.
- I maschi con scanalature a spirale aiutano a sollevare i trucioli dai fori ciechi.
- Le scanalature diritte funzionano bene per i fori passanti e i tagli corti.
- I maschi a spirale spingono i trucioli in avanti, ottimi per la maschiatura a macchina di fori passanti.
I maschi usurati causano filettature scadenti, coppie elevate e rischio di rottura. I taglienti opachi imbrattano il materiale invece di tranciarlo in modo netto.
Ispezionare spesso i maschi, soprattutto durante la produzione. Sostituirli al primo segno di usura o di ruvida finitura della filettatura.
Refrigerante, lubrificazione ed evacuazione dei trucioli
La lubrificazione aiuta a controllare il calore e a ridurre l'attrito. Inoltre, rende le filettature più pulite e migliora la durata dei rubinetti.
- Utilizzare olio da taglio per la battitura a mano o per piccoli lotti.
- Utilizzare un refrigerante sintetico o idrosolubile per la maschiatura CNC o ad alta velocità.
- Applicare una quantità di liquido sufficiente a rivestire il rubinetto e a far fuoriuscire i trucioli.
La rimozione dei trucioli è altrettanto fondamentale. I trucioli lasciati nel foro possono ostruire le scanalature, inceppare il rubinetto o danneggiare la filettatura. Se necessario, utilizzare aria compressa o un rubinetto con funzioni di controllo dei trucioli.
Per i fori profondi o ciechi, arretrare periodicamente il rubinetto o utilizzare un rubinetto a spirale progettato per l'evacuazione dei trucioli.
Problemi comuni nella filettatura
Anche con la pianificazione, la maschiatura può andare male. I problemi relativi all'utensile, alla configurazione o al materiale spesso si manifestano con maschi rotti o filettature difettose. Ecco come riconoscere i problemi e le loro cause.
Rottura del rubinetto
Si tratta di uno dei fallimenti più frustranti del tapping.
Cause comuni:
- Utilizzo di una punta di dimensioni errate (foro troppo piccolo)
- Battitura troppo veloce o con una coppia eccessiva
- Rubinetto opaco o usurato
- Scarsa rimozione dei trucioli
- Disallineamento durante la maschiatura manuale
- Materiale duro senza un'adeguata lubrificazione
Per evitare questo problema, controllare sempre le condizioni del rubinetto, utilizzare la giusta velocità di avanzamento e rompere spesso i trucioli durante la maschiatura manuale. Utilizzare supporti flottanti o guide per rubinetti per ridurre la pressione laterale.
Filettature sovradimensionate o sottodimensionate
Filettature troppo allentate o strette possono causare problemi di adattamento e indebolire il gruppo.
Fili sovradimensionati spesso derivano da:
- Utilizzo di una punta sbagliata (troppo grande)
- Rubinetto usurato
- Usura eccessiva del rubinetto sui taglienti
Filettature sottodimensionate può verificarsi a causa di:
- Punta del trapano troppo piccola
- Viene utilizzato un rubinetto di forma senza un foro di dimensioni adeguate.
- Passo di filettatura errato o rubinetto sbagliato
Verificare sempre le dimensioni del foro con un calibro e confermare le specifiche del rubinetto prima di iniziare.
Filettatura incrociata e disallineamento
La filettatura incrociata si verifica quando il rubinetto entra nel foro in modo obliquo. Ciò comporta filettature danneggiate e giunti deboli.
Cause:
- Maschiatura senza allineamento corretto
- Avvio del rubinetto senza smusso
- Non utilizzare una guida o una squadra per rubinetti
Nella maschiatura a mano, utilizzare un blocco o una guida per tenere il rubinetto diritto durante i primi giri. Nella maschiatura a macchina, assicurarsi che il mandrino sia in squadro rispetto alla superficie del foro.
Scarsa finitura superficiale o formazione di bave
Filettature ruvide o bave in eccesso riducono la resistenza della filettatura e rendono più difficile il montaggio.
Questo può accadere a causa di:
- Rubinetto usurato o tagliente scheggiato
- Rivestimento del rubinetto o materiale sbagliato per il lavoro
- Mancanza di lubrificazione
- Maschiatura ad alta velocità senza un'adeguata evacuazione dei trucioli
Utilizzare maschi affilati, applicare una quantità sufficiente di refrigerante e pulire e ispezionare le filettature dopo la maschiatura. Se necessario, una rapida sbavatura con un utensile svasatore può ripulire il foro.
Soluzioni e migliori pratiche
Per ridurre i problemi di maschiatura e migliorare la qualità della filettatura, è necessario seguire metodi collaudati. Queste migliori pratiche aiutano a evitare l'usura degli utensili, ad aumentare la costanza e a ridurre gli scarti.
Scelta corretta delle dimensioni di maschiatura e foratura
La dimensione della foratura deve sempre corrispondere allo standard del rubinetto e della filettatura. Utilizzare le tabelle di foratura dei rubinetti o fare un rapido calcolo in base al passo della filettatura.
- Un foro troppo piccolo porta alla rottura dei rubinetti.
- Un foro troppo grande porta a filettature deboli.
Se si utilizza un maschiatore di forma, fare ancora più attenzione alle dimensioni del foro. La maschiatura di forma dipende dallo spostamento del materiale, non dalla rimozione dei trucioli.
Controllare le marcature dell'utensile e confermare con calibri o calibri in caso di dubbi. Non tirare a indovinare.
Controllo corretto di velocità, avanzamento e profondità
Utilizzare la giusta velocità di taglio per il materiale. Una velocità eccessiva provoca un aumento del calore. Una velocità troppo bassa provoca una filettatura ruvida.
Ad esempio:
- Alluminio: alta velocità, bassa coppia
- Acciaio inossidabile: velocità inferiore, maggiore coppia
Nelle macchine CNC, impostare il numero di giri e l'avanzamento corretti in base al passo del filetto. Per la maschiatura rigida, il mandrino e l'avanzamento devono rimanere sincronizzati.
Evitare la sovralimentazione. Andare in profondità quanto basta per ottenere l'intera lunghezza del filetto e poi fermarsi. Per i fori ciechi, prevedere uno spazio per i trucioli nella parte inferiore.
Tecniche di lubrificazione per diversi materiali
Utilizzare un fluido da taglio per ridurre l'attrito, raffreddare l'utensile ed eliminare i trucioli.
- Alluminio: Utilizzare un olio da taglio leggero o un refrigerante nebulizzato
- Acciaio e acciaio inossidabile: Utilizzare oli da taglio a base di zolfo o ad alta pressione.
- Ottone o ghisa: Di solito è asciutto, ma un olio leggero può contribuire a prolungare la durata del rubinetto.
Applicare il fluido direttamente sul rubinetto, non solo sul foro. Nel lavoro manuale, riapplicare il liquido per ogni foro. Per le configurazioni CNC, utilizzare il liquido di raffreddamento a diluvio o per il foro passante, se disponibile.
Ispezione e manutenzione periodica degli utensili
Controllare regolarmente i rubinetti per verificare che non presentino segni di usura, scheggiature o opacità. I rubinetti usurati producono filettature ruvide e aumentano le possibilità di rottura. Pulire i rubinetti dopo l'uso. Rimuovere i trucioli incastrati nelle scanalature. Conservarli in appositi contenitori per evitare confusione e proteggere i taglienti.
Sostituire i maschi in base al numero di filetti, non solo al tatto. In produzione, monitorare la durata degli utensili per evitare guasti imprevisti. Ispezionare sempre i pezzi filettati con i calibri per confermare la qualità. I problemi vengono individuati tempestivamente, prima che si ripercuotano su altri pezzi.
Conclusione
La filettatura è una fase fondamentale della lavorazione di precisione. Dalla scelta della giusta dimensione di maschiatura e foratura al controllo della velocità, dell'avanzamento e della lubrificazione, ogni dettaglio influisce sulla qualità finale della filettatura. Una buona preparazione, una tecnica e strumenti puliti aiutano a evitare rotture, disallineamenti e filettature scadenti.
Avete bisogno di parti metalliche maschiate personalizzate per il vostro prossimo progetto? Offriamo servizi di maschiatura CNC, maschiatura manuale e lavorazione completa del metallo per soddisfare le specifiche del vostro progetto. Inviateci i vostri disegni per ottenere oggi stesso un preventivo rapido e accurato.
Ciao, sono Kevin Lee

Negli ultimi 10 anni mi sono immerso in varie forme di lavorazione della lamiera, condividendo qui le mie esperienze in diverse officine.
Contattate
Kevin Lee
Ho oltre dieci anni di esperienza professionale nella fabbricazione di lamiere, con specializzazione nel taglio laser, nella piegatura, nella saldatura e nelle tecniche di trattamento delle superfici. In qualità di direttore tecnico di Shengen, mi impegno a risolvere sfide produttive complesse e a promuovere innovazione e qualità in ogni progetto.
Risorsa correlata

Acciaio inossidabile resistente alle impronte digitali: come funziona e come sceglierlo

OEM e produzione a contratto: Come scegliere il modello giusto per il vostro progetto

Costo di allestimento e costo unitario nella produzione di lamiere
