Many beginners struggle when it comes to spot welding stainless steel. The metal can warp, burn through, or just not bond well. Spot welding may seem simple, but stainless steel demands the right approach. If you’re starting out, mastering the basics will help you save cost, increase quality, and feel confident handling this common yet tricky metal.
Ready to learn the step-by-step process? Let’s break it down into simple, actionable steps.
What Is Spot Welding?
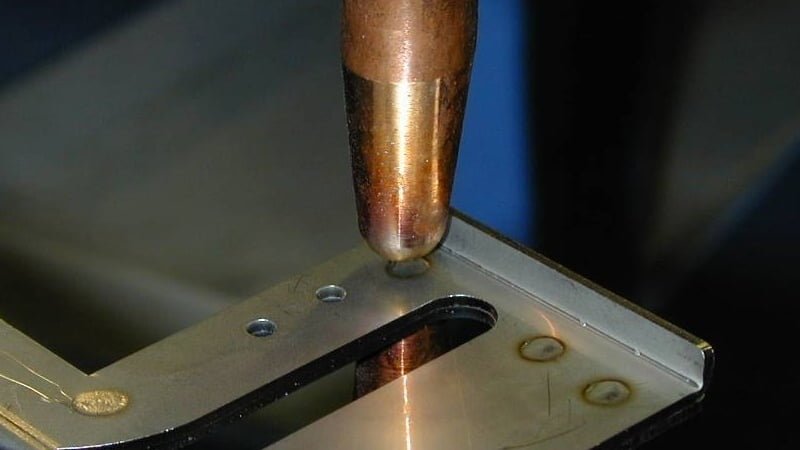
Spot welding is a type of resistance welding. It uses copper electrodes to clamp two metal sheets and pass electrical current through them. The heat comes from the metal’s resistance to the current. This heat melts the metal at the point of contact. The pressure from the electrodes helps fuse the metal together as it cools.
The process is quick. Most welds take less than a second. That makes it a common method in mass production, especially for thin sheet metal.
Stainless steel is a good fit for spot welding because of its resistance and strength. It allows enough heat buildup to create solid welds. The high chromium content forms a tight surface layer. This helps the metal resist rust after welding.
How to Spot Weld Stainless Steel?
Before welding, you need a proper setup and clean materials. These steps help ensure strong joints and fewer mistakes during the process.
Prepare the Surface
Start by cleaning the stainless steel. Use a wire brush or sandpaper to remove dirt, oil, or oxidation. Any surface contamination can weaken the weld. Clean both sides of the material. If needed, wipe with alcohol to remove grease.
Set Up the Spot Welder
Use a spot welder with copper electrodes. Make sure the machine is plugged in and working. Check the electrode tips. They should be clean and shaped correctly. Replace or dress the tips if they are worn or dirty.
Adjust Welding Parameters
Set the correct current, weld time, and pressure. Stainless steel usually needs higher current than mild steel. Start with short weld times to avoid overheating. Increase the force slowly if the weld isn’t strong.
Position the Workpiece
Align the two sheets properly. Clamp them so they don’t move. Place the joint between the electrodes. Double-check that the edges are flush.
Execute the Weld
Press the foot pedal or trigger to start the weld. Hold it for the set time. Let the electrodes cool for a moment before moving. Don’t lift the electrodes too fast—this can pull the hot metal apart.
Spot Welding Equipment Overview
Using the right equipment is key to getting clean, strong welds. The machine, electrodes, and power setup must match your material and production needs.
Spot Welding Machine Types
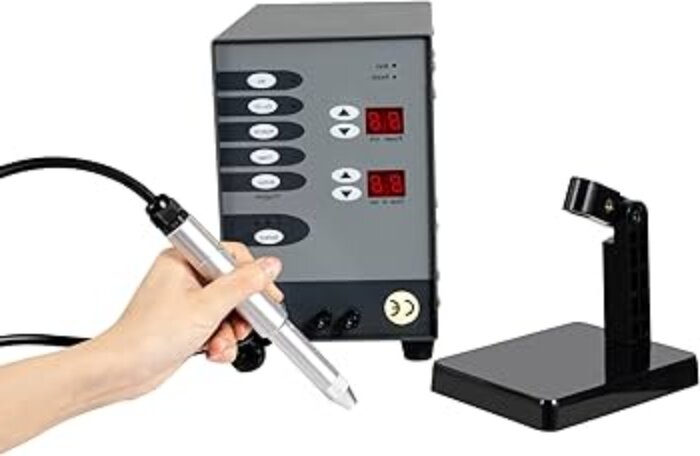
There are two main types of spot welding machines: pedal-operated and automated.
Pedal-operated machines are best for small-scale work or prototypes. You control the timing with a foot pedal. They’re easy to use and good for learning.
Automated machines are better for high-volume jobs. These machines use timers and pressure systems to make consistent welds with minimal operator input. They are common in factories and production lines.
Choosing the Right Electrodes
Electrodes are usually made of copper alloys. This metal conducts electricity well and resists heat damage. The shape of the tip matters too.
For stainless steel, use flat or dome-shaped tips. Flat tips give wide contact. Dome tips focus heat more narrowly.
Replace electrodes regularly. Dirty or worn tips can cause weak welds or overheating. Use a tip dresser to reshape them when needed.
Power Supply Requirements
Spot welders need a strong and steady power supply. Most use AC (alternating current), but some high-end machines use DC (direct current) or MFDC (medium-frequency DC).
MFDC systems provide faster, cleaner welds with less heat distortion. They’re more efficient but cost more.
Check the power ratings. Your machine should match your shop’s power capacity. Avoid using extension cords. Voltage drops can weaken the weld.
Spot Welding Stainless Steel Parameters Explained
The strength and quality of a spot weld depend on getting a few key settings right. These include current, force, time, and cooling. Each one plays a specific role.
Current Settings and Duration
Current is what generates the heat to melt the metal. Stainless steel needs higher current than carbon steel because it resists electricity more.
Start with medium settings and adjust based on results. If the weld is weak, raise the current slightly. If the metal burns through, reduce it.
Duration is how long the current flows. Too short won’t melt the metal enough. Too long overheats the part and deforms it. For thin stainless steel, use short bursts—often less than one second.
Electrode Force and Alignment
Electrode force keeps the sheets pressed together during welding. If the pressure is too low, the metal may spark or burn. If it’s too high, it may thin out the metal or cause marks.
Always apply force before the current starts. This helps ensure tight contact and reduces resistance at the surface.
Make sure the electrodes are aligned. Poor alignment can lead to uneven welds or gaps between sheets.
Welding Time and Cooling Intervals
Welding time includes both the heat time and the hold time. Hold time means keeping pressure after the current stops. This helps the molten metal cool and solidify.
Cooling intervals matter during batch welding. If the electrodes get too hot, weld quality drops. Pause between welds to let the tips cool down.
Electrode Selection and Maintenance
Electrodes do more than carry current. They also shape the weld and control heat. Using the right type—and keeping them in good shape—makes a big difference in weld quality.
Material Types: Copper, Tungsten, etc.
Copper alloys are the most common electrode material for spot welding stainless steel. They conduct electricity well and resist wear. Look for types like Class 2 copper-chromium for good strength and conductivity.
For heavy-duty or high-heat jobs, some use tungsten-copper blends. Tungsten holds its shape better at high temperatures but conducts less heat. These are less common but useful for high-pressure or precision welds.
Avoid using soft copper that wears down quickly. This causes poor welds and inconsistent results.
Electrode Tip Shapes for Stainless Steel
The tip shape affects heat flow and weld size. For stainless steel, common shapes include:
- Flat tips: Spread the heat. Best for larger weld areas or when you want to avoid deep marks.
- Dome tips: Focus the heat to a small area. Good for thick or harder stainless grades.
- Pointed tips: Rarely used with stainless steel, as they can overheat or burn through thin sheets.
Choose the shape that matches your part design and material thickness. Always keep the tips smooth and symmetrical.
Cleaning, Dressing, and Replacing Tips
Dirty or worn tips cause sparks, weak welds, and inconsistent joints. Clean tips with a wire brush or soft abrasive regularly. Avoid scraping with hard metal tools.
Dressing the tips means reshaping them with a file or tip dresser. This keeps the shape even and the contact surface smooth.
Replace tips when they become too short or can’t hold their shape. Don’t wait for problems—regular maintenance keeps welds consistent and clean.
Troubleshooting Common Issues
Even with a good setup, spot welding can run into problems. Knowing the signs and causes helps you fix them fast and avoid scrap.
Weak Welds or No Fusion
If the welds break easily or don’t hold, the metal likely didn’t fuse properly. This happens when:
- Current is too low
- Weld time is too short
- Pressure is too light
- The surfaces are dirty
Check your current and weld time first. Then clean the surfaces and try again. You can also increase the force slightly to get better contact between sheets.
Excessive Spatter or Burn-Through
Spatter or melted holes usually mean the settings are too aggressive. This can come from:
- High current
- Long weld time
- Dirty tips causing arcs
Try lowering the current or time. Make sure your tips are clean and shaped correctly. Also, check the thickness of the sheets. Very thin stainless steel needs extra care to avoid damage.
Electrode Sticking or Deformation
If the electrode sticks to the metal, it may be too hot. It can also happen if the tip shape is uneven or if the force is too high.
To fix this:
- Let the electrodes cool down between welds
- Dress the tips to keep the shape smooth
- Check your hold time—too short can lead to sticking
If the electrodes are deforming, switch to a harder copper alloy or use water-cooled tips.
Welding Thin vs. Thick Stainless Steel Sheets
Welding thin and thick stainless steel requires different settings and handling. Each has its own risks, like burn-through or poor fusion. Getting the right balance is key.
Techniques for Thin Gauge Welding
Thin stainless sheets are easy to overheat. Use:
- Lower current
- Short weld time
- Lighter electrode pressure
Always test on scrap first. Keep the electrode tips clean and flat to spread heat evenly. Clamp the sheets tightly to prevent movement. Cooling time between welds helps avoid warping.
Weld spacing matters too. Leave enough gap between each weld to let the area cool before making the next one.
Adjustments for Thicker Sections
Thicker sheets need more heat and pressure. Increase:
- Current level
- Weld time
- Electrode force
Use dome-shaped tips to focus heat at the joint. Longer hold time after welding helps the metal solidify better. Check for full penetration—partial fusion may look fine but fail under load.
If you’re welding dissimilar thicknesses, adjust your settings to match the thinner sheet. This prevents burning it while still bonding both layers.
Avoiding Warping and Distortion
Heat causes stainless steel to expand and contract. Uneven heat leads to bending or warping. To prevent this:
- Use short weld times
- Allow cooling between welds
- Clamp parts firmly during welding
Spread your welds out and alternate sides if possible. Avoid making many welds in one spot before moving on. Letting heat build up in one area is the main cause of distortion.
Conclusion
Spot welding stainless steel can be simple once you understand the basics. Clean surfaces, the right settings, proper pressure, and regular maintenance all play key roles. Thin and thick sheets require different techniques, and small adjustments can make a big difference.
Need custom stainless steel parts with expert-level welding? Our team supports both small and large-scale projects with fast turnaround and professional quality. Contact us today to get a quote.
Hey, I'm Kevin Lee

For the past 10 years, I’ve been immersed in various forms of sheet metal fabrication, sharing cool insights here from my experiences across diverse workshops.
Get in touch
Kevin Lee
I have over ten years of professional experience in sheet metal fabrication, specializing in laser cutting, bending, welding, and surface treatment techniques. As the Technical Director at Shengen, I am committed to solving complex manufacturing challenges and driving innovation and quality in each project.
Related Resource

Fingerprint Resistant Stainless Steel: How It Works,and How to Choose


