Sheet metal is used everywhere—from equipment panels to electronics enclosures. Yet many designs still face the same problems: higher costs, wasted material, and harder-to-assemble parts. These issues usually do not come from poor fabrication skills. They often come from small choices made early in the design stage.
Every sheet metal part begins the same way—as a flat sheet with a uniform thickness. That basic fact guides every bend, cut, and material choice. When designers consider this, parts become easier to produce, stronger, and more cost-effective. When they do not, problems appear in delays, redesigns, and added expense.
This raises a simple question: How can we design sheet metal parts to be smarter from the start? Below are seven practical methods to improve sheet metal parts, lower hidden costs, and achieve better fabrication results.
Implementing Proper Bend Radius Standards
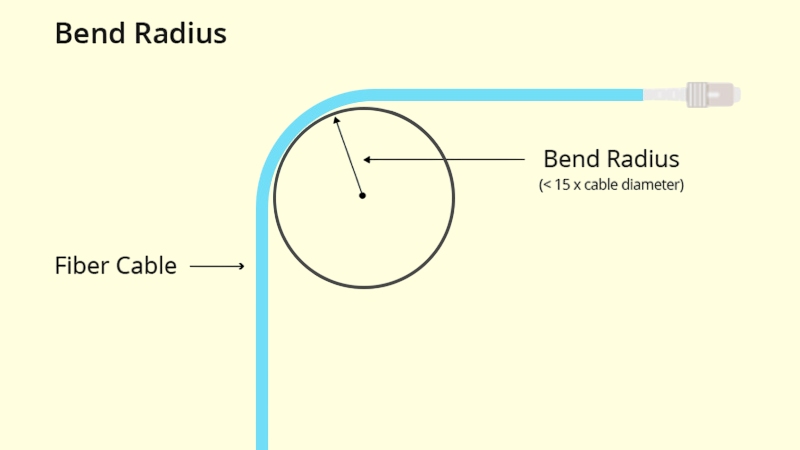
Metal does not bend like paper. When it turns, the outer side stretches and the inner side compresses. If the radius is too small, the stretched side can split. If it is too large, the bend may look weak or unfinished. Tests show that bends tighter than the sheet’s thickness increase the chance of cracks by more than 50%. A proper bend radius keeps parts strong, consistent, and clean in appearance.
General Rules
- Set the bend radius at least equal to the sheet thickness.
- Increase the radius as the sheet gets thicker. For example, a 3 mm steel sheet often needs a 3–5 mm radius for safe bending.
- Use the same radius across a part to save time and lower costs.
- Avoid mixing sharp and wide bends in the same part unless absolutely required.
Mistakes to Avoid
- Using zero or near-zero radii, which almost always cause cracks.
- Ignoring the grain direction of the metal sheet. Bending across the grain can reduce cracking compared to bending with the grain.
- Overlooking the effect of surface finishes. Coatings such as paint or plating add thickness and change how the sheet bends.
Keeping Tolerances Realistic
Every cutting and bending process has natural limits. For example, laser cutting can usually hold tolerances of ±0.1 mm on thin sheets, while CNC punching often allows about ±0.2 mm. When engineers ask for tighter tolerances, special tools or extra inspections may be required. This adds cost and time without improving performance in many cases.
General Rules
- Use tight tolerances only for features that affect function.
- Apply standard tolerances for non-critical dimensions. In sheet metal, ±0.1–0.2 mm works well for most cases.
- Match tolerances to the process. For example, a bent flange length may vary by ±0.3 mm, while a laser-cut slot can stay within ±0.1 mm.
- Keep tolerance styles consistent across a drawing to avoid confusion.
Mistakes to Avoid
- Applying tight tolerances to every feature. This makes parts harder to build and increases inspection costs.
- We often forget that bending adds variation. A 90° bend angle can shift by about ±1° depending on material thickness and springback.
- Ignoring how finishing affects size. Powder coating can add 0.05–0.1 mm per side, blocking tight-fitting holes.
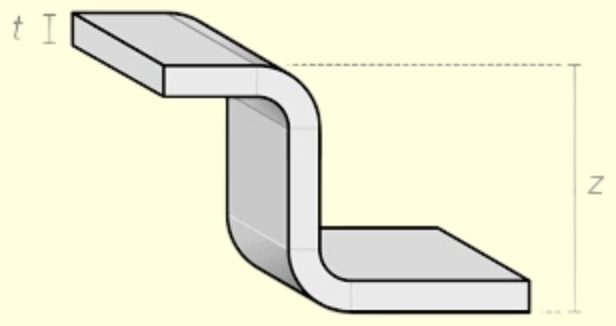
Designing Effective Offsets and Z-Bends
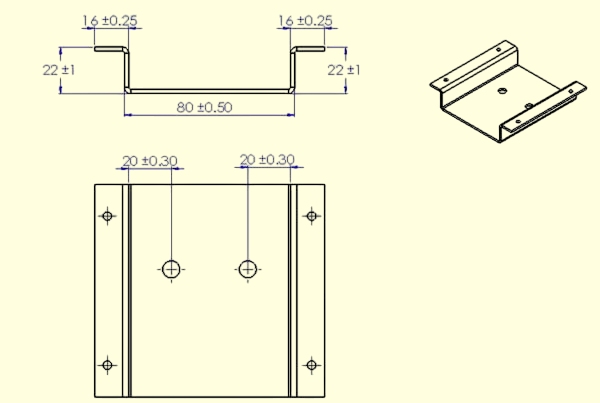
Offsets create a step in the sheet so two parts can fit together without interference. Z-bends serve the same purpose but work in tighter spaces. Both are widely used in brackets, covers, and enclosures. A well-designed offset helps parts fit as planned, while a poorly planned one can cause gaps, weak spots, or assembly problems.
General Rules
- Keep the offset height equal to or greater than two times the sheet thickness. For example, a 2 mm sheet usually needs a 4 mm offset for clearance.
- Use consistent bend radii on both sides of the offset. This prevents twisting or distortion.
- Plan the offset direction carefully to avoid clashes with nearby bends.
- Space Z-bends far enough apart. A gap of at least three times the sheet thickness between bends helps prevent deformation.
Mistakes to Avoid
- Designing offsets smaller than the sheet thickness often crushes the bend and weakens the part.
- Overlapping offsets with other bend lines can cause warping.
- Ignoring bend relief. Without relief cuts, sharp corners may tear during bending.
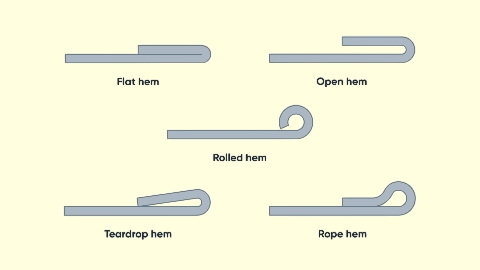
Implementing Robust Hemming Techniques
Hemming folds the edge of a sheet metal part back onto itself. A hem does more than cover sharp edges. It strengthens the part and helps it resist bending forces. In automotive manufacturing, for example, hemmed panels can handle higher loads and show less vibration.
General Rules
- Keep the hem length at least four times the sheet thickness. For example, a 1 mm sheet should have a hem length of 4 mm or more.
- Use a bend radius at least equal to the sheet thickness before flattening. This prevents cracks during the final forming step.
- Design open hems (not fully closed) when space or tooling limits prevent tight closure.
- Add relief notches at corners to stop tearing as the metal folds.
Mistakes to Avoid
- Making hems too short, which causes them to spring open or split.
- Flattening the hem in a single step instead of two. This often creates wrinkles.
- Ignoring coating thickness. Paint or plating inside a hem can build up and lead to poor closure.
Perfect Hole, Slot, and Notch Placement
Holes, slots, and notches are critical for how sheet metal parts fit and function. They guide fasteners, allow airflow, and assist in assembly. Placing them too close to edges or bends can create stress during forming, often leading to cracks or distortion.
General Rules
- Keep holes at least twice the sheet thickness away from bend lines. For example, a 2 mm sheet should have holes at least 4 mm from a bend.
- Maintain at least one sheet thickness between the hole edges and the sheet edge to prevent tearing.
- Use standard hole sizes that match common tooling. A 5 mm hole is easier and cheaper than a 5.2 mm hole.
- Add relief cuts for notches to reduce stress buildup during bending.
Mistakes to Avoid
- Placing holes too close to bends can distort the part during forming.
- Using uncommon hole sizes increases costs due to special tooling.
- Designing thin webs between holes or slots. Gaps less than 1.5 times the material thickness may fail under load.
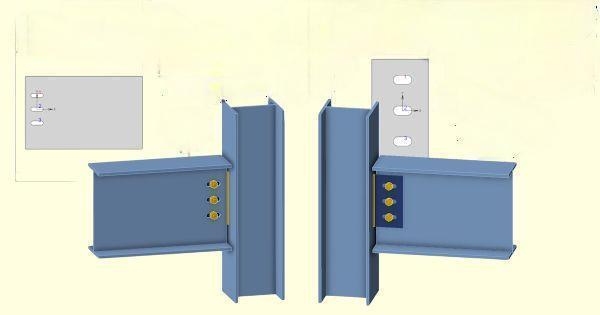
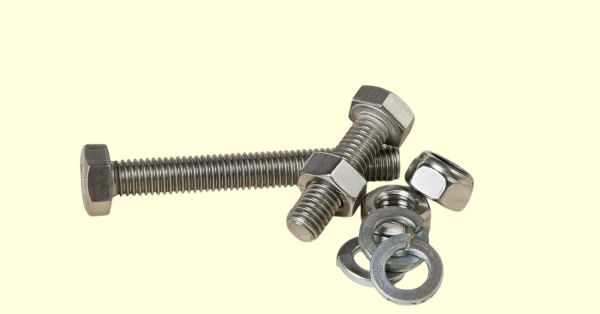
Leverage Advanced Fastening and Insert Solutions
Fasteners and inserts connect sheet metal parts without welding. They create strong, consistent joints and make assembly faster. Modern options like self-clinching nuts, studs, and rivet nuts expand design flexibility and reduce extra work. They save costs, improve strength, and simplify repairs when appropriately used. Poor selection or placement, however, can weaken joints and cause failure.
General Rules
- Match fastener type to material thickness. Use self-clinching nuts for thin sheets (0.8–2.5 mm) and rivet nuts for thicker or softer materials.
- Place inserts away from bends or edges. Keep the sheet thickness distance at least twice to prevent distortion during installation.
- Standardize fastener sizes across a design. This reduces tool changes and speeds up assembly.
- Plan the installation method early. Some inserts need press-fit tools, while others work with hand tools.
Mistakes to Avoid
- Threaded holes are used directly in thin sheet metal. Threads can strip easily and shorten part life.
- Placing inserts too close to corners or other holes weakens the sheet.
- Ignoring coating thickness. Paint or plating can clog threads if not accounted for.
Implement Protective and Aesthetic Finishes
Finishes extend the life of sheet metal parts, improve performance, and give a cleaner appearance. They protect against corrosion, scratches, and wear while enhancing the product’s look. Choosing the right finish early in design helps prevent fit and durability problems later.
General Rules
- Select finishes based on the environment. Powder coating is suitable for outdoor use, while anodizing works well for aluminum parts.
- Plan for added thickness. Powder coating adds 0.05–0.1 mm per side, which can reduce hole sizes.
- Standardize finishes across a product line to cut costs and simplify production.
- Clearly label finishes in design drawings so manufacturers know what to apply.
Mistakes to Avoid
- Adding finishes late in the process can cause clearance problems in tight assemblies.
- Over-specifying finishes that are not necessary. A basic zinc coating may suffice where stainless steel is not needed.
- Ignoring surface preparation. Dirty or oily surfaces can make paint or plating peel quickly.
Hey, I'm Kevin Lee

For the past 10 years, I’ve been immersed in various forms of sheet metal fabrication, sharing cool insights here from my experiences across diverse workshops.
Get in touch
Kevin Lee
I have over ten years of professional experience in sheet metal fabrication, specializing in laser cutting, bending, welding, and surface treatment techniques. As the Technical Director at Shengen, I am committed to solving complex manufacturing challenges and driving innovation and quality in each project.
Related Resource

Fingerprint Resistant Stainless Steel: How It Works,and How to Choose


