Многие начинающие сварщики испытывают трудности, когда речь заходит о точечной сварке нержавеющей стали. Металл может деформироваться, прогореть или просто плохо свариваться. Точечная сварка может показаться простой, но нержавеющая сталь требует правильного подхода. Если вы только начинаете, освоение основ поможет вам сэкономить средства, повысить качество и чувствовать себя уверенно при работе с этим распространенным, но сложным металлом.
Готовы узнать пошаговый процесс? Давайте разделим его на простые и понятные шаги.
Что такое точечная сварка?
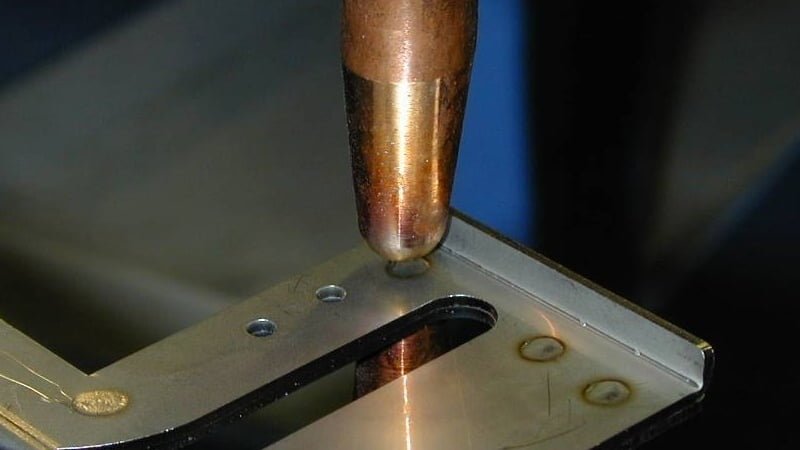
Точечная сварка - это разновидность контактной сварки. С помощью медных электродов зажимают два металлических листа и пропускают через них электрический ток. Тепло возникает из-за сопротивления металла току. Это тепло расплавляет металл в месте контакта. Давление электродов помогает сплавить металл вместе, когда он остывает.
Процесс происходит быстро. Большинство сварных швов занимает менее секунды. Это делает его распространенным методом в массовом производстве, особенно для тонкого листового металла.
Нержавеющая сталь хорошо подходит для точечной сварки благодаря своей стойкости и прочности. Она позволяет накапливать достаточно тепла для создания прочных сварных швов. Высокое содержание хрома образует плотный поверхностный слой. Это помогает металлу противостоять ржавчине после сварки.
Как выполнить точечную сварку нержавеющей стали?
Перед началом сварки необходимо правильно подготовиться и использовать чистые материалы. Эти шаги помогут обеспечить прочные соединения и уменьшить количество ошибок в процессе.
Подготовьте поверхность
Начните с очистки нержавеющей стали. Используйте проволочную щетку или наждачную бумагу, чтобы удалить грязь, масло или окисление. Любое поверхностное загрязнение может ослабить сварной шов. Очистите обе стороны материала. При необходимости протрите спиртом, чтобы удалить смазку.
Настройка аппарата для точечной сварки
Используйте аппарат точечной сварки с медными электродами. Убедитесь, что аппарат подключен к сети и работает. Проверьте наконечники электродов. Они должны быть чистыми и иметь правильную форму. Замените или подправьте наконечники, если они изношены или загрязнены.
Настройка параметров сварки
Установите правильный ток, время сварки и давление. Для нержавеющей стали обычно требуется более высокий ток, чем для низкоуглеродистой. Начинайте с короткого времени сварки, чтобы избежать перегрева. Если сварной шов не прочный, постепенно увеличивайте усилие.
Расположите заготовку
Выровняйте два листа должным образом. Зажмите их, чтобы они не двигались. Поместите шов между электродами. Дважды проверьте, чтобы края были заподлицо.
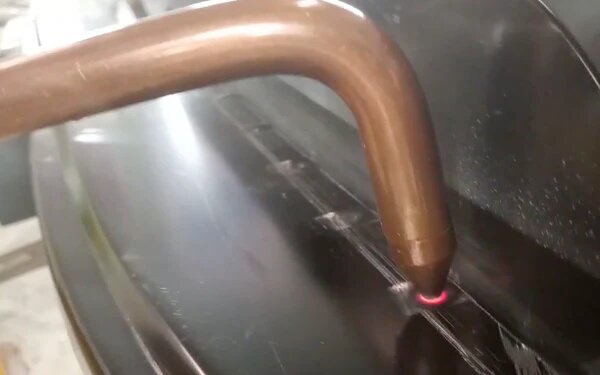
Выполнить сварку
Нажмите на педаль или кнопку включения, чтобы начать сварку. Удерживайте ее в течение заданного времени. Дайте электродам остыть в течение некоторого времени, прежде чем двигаться. Не поднимайте электроды слишком быстро - это может привести к разъединению горячего металла.
Обзор оборудования для точечной сварки
Использование правильного оборудования - это ключ к получению чистых и прочных сварных швов. Аппарат, электроды и электропитание должны соответствовать материалу и производственным потребностям.
Типы машин для точечной сварки
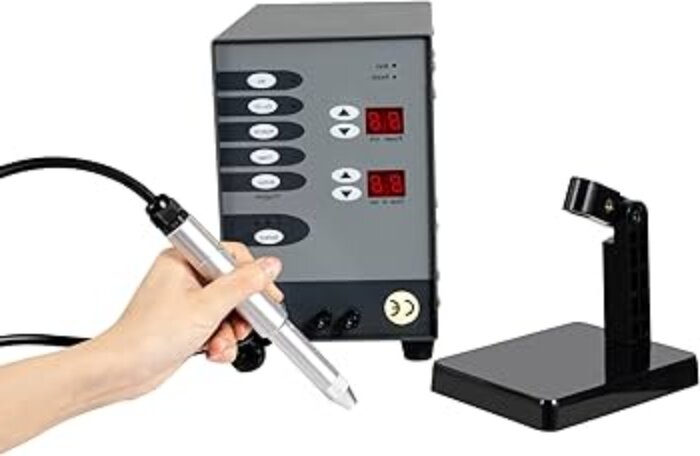
Существует два основных типа машины точечной сварки: с педальным приводом и автоматические.
Машины с педальным приводом лучше всего подходят для небольших работ или прототипы. Вы управляете временем с помощью ножной педали. Они просты в использовании и хороши для обучения.
Автоматизированные машины лучше подходят для выполнения больших объемов работ. Эти машины используют таймеры и системы давления для выполнения последовательных сварных швов при минимальном участии оператора. Они широко распространены на заводах и производственных линиях.
Выбор правильных электродов
Электроды обычно изготавливаются из медных сплавов. Этот металл хорошо проводит электричество и устойчив к тепловому воздействию. Форма наконечника тоже имеет значение.
Для нержавеющей стали используйте плоские или куполообразные наконечники. Плоские наконечники обеспечивают широкий контакт. Куполообразные наконечники более узко фокусируют тепло.
Регулярно заменяйте электроды. Грязные или изношенные наконечники могут стать причиной слабых сварных швов или перегрева. При необходимости используйте приспособление для правки наконечников, чтобы изменить их форму.
Требования к источнику питания
Аппараты точечной сварки нуждаются в мощном и стабильном источнике питания. Большинство из них используют переменный ток (AC), но некоторые высококлассные аппараты используют постоянный ток (DC) или среднечастотный постоянный ток (MFDC).
Системы MFDC обеспечивают более быстрые и чистые сварные швы с меньшими тепловыми искажениями. Они более эффективны, но стоят дороже.
Проверьте номинальную мощность. Мощность машины должна соответствовать мощности вашего магазина. Избегайте использования удлинителей. Перепады напряжения могут ослабить сварной шов.
Параметры точечной сварки нержавеющей стали
Прочность и качество точечной сварки зависят от правильного выбора нескольких ключевых параметров. К ним относятся сила тока, усилие, время и охлаждение. Каждый из них играет определенную роль.
Текущие настройки и продолжительность
Ток - это то, что создает тепло для расплавления металла. Нержавеющая сталь требует большего тока, чем углеродистая, потому что она сильнее сопротивляется электричеству.
Начните со средних настроек и регулируйте их в зависимости от результатов. Если сварка слабая, немного увеличьте силу тока. Если металл прогорает насквозь, уменьшите силу тока.
Длительность - это время протекания тока. Слишком короткий ток не сможет достаточно расплавить металл. Слишком длинный перегревает деталь и деформирует ее. Для тонкой нержавеющей стали используйте короткие импульсы - часто не более одной секунды.
Усилие на электроде и выравнивание
Сила прижатия электрода удерживает листы вместе во время сварки. Если давление слишком мало, металл может искрить или гореть. Слишком высокое давление может привести к истончению металла или появлению следов.
Всегда прикладывайте усилие до начала тока. Это поможет обеспечить плотный контакт и уменьшит сопротивление на поверхности.
Убедитесь, что электроды выровнены. Плохое выравнивание может привести к неровным сварным швам или зазорам между листами.
Время сварки и интервалы охлаждения
Время сварки включает в себя как время нагрева, так и время выдержки. Время выдержки означает сохранение давления после прекращения тока. Это помогает расплавленному металлу остыть и затвердеть.
Интервалы охлаждения имеют большое значение при пакетной сварке. Если электроды перегреваются, качество сварки падает. Делайте паузы между сварками, чтобы дать наконечникам остыть.
Выбор и обслуживание электродов
Электроды не только проводят ток. Они также формируют сварной шов и контролируют нагрев. Использование электродов правильного типа и поддержание их в хорошем состоянии значительно повышает качество сварки.
Типы материалов: Медь, вольфрам и т.д.
Медные сплавы являются наиболее распространенным электродным материалом для точечной сварки нержавеющей стали. Они хорошо проводят электричество и устойчивы к износу. Обратите внимание на такие типы, как медно-хромовый сплав класса 2, обеспечивающий хорошую прочность и проводимость.
Для тяжелых работ или работ с высокой температурой некоторые используют вольфрамово-медные смеси. Вольфрам лучше держит форму при высоких температурах, но проводит меньше тепла. Они менее распространены, но полезны при сварке под высоким давлением или в точных условиях.
Избегайте использования мягкой меди, которая быстро изнашивается. Это приводит к некачественным сварным швам и несовместимым результатам.
Формы наконечников электродов для нержавеющей стали
Форма наконечника влияет на тепловой поток и размер сварного шва. Для нержавеющей стали распространены следующие формы:
- Плоские наконечники: Распределите тепло. Лучше всего подходит для больших зон сварки или если вы хотите избежать глубоких следов.
- Наконечники для купола: Сосредоточение тепла на небольшой площади. Хорошо подходит для толстых или более твердых сортов нержавеющей стали.
- Заостренные кончики: Редко используется с нержавеющей сталью, так как может перегреться или прожечь тонкий лист.
Выберите форму, соответствующую дизайну детали и толщине материала. Кончики всегда должны быть гладкими и симметричными.
Советы по чистке, уходу и замене
Грязные или изношенные наконечники вызывают искры, слабые сварные швы и несовместимые соединения. Регулярно очищайте наконечники проволочной щеткой или мягким абразивом. Избегайте зачистки твердыми металлическими инструментами.
Правка наконечников означает изменение их формы с помощью напильника или приспособления для правки наконечников. Это позволяет сохранить ровную форму и гладкую контактную поверхность.
Заменяйте наконечники, когда они становятся слишком короткими или не держат форму. Не ждите проблем - регулярное обслуживание позволяет поддерживать сварные швы в стабильном и чистом состоянии.
Устранение распространенных проблем
Даже при хорошей настройке точечной сварки могут возникнуть проблемы. Знание признаков и причин поможет вам быстро устранить их и избежать брака.
Слабые сварные швы или отсутствие плавления
Если сварные швы легко ломаются или не держатся, скорее всего, металл сплавился неправильно. Это происходит, когда:
- Слишком низкий ток
- Время сварки слишком мало
- Слишком слабое давление
- Поверхности загрязнены
Сначала проверьте силу тока и время сварки. Затем очистите поверхности и попробуйте снова. Вы также можете немного увеличить усилие, чтобы добиться лучшего контакта между листами.
Чрезмерное количество брызг или прогаров
Брызги или оплавленные отверстия обычно означают, что настройки слишком агрессивны. Это может происходить из-за:
- Высокий ток
- Длительное время сварки
- Загрязненные наконечники вызывают дугу
Попробуйте уменьшить силу тока или время. Убедитесь, что ваши кончики чистые и имеют правильную форму. Также проверьте толщину листов. Очень тонкая нержавеющая сталь требует особой осторожности, чтобы избежать повреждений.
Залипание или деформация электрода
Если электрод прилипает к металлу, возможно, он слишком горячий. Это также может произойти, если форма наконечника неровная или усилие слишком велико.
Чтобы исправить это:
- Дайте электродам остыть между сварными швами
- Подстригите кончики, чтобы сохранить ровную форму
- Проверьте время выдержки - слишком короткое время может привести к пригоранию
Если электроды деформируются, перейдите на более твердый медный сплав или используйте наконечники с водяным охлаждением.
Тонкая сварка Толщина листов из нержавеющей стали
Сварка тонкой и толстой нержавеющей стали требует разных настроек и обращения. Каждая из них имеет свои риски, такие как прожог или плохое проплавление. Правильный баланс - ключевой момент.
Техника для сварки тонким слоем
Тонкие нержавеющие листы легко перегреваются. Используйте:
- Меньший ток
- Короткое время сварки
- Более легкое давление на электрод
Всегда сначала проводите испытания на ломе. Держите кончики электродов чистыми и плоскими для равномерного распределения тепла. Плотно зажимайте листы, чтобы предотвратить их смещение. Время охлаждения между сварными швами помогает избежать коробления.
Расстояние между сварными швами тоже имеет значение. Оставляйте достаточный зазор между каждым швом, чтобы дать области остыть перед нанесением следующего шва.
Регулировки для более толстых секций
Более толстые листы требуют большего нагрева и давления. Увеличить:
- Текущий уровень
- Время сварки
- Усилие на электроде
Используйте куполообразные наконечники, чтобы сфокусировать тепло на стыке. Более длительное время выдержки после сварки помогает металлу лучше затвердеть. Проверяйте полное проплавление - частичное проплавление может выглядеть нормально, но разрушиться под нагрузкой.
Если вы свариваете разнородные по толщине листы, отрегулируйте настройки так, чтобы они соответствовали более тонкому листу. Это позволит избежать прожогов и при этом скрепить оба слоя.
Как избежать деформации и искажений
Под воздействием тепла нержавеющая сталь расширяется и сжимается. Неравномерное нагревание приводит к изгибу или деформации. Чтобы предотвратить это:
- Используйте короткое время сварки
- Обеспечьте охлаждение между сварными швами
- Крепко зажмите детали во время сварки
Распределите сварные швы и, по возможности, чередуйте стороны. Не делайте много сварных швов в одном месте, прежде чем двигаться дальше. Нагрев в одной области является основной причиной деформации.
Заключение
Точечная сварка нержавеющей стали может быть простой, если вы поймете ее основы. Чистые поверхности, правильные настройки, правильное давление и регулярное обслуживание - все это играет ключевую роль. Для тонких и толстых листов требуются разные техники, и небольшие корректировки могут иметь большое значение.
Вам нужны нестандартные детали из нержавеющей стали со сваркой экспертного уровня? Наша команда поддерживает как небольшие, так и крупные проекты, обеспечивая быстрые сроки выполнения и профессиональное качество. Свяжитесь с нами сегодня, чтобы получить предложение.
Привет, я Кевин Ли

Последние 10 лет я занимался различными формами изготовления листового металла и делился здесь интересными идеями из своего опыта работы в различных мастерских.
Связаться
Кевин Ли
У меня более десяти лет профессионального опыта в производстве листового металла, специализирующегося на лазерной резке, гибке, сварке и методах обработки поверхности. Как технический директор Shengen, я стремлюсь решать сложные производственные задачи и внедрять инновации и качество в каждом проекте.
Связанный ресурс

Нержавеющая сталь с защитой от отпечатков пальцев: как это работает и как выбрать

OEM и контрактное производство: Как выбрать правильную модель для вашего проекта

Стоимость установки и стоимость единицы продукции при производстве листового металла
