Każdy projekt wymaga wytrzymałych i niezawodnych gwintów. Jednak wiele zespołów ma trudności z utrzymaniem dokładności i spójności, których wymaga precyzyjna obróbka skrawaniem. Jeśli chcesz tworzyć idealne gwinty za każdym razem, musisz zrozumieć podstawy gwintowania. Musisz także znać narzędzia i najlepsze metody, których należy przestrzegać, aby uzyskać czyste i dokładne wyniki.
Chcesz przestać popełniać typowe błędy w tappingu? Czytaj dalej, aby poznać kroki i wskazówki, które pomogą ci zrobić to dobrze.
Co to jest gwintowanie?
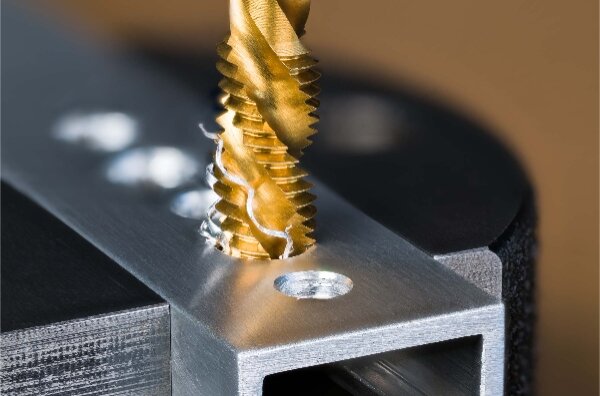
Gwintowanie polega na nacinaniu gwintów wewnątrz otworu za pomocą gwintownika. Gwintownik ma krawędzie tnące o kształcie dopasowanym do profilu gwintu. Gdy gwintownik obraca się w wywierconym otworze, usuwa rowki, tworząc gwintowaną ścieżkę.
Gwintowanie jest stosowane, gdy element musi otrzymać łącznik, taki jak śruba lub wkręt. Rezultatem jest bezpieczne połączenie wielokrotnego użytku. Gwintowanie może być wykonywane ręcznie lub maszynowo. Gwintowanie ręczne jest wolniejsze, ale idealne dla małych partii. Gwintowanie CNC jest szybki, dokładny i odpowiedni do produkcji na dużą skalę.
Gwinty wewnętrzne a zewnętrzne
Gwinty występują w dwóch podstawowych typach: wewnętrznym i zewnętrznym.
- Gwinty wewnętrzne są wycinane wewnątrz otworu. Wykonuje się je za pomocą gwintownika. Można je znaleźć w częściach takich jak wsporniki, obudowy i obudowy przekładni.
- Gwinty zewnętrzne są wycinane na zewnątrz cylindra. Są one wykonywane za pomocą matrycy lub narzędzia do gwintowania na tokarce. Śruby, wkręty i kołki mają gwinty zewnętrzne.
Kluczowe standardy gwintów
Normy dotyczące gwintów pomagają zapewnić, że części wykonane w różnych sklepach lub krajach pasują do siebie. Oto najpopularniejsze z nich:
- Metryczny (ISO): Mierzone w milimetrach. Powszechny na całym świecie. Typowym rozmiarem może być M6 × 1,0.
- Unified (UNC/UNF): Używany głównie w USA i mierzony w calach. UNC oznacza gwinty grube; UNF oznacza gwinty drobne. Przykład: ¼"-20 UNC.
- BSP (British Standard Pipe): Używany do uszczelniania gwintów rurowych. Powszechne w instalacjach wodno-kanalizacyjnych i systemach płynów.
- NPT (krajowy gwint rurowy): Gwinty stożkowe zapewniające szczelność w systemach rurowych. Szeroko stosowane w USA.
Terminologia i geometria gwintów
Znajomość terminów związanych z wątkami pomaga w bardziej precyzyjnej pracy. Oto kilka podstawowych:
- Główna średnica: Zewnętrzna średnica gwintu.
- Mniejsza średnica: Średnica u podstawy rowka gwintu.
- Boisko: Odległość od jednego gwintu do następnego. Mniejszy skok = drobniejszy gwint.
- Lead: Odległość przesuwu gwintu w jednym obrocie. To samo co skok w gwintach jednobiegunowych.
- Kąt gwintu: Kąt pomiędzy bokami gwintu. Najczęściej jest to 60° dla gwintów metrycznych i zunifikowanych.
Rodzaje metod gwintowania
Wybór odpowiedniej metody gwintowania zależy od konfiguracji, materiału i potrzeb objętościowych. Poniżej znajdują się najczęściej używane typy, z których każdy ma inne mocne strony i ograniczenia.
Gwintowanie ręczne
Gwintowanie ręczne jest najbardziej podstawową metodą. Wykorzystuje klucz do gwintowników i zestaw gwintowników, zwykle w trzech etapach: stożkowym, zaślepiającym i dennym.
Ta metoda jest powolna, ale bardzo elastyczna. Świetnie nadaje się do małych prac, napraw lub gdy elektronarzędzia nie mogą dosięgnąć części. Działa dobrze na miękkich materiałach, takich jak aluminium lub stal miękka.
Jednak łatwo jest źle ustawić gwintownik, a złamanie jest ryzykowne, jeśli nie zachowasz ostrożności przy użyciu siły lub usuwaniu wiórów. Jest również mniej dokładny pod względem głębokości i spójności gwintu.
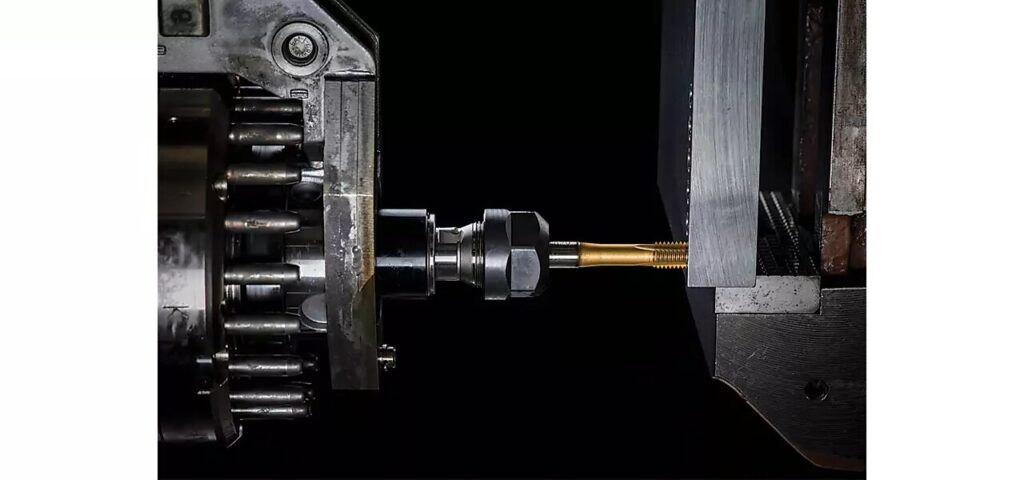
Stukanie maszynowe
Gwintowanie maszynowe wykorzystuje zasilany sprzęt, taki jak wiertarka, głowica gwintująca lub maszyna CNC. Gwintownik obraca się i automatycznie wprowadza do otworu.
Ta metoda jest szybsza, bardziej spójna i lepsza dla produkcji. Łatwiej jest również kontrolować prędkość i głębokość posuwu. Gwintowanie maszynowe redukuje błędy operatora i pozwala na uzyskanie węższych tolerancji.
Większość warsztatów używa tej metody do prac o średniej i dużej objętości. Przy odpowiednim smarowaniu i prędkości cięcia lepiej radzi sobie również z twardszymi materiałami.
Form Tapping (Roll Tapping) vs Cut Tapping (gwintowanie)
Istnieją dwa główne sposoby tworzenia nici - cięcie i formowanie.
- Nacinanie gwintowników Usuwa materiał, tworząc gwinty. Działa na większości metali i jest standardem w wielu pracach. Tworzy wióry, więc dobre usuwanie wiórów jest kluczowe.
- Forma stukania (gwintowanie walcowe) wypiera materiał zamiast go ciąć. Wymaga metali ciągliwych, takich jak aluminium lub miękka stal. Tworzy mocniejsze gwinty, ponieważ przepływ ziarna nie jest przerywany.
Podczas gwintowania nie powstają wióry. Zmniejsza również zużycie gwintownika i poprawia wykończenie powierzchni. Wymaga jednak dokładnego rozmiaru otworu i wyższego momentu obrotowego.
Gwintowanie sztywne a pływające
Odnoszą się one do sposobu trzymania i przesuwania gwintownika podczas gwintowania maszynowego.
- Sztywne gwintowanie blokuje uchwyt gwintownika na wrzecionie. Posuw i prędkość wrzeciona są zsynchronizowane. Zapewnia to wysoką precyzję i jest często stosowane w maszynach CNC.
- Pływający gwintownik wykorzystuje uchwyt gwintownika z ruchem osiowym lub promieniowym. Pozwala to na niewielką niewspółosiowość lub zmiany posuwu. Jest to lepsze rozwiązanie dla starszych maszyn lub ustawień ręcznych.
Gwintowanie sztywne jest szybsze i dokładniejsze, ale wymaga idealnego wyrównania. Gwintowanie pływające jest bardziej wyrozumiałe i pomaga chronić gwintownik przed pęknięciem.
Narzędzia i sprzęt do gwintowania
Sukces w gwintowaniu zależy od użycia odpowiednich narzędzi. Różne gwintowniki, materiały i uchwyty nadają się do różnych zadań. W tej sekcji opisano, czego należy używać i dlaczego ma to znaczenie.
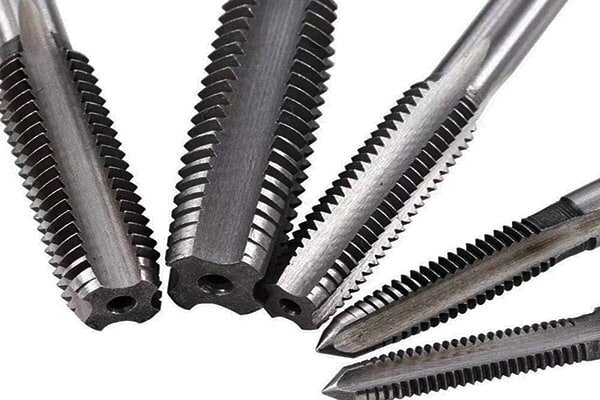
Rodzaje kranów
Gwintowniki występują w trzech popularnych typach, z których każdy ma inną końcówkę i ścieżkę wióra. Te typy są często używane etapami w celu uzyskania lepszej kontroli i czystszych gwintów:
- Taper Tap: Ma długie prowadzenie z około 8 do 10 gwintami stopniowo tnącymi. Łatwo się uruchamia i dobrze centruje. Najlepsza do ręcznego wykonywania otworów lub do miękkich materiałów.
- Wtyczka Tap: Posiada średniej długości fazę z 3 do 5 gwintami. Jest to najpopularniejszy typ, który równoważy łatwość rozpoczęcia pracy z gwintowaniem na całej głębokości.
- Bottoming Tap: Nie ma prawie żadnego wyprzedzenia, tylko 1 do 1,5 gwintu. Jest przeznaczony do gwintowania do dolnej części ślepe otwory. Zwykle używany jako ostatni po stożku lub gwintowniku rozpoczynającym gwint.
Materiały i powłoki dla różnych przedmiotów obrabianych
Materiał bazowy i powłoka kranu wpływają na wydajność, zużycie i trwałość. Oto spojrzenie na typowe wybory:
- Stal szybkotnąca (HSS): Przystępna cenowo i dobra do ogólnego użytku na miękkich i średnich metalach, takich jak aluminium, mosiądz lub stal miękka.
- Stal kobaltowa: Twardsze niż HSS. Lepsze do twardszych materiałów, takich jak stal nierdzewna lub żeliwo. Dłuższa trwałość pod wpływem ciepła i naprężeń.
- Węglik: Bardzo twarde i odporne na zużycie. Najlepszy do sztywnych konfiguracji i szybkiego gwintowania materiałów ściernych lub twardych. Jest również kruchy, więc nie jest idealny do gwintowania ręcznego.
Popularne powłoki:
- TiN (azotek tytanu): Zmniejsza zużycie, obniża tarcie i wydłuża żywotność gwintownika.
- TiCN (węgloazotek tytanu): Mocniejsza i bardziej odporna na ciepło niż TiN.
- TiAlN (azotek tytanowo-glinowy): Doskonałe do szybkiego i suchego gwintowania twardych stopów.
Uchwyty do gwintowników, uchwyty i adaptery
Uchwyty do gwintowników utrzymują gwintownik w osi i umożliwiają jego płynny obrót. Rodzaj uchwytu wpływa na dokładność, żywotność narzędzia i bezpieczeństwo.
- Sztywne uchwyty do gwintowników: Używany w maszynach z synchronizowanym posuwem. Idealne do gwintowania CNC. Zapewnia ścisłą kontrolę nad głębokością i wyrównaniem.
- Pływające uchwyty na kran: Umożliwiają niewielki ruch. Pomaga uniknąć pęknięcia kranu w przypadku niewspółosiowości. Przydatne w ręcznych lub starszych maszynach.
- Uchwyty do szybkiej wymiany gwintowników: Oszczędność czasu podczas konfiguracji lub zadań wieloczęściowych. Skrócenie czasu przestojów w produkcji.
Przygotowanie do gwintowania
Dobre gwintowanie zaczyna się jeszcze zanim gwintownik dotknie części. Właściwe planowanie i przygotowanie sprawiają, że gwintowanie jest łatwiejsze, bezpieczniejsze i dokładniejsze. Ta sekcja obejmuje wybór odpowiednich rozmiarów i prawidłowe ustawienie.
Wybór właściwego rozmiaru gwintownika i wiertła
Przed gwintowaniem należy dopasować rozmiar gwintownika do żądanego gwintu. Następnie należy wybrać odpowiedni rozmiar wiertła do wykonania otworu.
Rozmiar gwintownika zależy od wkrętu lub śruby, która zostanie umieszczona w otworze. Na przykład, gwintownik ¼"-20 UNC jest używany do śruby ¼" z gwintem 20 na cal.
Każdy gwintownik wymaga określonego rozmiaru wiertła. Jeśli otwór jest zbyt mały, gwintownik może się złamać. Jeśli jest zbyt duży, gwint nie będzie dobrze trzymał.
Wykresy są powszechnie dostępne, ale oto dwa popularne przykłady:
- ¼"-20 UNC potrzebuje Wiertło #7 (0.201″)
- M6 × 1.0 potrzebuje Wiertło 5,0 mm.
Przed ustaleniem rozmiaru wiertła należy zawsze sprawdzić typ gwintownika i materiał.
Obliczanie rozmiaru gwintownika na podstawie specyfikacji gwintu
Jeśli nie masz pod ręką tabeli, możesz również obliczyć rozmiar wiertła. Oto jak to zrobić:
Dla gwintów metrycznych:
- Rozmiar wiertła = średnica główna - skok gwintu
- Przykład: M10 × 1,5 → 10 - 1,5 = wiertło 8,5 mm
Dla gwintów calowych:
- Rozmiar wiertła = średnica główna - (1 ÷ gwint na cal)
- Przykład: ½"-13 → 0,5 - (1 ÷ 13) = 0,423″ wiertła
Daje to około 75% zarysu gwintu, co jest dobre dla większości zastosowań.
Nieco większe w przypadku twardych materiałów lub trudnych gwintowników. Mniejsze tylko wtedy, gdy wymagana jest maksymalna wytrzymałość, a moment obrotowy gwintowania nie jest istotny.
Przygotowanie przedmiotu obrabianego i wyrównanie otworów
Czyste, dokładne otwory sprawiają, że gwintowanie jest płynniejsze i bezpieczniejsze.
- Usunąć zadziory z otworu aby usunąć ostre krawędzie.
- Fazowanie otworu lekko. Pomaga to w prostym uruchomieniu kranu.
- Sprawdź głębokość otworu dla otworów nieprzelotowych. Pozostaw wystarczająco dużo miejsca na końcówkę gwintownika i wióry.
- Wyrównaj kran ze środkiem otworu. Niewspółosiowość może spowodować pęknięcie gwintownika lub zerwanie gwintu.
Uruchom kran z delikatnym naciskiem i obracaj powoli, jeśli stukasz ręcznie. Gwintownik powinien być ustawiony prostopadle do powierzchni. W przypadku gwintowania maszynowego, przed rozpoczęciem pracy należy sprawdzić wyrównanie wrzeciona.
Proces gwintowania krok po kroku
Każdy krok w procesie gwintowania ma znaczenie. Pośpiech lub pominięcie poszczególnych kroków może prowadzić do złamania gwintownika, uszkodzenia gwintu lub złomowania części. Oto jak zrobić to dobrze, od początku do końca.
Oznaczanie i wiercenie otworu
Rozpocznij od wyraźnego zaznaczenia lokalizacji otworu. Użyj punktaka, aby poprowadzić wiertło. Dzięki temu wiertło nie będzie się obracać, zwłaszcza na twardych lub gładkich powierzchniach.
Wybierz odpowiednie wiertło do gwintownika. Aby uzyskać najlepszą dokładność, użyj wiertarki lub maszyny CNC. W przypadku wiercenia ręcznego należy trzymać wiertło prosto i wywierać stały nacisk.
Wywierć otwór na odpowiednią głębokość. W przypadku otworów nieprzelotowych należy zapewnić dodatkowe miejsce na dole na wióry i końcówkę gwintownika. Po wywierceniu otworu oczyść go. Usuń wszelkie zadziory lub luźne wióry, które mogą kolidować z gwintownikiem.
Ustawianie i uruchamianie kranu
Ostrożnie umieść kran w otworze. Upewnij się, że jest idealnie pionowy (lub w linii z otworem, jeśli jest ustawiony pod kątem).
W przypadku gwintowania ręcznego użyj prowadnicy lub kwadratu, aby sprawdzić wyrównanie. Zastosuj lekki nacisk i powoli obracaj gwintownik. Powinien on rozpocząć cięcie samoczynnie.
Zatrzymaj się, jeśli od razu poczujesz, że gwintownik naciska zbyt mocno. Sprawdź rozmiar otworu lub wypróbuj gwintownik stożkowy dla łatwiejszego rozruchu.
Awansowanie, rozliczanie żetonów i utrzymywanie dokładności
Po zablokowaniu gwintownika należy kontynuować obracanie powoli i równomiernie. W przypadku gwintowania ręcznego należy obrócić o pół obrotu do przodu, a następnie o ćwierć obrotu do tyłu. Pomaga to w rozbijaniu i usuwaniu wiórów.
Płyn do cięcia zmniejsza tarcie i wydłuża żywotność narzędzia. Pomaga on również w utrzymaniu gładkich i czystych gwintów. Należy sprawdzać, czy gwintownik pozostaje wyrównany. Nawet niewielkie przechylenie może spowodować krzywy gwint lub pęknięcie gwintownika.
Podczas gwintowania maszynowego należy upewnić się, że prędkość posuwu odpowiada skokowi gwintu. Używaj odpowiednich uchwytów narzędziowych, aby zachować prostoliniowość.
Łamanie chipów i unikanie zacięć
Używaj metody odwrotnego obrotu (pół obrotu do przodu, ćwierć obrotu do tyłu) do łamania wiórów podczas stukania ręcznego.
Gwintowanie Peck może pomóc w gwintowaniu maszynowym. Oznacza to cofnięcie gwintownika po kilku obrotach w celu usunięcia wiórów przed kontynuowaniem.
Nagromadzenie wiórów nie jest problemem w przypadku gwintowników kształtowych, ale wysoki moment obrotowy już tak. Należy używać wystarczającej ilości smaru i odpowiednich ustawień maszyny, aby uniknąć zablokowania.
Czynniki wpływające na jakość nici
Dobre gwinty zależą nie tylko od ostrego gwintownika. Wiele zmiennych wpływa na czystość, wytrzymałość i spójność gwintów. Przyjrzyjmy się kluczowym z nich.
Właściwości materiału i twardość
Niektóre metale są łatwiejsze w obróbce niż inne.
- Miękkie materiały takie jak aluminium i mosiądz łatwo się gwintują, ale mogą się rozerwać, jeśli gwintownik jest tępy.
- Twardsze materiały takie jak stal nierdzewna, tytan lub stale narzędziowe wymagają większego momentu obrotowego i szybciej zużywają gwintowniki.
- Kruche materiały takie jak żeliwo wytwarzają drobne wióry, ale mogą pękać pod wpływem naprężeń.
Wysoka twardość zwiększa zużycie narzędzia. Niska ciągliwość zwiększa ryzyko wykruszenia lub słabego kształtu gwintu. Zawsze dobieraj typ gwintownika i powłokę do gwintowanego materiału.
Należy również pamiętać, że części poddane obróbce cieplnej są trudniejsze do gwintowania. Wstępne nawiercanie przed obróbką cieplną może być dla nich lepszym wyborem.
Geometria gwintownika i stan krawędzi tnącej
Kształt kranu i stan jego krawędzi tnących mają duże znaczenie.
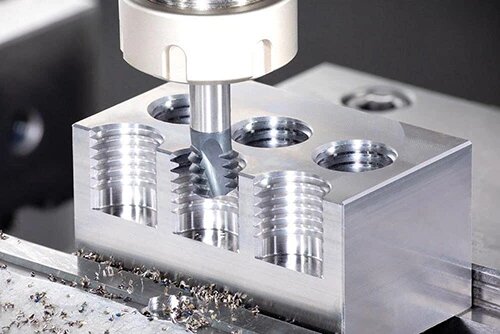
- Gwintowniki ze spiralnymi rowkami pomagają usuwać wióry z otworów nieprzelotowych.
- Flety proste dobrze sprawdzają się w przypadku otworów przelotowych i krótkich cięć.
- Gwintowniki ze spiralnym czubkiem wypychają wióry do przodu, co doskonale nadaje się do maszynowego gwintowania otworów.
Zużyte gwintowniki prowadzą do słabego gwintu, wysokiego momentu obrotowego i ryzyka pęknięcia. Tępe krawędzie tnące rozmazują materiał zamiast go czysto ścinać.
Często sprawdzaj gwintowniki, zwłaszcza w seriach produkcyjnych. Należy je wymieniać przy pierwszych oznakach zużycia lub szorstkiego wykończenia gwintu.
Chłodziwo, smarowanie i odprowadzanie wiórów
Smarowanie pomaga kontrolować ciepło i zmniejszać tarcie. Sprawia również, że gwinty są czystsze i zwiększa żywotność gwintowników.
- Do gwintowania ręcznego lub małych partii należy używać oleju do cięcia.
- W przypadku gwintowania CNC lub gwintowania z dużą prędkością należy używać chłodziwa syntetycznego lub rozpuszczalnego w wodzie.
- Nałóż wystarczającą ilość płynu, aby pokryć kran i wypłukać wióry.
Usuwanie wiórów jest równie ważne. Wióry pozostawione w otworze mogą zatkać rowki, zablokować gwintownik lub uszkodzić gwinty. W razie potrzeby użyj sprężonego powietrza lub gwintownika z funkcją kontroli wiórów.
W przypadku głębokich lub nieprzelotowych otworów należy okresowo wycofywać gwintownik lub użyć gwintownika ze spiralnym rowkiem zaprojektowanego do odprowadzania wiórów.
Typowe problemy podczas gwintowania
Nawet przy planowaniu gwintowanie może pójść źle. Problemy z narzędziem, konfiguracją lub materiałem często objawiają się jako złamane gwintowniki lub uszkodzone gwinty. Oto jak rozpoznać problemy i ich przyczyny.
Uszkodzenie kranu
Jest to jedna z najbardziej frustrujących awarii w tappingu.
Najczęstsze przyczyny:
- Użycie niewłaściwego rozmiaru wiertła (zbyt mały otwór)
- Zbyt szybkie stukanie lub zbyt duży moment obrotowy
- Tępy lub zużyty kran
- Słabe usuwanie wiórów
- Niewspółosiowość podczas gwintowania ręcznego
- Twardy materiał bez odpowiedniego smarowania
Aby tego uniknąć, należy zawsze sprawdzać stan gwintownika, stosować odpowiednią prędkość posuwu i często rozbijać wióry podczas ręcznego gwintowania. Używaj pływających uchwytów lub prowadnic gwintowników, aby zmniejszyć nacisk boczny.
Nadwymiarowe lub niewymiarowe gwinty
Zbyt luźne lub zbyt ciasne gwinty mogą powodować problemy z dopasowaniem i osłabiać zespół.
Ponadwymiarowe nici często wynikają z:
- Użycie niewłaściwego wiertła (zbyt dużego)
- Zużyty kran
- Nadmierne zużycie gwintownika na krawędziach tnących
Niewymiarowe gwinty może się zdarzyć z powodu:
- Zbyt małe wiertło
- Gwintownik jest używany bez odpowiedniego rozmiaru otworu
- Nieprawidłowy skok gwintu lub niewłaściwy gwintownik
Zawsze sprawdzaj rozmiar otworu za pomocą miernika i potwierdź specyfikację gwintownika przed rozpoczęciem pracy.
Krzyżowanie gwintów i niewspółosiowość
Gwintowanie poprzeczne ma miejsce, gdy gwintownik wchodzi do otworu pod kątem. Prowadzi to do uszkodzenia gwintów i słabych połączeń.
Powoduje:
- Stukanie bez odpowiedniego wyrównania
- Uruchamianie kranu bez fazowania
- Nieużywanie prowadnicy gwintownika lub kwadratu
Użyj klocka lub prowadnicy, aby utrzymać gwintownik prosto podczas kilku pierwszych obrotów podczas gwintowania ręcznego. Podczas gwintowania maszynowego upewnij się, że wrzeciono jest ustawione prostopadle do powierzchni otworu.
Słabe wykończenie powierzchni lub powstawanie zadziorów
Szorstkie gwinty lub nadmiar zadziorów zmniejszają wytrzymałość gwintu i utrudniają montaż.
Może się to zdarzyć z powodu:
- Zużyty gwintownik lub wyszczerbiona krawędź tnąca
- Niewłaściwa powłoka kranu lub materiał
- Brak smarowania
- Gwintowanie z dużą prędkością bez odpowiedniego odprowadzania wiórów
Należy używać ostrych gwintowników, stosować odpowiednią ilość chłodziwa oraz czyścić i sprawdzać gwinty po gwintowaniu. W razie potrzeby, szybkie usunięcie zadziorów za pomocą narzędzia do pogłębiania może oczyścić otwór.
Rozwiązania i najlepsze praktyki
Aby ograniczyć problemy z gwintowaniem i poprawić jakość gwintów, należy stosować sprawdzone metody. Te najlepsze praktyki pomagają uniknąć zużycia narzędzi, zwiększyć spójność i zmniejszyć ilość odpadów.
Prawidłowy dobór rozmiaru gwintownika i wiertła
Zawsze należy dopasować rozmiar wiertła do gwintownika i standardu gwintu. Skorzystaj z tabeli wierteł do gwintowników lub wykonaj szybkie obliczenia na podstawie skoku gwintu.
- Zbyt mały otwór prowadzi do uszkodzenia kranów.
- Zbyt duży otwór prowadzi do słabych gwintów.
W przypadku korzystania z gwintownika kształtowego należy jeszcze bardziej uważać na rozmiar otworu. Gwintowanie kształtowe zależy od przemieszczenia materiału, a nie usuwania wiórów.
Sprawdź oznaczenia narzędzi i potwierdź za pomocą suwmiarki lub miernika, jeśli nie masz pewności. Nie zgaduj.
Właściwa kontrola prędkości, posuwu i głębokości
Należy używać prędkości cięcia odpowiedniej dla danego materiału. Zbyt duża prędkość powoduje wzrost temperatury. Zbyt wolna powoduje szorstkie gwinty.
Na przykład:
- Aluminium: wysoka prędkość, niski moment obrotowy
- Stal nierdzewna: niższa prędkość, większy moment obrotowy
W maszynach CNC należy ustawić prawidłowe obroty i posuw, aby dopasować je do skoku gwintu. W przypadku gwintowania sztywnego wrzeciono i posuw muszą pozostać zsynchronizowane.
Unikaj nadmiernego podawania. Należy wejść wystarczająco głęboko, aby uzyskać pełną długość gwintu, a następnie zatrzymać się. W przypadku otworów nieprzelotowych należy uwzględnić miejsce na wióry na dole.
Techniki smarowania dla różnych materiałów
Płyn do cięcia zmniejsza tarcie, chłodzi narzędzie i usuwa wióry.
- Aluminium: Używaj lekkiego oleju do cięcia lub chłodziwa w postaci mgiełki
- Stal i stal nierdzewna: Używać olejów na bazie siarki lub wysokociśnieniowych olejów do cięcia
- Mosiądz lub żeliwo: Zwykle suchy, ale lekki olej może pomóc przedłużyć żywotność kranu
Płyn należy nakładać bezpośrednio na kran, a nie tylko na otwór. W przypadku pracy ręcznej należy ponownie nałożyć płyn na każdy otwór. W przypadku konfiguracji CNC użyj chłodziwa zalewowego lub przelotowego, jeśli jest dostępne.
Okresowa kontrola i konserwacja narzędzi
Regularnie sprawdzaj gwintowniki pod kątem oznak zużycia, wyszczerbienia lub stępienia. Zużyte gwintowniki tworzą szorstkie gwinty i zwiększają ryzyko pęknięcia. Czyść gwintowniki po użyciu. Usuwaj wióry zablokowane w rowkach. Przechowuj je w oznaczonych uchwytach, aby zapobiec pomyłkom i chronić krawędzie tnące.
Wymieniaj gwintowniki na podstawie liczby gwintów, a nie tylko wyczucia. Podczas produkcji należy śledzić żywotność narzędzia, aby uniknąć nieoczekiwanych awarii. Zawsze sprawdzaj gwintowane części za pomocą mierników, aby potwierdzić jakość. Wyłapuj problemy na wczesnym etapie, zanim wpłyną one na większą liczbę części.
Wnioski
Gwintowanie jest kluczowym etapem obróbki precyzyjnej. Od wyboru odpowiedniego gwintownika i rozmiaru wiertła po kontrolę prędkości, posuwu i smarowania - każdy szczegół wpływa na ostateczną jakość gwintu. Dobre przygotowanie, czysta technika i narzędzia pomagają uniknąć pęknięć, niewspółosiowości i słabych gwintów.
Potrzebujesz niestandardowych gwintowanych części metalowych do następnego projektu? Oferujemy usługi gwintowania CNC, gwintowania ręcznego i pełnej obróbki metalu, aby spełnić wymagania projektowe. Prosimy o przesłanie rysunków aby uzyskać szybką i dokładną wycenę już dziś.
Hej, jestem Kevin Lee

Przez ostatnie 10 lat byłem zanurzony w różnych formach produkcji blach, dzieląc się tutaj fajnymi spostrzeżeniami z moich doświadczeń w różnych warsztatach.
Skontaktuj się z nami
Kevin Lee
Mam ponad dziesięcioletnie doświadczenie zawodowe w produkcji blach, specjalizując się w cięciu laserowym, gięciu, spawaniu i technikach obróbki powierzchni. Jako dyrektor techniczny w Shengen, jestem zaangażowany w rozwiązywanie złożonych wyzwań produkcyjnych i napędzanie innowacji i jakości w każdym projekcie.
Powiązane zasoby

Odporna na odciski palców stal nierdzewna: jak to działa i jak wybrać


